
One of the most important maintenance tasks for your dirt bike is bleeding the forks. Bleeding the forks is the process of removing air from the suspension system, which allows for smoother and more controlled riding. If your dirt bike’s forks feel spongy or if you are experiencing poor suspension performance, it may be time to bleed the forks.
Before you begin, it is important to gather the necessary tools and equipment. You will need a clean towel, a bleeder screw tool, a suspension fluid syringe, and the correct suspension fluid for your dirt bike. It is also recommended to have a friend or a bike stand to help stabilize the bike during the bleeding process.
To bleed the dirt bike forks, start by placing the bike on a bike stand or having a friend hold it upright. Next, remove the front wheel to provide easier access to the forks. Locate the bleeder screw on each fork leg and use the bleeder screw tool to loosen it. This will release any built-up pressure and allow air to escape.
Once the bleeder screws are loosened, attach the suspension fluid syringe to one of the bleeders. Slowly push down on the syringe to inject the suspension fluid into the fork leg. Keep an eye on the fluid level to ensure that you do not overfill the fork leg. Repeat this process for the other fork leg.
After injecting the suspension fluid, carefully tighten the bleeder screws on each fork leg. Wipe away any excess fluid with a clean towel to keep the area clean and prevent any potential damage. Once the bleeder screws are tightened, reinstall the front wheel and ensure that it is properly secured.
Finally, after bleeding the dirt bike forks, it is important to test the suspension to ensure proper functionality. Take your dirt bike for a short ride, paying close attention to how the forks feel and how the bike handles. If you notice any issues or if the forks still feel spongy, it may be necessary to repeat the bleeding process or seek professional assistance.
Bleeding the dirt bike forks is a crucial maintenance task that can greatly improve your riding experience. By following these steps and taking the time to properly bleed your forks, you will enjoy a smoother and more controlled ride on your dirt bike.
Why bleed dirt bike forks?
Bleeding dirt bike forks is an essential maintenance procedure that ensures optimal performance and safety. Dirt bike forks, also known as suspension forks, play a crucial role in absorbing shocks and providing a smooth ride over rough terrain. Over time, air can get trapped in the forks, causing a loss of performance and a harsher riding experience.
By bleeding the dirt bike forks, you remove any trapped air and replenish the suspension system with fresh oil. This process improves the responsiveness and damping characteristics of the forks, resulting in better traction, control, and overall ride quality. Bleeding the forks is particularly important after rebuilding or servicing the forks to ensure that they are functioning at their best.
When the forks are not properly bled, you may experience a range of issues while riding. These can include a loss of suspension travel, inconsistent damping, poor handling, excessive fork dive, bottoming out, and an increase in fork stiction. These issues can affect your safety and performance when riding off-road or on motocross tracks.
Regularly bleeding your dirt bike forks can help you avoid costly repairs and extend the lifespan of your suspension components. It is recommended to bleed the forks at least once a year or more frequently if you ride in challenging conditions, such as muddy or sandy terrain.
In summary, bleeding dirt bike forks is necessary to maintain optimal performance, improve ride quality, and ensure safety while riding off-road. By removing trapped air and replacing the oil, you can expect better suspension response, increased traction, and enhanced control over your dirt bike.
Importance of bleeding the forks
Bleeding the forks on your dirt bike is a crucial maintenance procedure that should not be overlooked. It involves removing any air from the suspension system and ensuring that the forks are properly lubricated. Bleeding the forks is essential for maintaining optimal performance and safety while riding.
1. Performance Enhancement
Bleeding the forks is important for improving the overall performance of your dirt bike. When air enters the suspension system, it can lead to decreased compression and damping capabilities. This can result in a harsher ride, reduced handling, and less control over your bike. By bleeding the forks, you ensure that the suspension system is free from air and operating at its full potential, providing a smoother and more responsive ride.
2. Safety Precaution
Bleeding the forks is not only about performance but also about safety. Air trapped in the suspension system can cause unpredictable behavior, especially during hard braking or aggressive riding. It can lead to a loss of control, increased vibration, and potentially dangerous situations. By bleeding the forks regularly, you minimize the risk of any unexpected issues and ensure a safer riding experience.
Regularly bleeding the forks also allows you to identify any potential leaks or damage to the suspension system. It is an opportunity to inspect the forks for any signs of wear and tear, such as oil leakage or damaged seals. By catching these issues early, you can address them before they become major problems, preventing further damage and costly repairs.
3. Longer Lifespan
The forks on your dirt bike are subjected to constant stress and vibrations while riding. Failing to bleed the forks can lead to increased wear and tear, compromising their longevity. By regularly bleeding the forks and ensuring they are properly lubricated, you can extend their lifespan and save money on expensive replacements in the long run.
Overall, bleeding the forks is a simple yet essential maintenance task that every dirt bike owner should prioritize. It not only improves performance and safety but also helps prolong the lifespan of your forks. By following the recommended guidelines for bleeding your dirt bike forks, you can enjoy a smoother ride and peace of mind on the trails.
Tools required for bleeding
Before you start bleeding your dirt bike forks, you need to gather a few essential tools. These tools will make the bleeding process easier and more efficient, ensuring that you get the best performance from your forks.
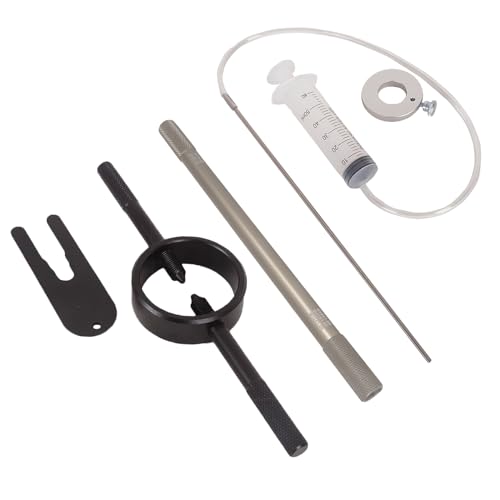
1. Fork Seal Bullet
A fork seal bullet is a small tool that helps you safely remove the dust seals without damaging them. It slides under the seal and allows you to pry it off without scratching or tearing it. This tool is essential for bleeding your dirt bike forks as it prevents any damage to the seals during the process.
2. Fork Oil Syringe
A fork oil syringe is used to extract and measure the amount of fork oil in your forks. It allows you to precisely add or remove oil from the forks, ensuring that you have the correct amount for optimal performance. This tool is crucial for bleeding your dirt bike forks as it helps you maintain the right oil level.
It is recommended to use a syringe with a capacity of 60-100ml to ensure accuracy and ease of use.
3. Fluid Catch Tray
A fluid catch tray is used to collect any excess oil or fluid that may drip out during the bleeding process. It helps keep your work area clean and prevents any spills or mess. Using a catch tray is essential for a smooth and hassle-free bleeding experience.
Make sure the catch tray is large enough to hold all the oil that may come out during bleeding.
4. Clean Cloth or Towel
A clean cloth or towel is necessary for wiping off any excess oil or fluid that may spill during the bleeding process. It helps keep your work area clean and prevents any contamination of the fork components. Having a clean cloth or towel handy will ensure that you can quickly clean up any mess and maintain a tidy workspace.
Remember to use a lint-free cloth to avoid leaving any fibers in the forks.
Note: Ensure that you have all the necessary tools before you start bleeding your dirt bike forks. Having the right tools will make the process easier and more efficient, ensuring that you achieve the best results.
What tools are needed for the process
When bleeding your dirt bike forks, it is important to have the right tools on hand to ensure a smooth and successful process. Here are the tools you will need:
1. Fork Bleeder Valve Tool: This tool is essential for releasing air pressure from the fork tubes. It makes the bleeding process easier and more efficient.
2. Fork Oil: You will need the appropriate fork oil for your dirt bike model. Make sure you use the recommended oil viscosity and quantity as specified in your bike’s manual.
3. Rags or Towels: Keep some clean rags or towels nearby to wipe off any spillage or excess oil during the bleeding process. This will help maintain a clean working environment.
4. Suspension Fluid Syringe: A syringe can be used to remove old fork oil or to measure the correct quantity of new fork oil. It helps in achieving the desired amount of oil for an optimal suspension setup.
5. Vice or Fork Seal Bullet: A vice or a fork seal bullet can be used to hold the fork tubes while bleeding. This will enable you to easily open and close the bleeder valves without damaging the forks.
6. Bleeding Cup: A bleeding cup or a container with measurement markings can be used to collect the old fork oil during the bleeding process. This will prevent any spills or mess.
7. Socket Wrench: A socket wrench with the correct size socket is needed to remove the fork caps and drain bolts. This will allow you to access the fork tubes and drain the old oil.
8. Torque Wrench: A torque wrench is necessary for properly tightening the fork caps and drain bolts after the bleeding process. This ensures that everything is securely fastened and prevents any oil leakage.
9. Safety Glasses and Gloves: It is important to protect your eyes and hands during the bleeding process. Safety glasses will protect your eyes from any potential oil splatter, while gloves will keep your hands clean and provide grip.
Having these tools readily available before starting the process will help ensure a successful and hassle-free dirt bike forks bleeding experience.
Preparing the dirt bike
Step 1: Before starting any work on the dirt bike forks, it’s important to make sure that the bike is securely supported and stable. Use a bike stand or blocks to lift the front wheel off the ground, ensuring that the bike is level and not leaning to one side.
Step 2: Next, locate the compression and rebound adjusters on the fork. These can usually be found near the top of the fork leg. Take note of their current positions, as you will need to return them to these settings after bleeding the forks.
Step 3: Use a clean cloth or rag to clean the fork leg and surrounding area. This will help to prevent any dirt or debris from entering the fork during the bleeding process.
Step 4: Locate the bleed screws on the fork. These are usually located on the top caps of the fork legs. Remove the screws using a suitable tool, such as an Allen key or a socket wrench.
Step 5: Once the bleed screws are removed, use a clean cloth or rag to wipe away any excess oil or debris from the screws and the surrounding area.
Step 6: If the forks have been recently used or are warm, allow them to cool down completely before proceeding with the bleeding process. This will prevent any hot oil from splashing or causing burns.
Step 7: Finally, gather all the necessary tools and materials for bleeding the dirt bike forks. This may include a fork oil syringe, fresh fork oil, a drain pan, and a torque wrench.
Note: It’s always a good idea to consult the dirt bike’s owner’s manual or seek professional advice if you are unsure about any aspect of bleeding the forks.
Steps for preparing the bike for bleeding
Before bleeding the dirt bike forks, it is important to properly prepare the bike. Following these steps will help ensure a successful bleeding process.
Gather the necessary tools
Before starting, gather all the necessary tools for bleeding the dirt bike forks. These tools may include a fork bleed kit, a wrench or socket set, a clean rag or towel, and a jack or stand to elevate the bike.
Clean the forks
Thoroughly clean the dirt bike forks to remove any debris, dirt, or grime that may interfere with the bleeding process. Use a clean rag or towel and a mild detergent or bike-specific cleaning solution to clean the forks.
Elevate the bike
Use a jack or stand to elevate the dirt bike. This will allow for easier access to the forks and make the bleeding process more convenient. Ensure that the bike is stable and secure before proceeding.
Remove the fork caps
Using a wrench or socket set, carefully remove the fork caps from each fork leg. Take caution not to damage the caps or scratch the forks while removing them. Place the cap aside in a safe location.
Release the air pressure
To release the air pressure in the forks, compress the forks several times or use a recommended air release tool. This will help prevent any unexpected release of pressure during the bleeding process.
Inspect the forks
While the fork caps are removed, inspect the forks for any signs of damage or wear. Look for leaking seals, scratches, dents, or any other issues that may affect the functioning of the forks. If any problems are detected, it is recommended to address them before proceeding with the bleeding process.
Following these steps to prepare the bike for bleeding the dirt bike forks will help ensure a safe and effective process. It is important to be thorough and take the necessary precautions to achieve the best results.
Bleeding the dirt bike forks
Regular maintenance and proper bleeding of the dirt bike forks is crucial for maintaining optimal suspension performance and ensuring a smooth ride. Bleeding the forks removes air trapped within the system and allows for better oil flow, preventing any loss of damping or potential damage.
Tools needed:
- Socket wrench
- Suspension pump
- Bleed tool (specific to your dirt bike model)
- Oil measuring cup
- Rag or towel
Procedure:
1. Begin by securing the dirt bike on a stand or lift to ensure stability during the bleeding process. The front wheel should be off the ground.
2. Locate the bleed screws on the top of each fork tube. These screws may be covered with protective caps that need to be removed before proceeding.
3. Using the socket wrench, carefully loosen the bleed screws on each fork tube. Be cautious not to overtighten or strip the screws.
4. Attach the suspension pump to the air valve on one fork tube. Slowly pump the fork to increase the pressure inside the system.
5. While maintaining pressure on one fork tube, use the bleed tool to open the bleed screw on the opposite fork tube. This releases any trapped air and excess oil.
6. Repeat the process for the other fork tube, ensuring that pressure is maintained on one tube while bleeding the other.
7. Once both fork tubes have been bled, carefully tighten the bleed screws to the recommended torque specification. Do not overtighten.
8. Measure and adjust the oil levels in each fork tube according to the manufacturer’s specifications. This can be done using the oil measuring cup provided.
9. Clean any excess oil or debris from the fork tubes and surrounding area with a rag or towel.
10. Reinstall any protective caps that were removed earlier.
11. Finally, test the suspension by compressing and rebounding the forks several times. Ensure that the suspension feels smooth and returns to its proper position without any issues.
By following these steps, you can effectively bleed your dirt bike forks and maintain a well-functioning suspension system. Regularly inspect and bleed your forks to ensure optimal performance and a safe riding experience.
Step-by-step guide to bleeding the forks
When it comes to maintaining your dirt bike, bleeding the forks is an essential task. Bleeding the forks helps to remove air bubbles from the fork’s fluid, ensuring optimal performance and smooth operation. Here is a step-by-step guide to help you bleed the forks effectively:
Step 1: Prepare the necessary tools
Before you begin, make sure you have all the required tools. You will need a wrench, a syringe or turkey baster, a clean rag, and the appropriate fork oil. It is essential to use the correct type and viscosity of fork oil recommended by your bike’s manufacturer.
Step 2: Elevate the bike
Next, elevate the front wheel of your dirt bike using a stand or a lift. This will ensure that the forks are fully extended and positioned upright, allowing for easier access and bleeding.
Step 3: Loosen the bleed screws
Locate the bleed screws on the top of each fork leg. Use the wrench to gently loosen these screws, but do not remove them completely. Loosening the screws will facilitate the release of any trapped air and promote smoother bleeding.
Step 4: Extract the old fork oil
Using the syringe or turkey baster, extract the old fork oil from the bleed screws. Slowly insert the syringe into the screw hole and carefully suction out the fluid. Repeat this process until all the old oil has been removed from both fork legs.
Step 5: Refill with fresh fork oil
After removing the old oil, refill each fork leg with fresh fork oil. Refer to your bike’s manual or manufacturer’s recommendations to determine the appropriate oil quantity for your particular model. Carefully pour the oil into the fork leg until it reaches the recommended level.
Step 6: Re-tighten the bleed screws
Once you have refilled the fork legs with fresh oil, re-tighten the bleed screws using the wrench. Make sure they are secure but not overly tight. This will prevent any oil leakage and ensure a proper seal.
Step 7: Test the fork’s suspension
With the bleed screws tightened, gently compress and extend the forks several times to help circulate the new oil and remove any remaining air bubbles. This will also allow for proper lubrication and ensure smooth suspension movement.
Step 8: Final adjustments
After completing the bleeding process, check the fork’s suspension and make any necessary adjustments. If needed, adjust the compression and rebound settings according to your riding preferences and the specific terrain conditions.
By following this step-by-step guide, you can effectively bleed the forks of your dirt bike and maintain optimal performance. Regularly bleeding your forks will help improve your bike’s overall suspension performance, ensuring a smoother and more enjoyable riding experience.


