
Motorcycle forks play a crucial role in ensuring a smooth and stable ride. Over time, the oil in the forks can become contaminated or lose its effectiveness, resulting in reduced performance and potential damage to the suspension system. Bleeding the oil is a crucial maintenance task that helps restore the forks’ optimal functionality.
Why is it important to bleed the oil in motorcycle forks?
When the motorcycle forks are in use, the suspension oil gets heated and accumulates air bubbles. These air bubbles can cause a spongy or inconsistent fork response, resulting in reduced control and handling. By bleeding the oil, you remove these air bubbles and ensure that the forks operate smoothly and with precision.
How often should you bleed the oil in motorcycle forks?
The frequency of oil bleeding depends on various factors, including the type of motorcycle, the rider’s style, and the conditions in which the motorcycle is ridden. Generally, it is recommended to bleed
Step-by-Step Guide on Bleeding Motorcycle Fork Oil
Regular maintenance of your motorcycle’s forks is crucial for maintaining a smooth and safe ride. One important aspect of fork maintenance is bleeding the oil, which helps to remove any excess air and contaminants from the forks. Follow these steps to bleed the oil in your motorcycle forks:
Step 1: Lift the Front End of the Motorcycle
Using a motorcycle stand or a jack, lift the front end of the motorcycle off the ground. This will allow you to access the fork components more easily.
Step 2: Remove the Fork Caps
Locate the fork caps on top of the forks and use a wrench or suitable tool to remove them. Take caution as the fork caps may be under spring tension.
Step 3: Drain the Old Fork Oil
Use a drain pan to catch the old fork oil as you loosen and remove the drain screws at the bottom of the forks. Allow the oil to fully drain out of the forks until no more oil is flowing.
Step 4: Clean the Fork Components
While the old oil is draining, use a clean cloth or paper towels to wipe down the fork tubes and other components. This will help remove any dirt or debris that may have accumulated.
Step 5: Refill the Forks with Fresh Oil
Using a funnel, pour the recommended type and amount of fresh fork oil into each fork tube. Refer to your motorcycle’s manual for the correct specifications.
Step 6: Reinstall the Fork Caps
Carefully reinstall the fork caps, ensuring they are tightened securely. Be cautious not to overtighten, as this can cause damage to the caps or forks.
Step 7: Test the Fork Compression
With the motorcycle still lifted off the ground, compress the forks a few times to help distribute the new oil evenly. Check for any leaks or abnormalities in the fork movement.
Step 8: Lower the Front End of the Motorcycle
Once you are satisfied with the fork compression and there are no signs of leaks, carefully lower the front end of the motorcycle back onto the ground. Remove the stand or jack.
Step 9: Check Fork Oil Level
Using the recommended method outlined in your motorcycle’s manual, check the fork oil level. Adjust if necessary by adding or removing oil.
Step 10: Test Ride
Take your motorcycle for a test ride to ensure that the fork oil bleeding process was successful. Pay attention to the overall ride quality and fork performance.
By following these steps, you can effectively bleed the oil in your motorcycle forks and keep your bike running smoothly. Remember, if you are unsure or uncomfortable performing this maintenance yourself, it is always recommended to consult a professional motorcycle mechanic.
Why is it important to bleed the oil in motorcycle forks?
When it comes to maintaining your motorcycle’s forks, bleeding the oil is an essential step that should not be overlooked. Bleeding involves removing any air bubbles and excess oil from the fork system, ensuring optimal performance and safety. Here are a few reasons why bleeding the oil in motorcycle forks is so important:
1. Improved Suspension Performance: Over time, air bubbles can get trapped in the fork oil, causing a spongy and less responsive suspension. By bleeding the oil, you remove these air bubbles and achieve a more consistent and controlled suspension performance. This allows for better handling, smoother rides, and increased overall comfort.
2. Increased Safety: Air bubbles in the fork oil can lead to unpredictable and inconsistent suspension behavior, making it harder to control the motorcycle. This can be particularly dangerous when riding at high speeds or in challenging road conditions. Bleeding the oil ensures that the forks work as intended, providing you with better control and enhancing your overall safety on the road.
3. Prevents Fork Seal Damage: Excess oil in the fork system can cause the fork seals to leak or burst, resulting in oil leaks and potential damage to other components. By bleeding the oil, you remove any excess and ensure that the oil level is at the correct level. This helps to prolong the lifespan of the fork seals and prevents costly repairs in the future.
4. Maintenance and Longevity: Bleeding the oil in your motorcycle forks is an important part of regular maintenance that helps to keep your forks in good working condition. It removes contaminants and impurities that may have accumulated over time, ensuring that the fork system operates smoothly and extends its overall lifespan.
In conclusion, bleeding the oil in motorcycle forks is crucial for optimal suspension performance, increased safety, prevention of seal damage, and overall maintenance. Whether you are an experienced rider or a beginner, taking the time to bleed the oil regularly will help ensure a smoother and more enjoyable ride.
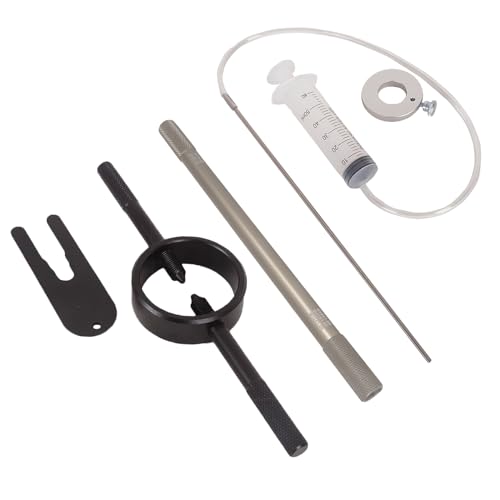
Tools and materials needed for bleeding motorcycle fork oil
Before you begin the process of bleeding the oil in your motorcycle forks, it is important to gather all the necessary tools and materials. Here is a list of everything you will need:
1. Fork oil
Make sure you have the correct type and amount of fork oil for your specific motorcycle. Consult your owner’s manual or contact a professional if you are unsure.
2. Fork oil level syringe
This tool will help you accurately measure and adjust the fork oil level in your forks.
3. Fork oil seal driver
You will need this tool to properly install new fork oil seals if you decide to replace them during the process.
4. Fork oil wrench
This tool will allow you to remove the fork cap and adjust the preload on your fork springs.
5. Seals and O-rings
If you are replacing the fork oil seals, make sure you have the necessary seals and O-rings for your motorcycle model.
6. Wrench set
You will need a set of wrenches to remove various components of your motorcycle fork.
7. Cleaning supplies
Have some rags or towels handy to clean up any spilled oil and to wipe down the forks before reassembly.
8. Safety gear
Don’t forget to wear appropriate safety gear, such as gloves and eye protection, when working with fork oil.
Having these tools and materials ready before starting the process will help ensure a smooth and efficient oil bleeding process for your motorcycle forks.
Step-by-step instructions for bleeding oil in motorcycle forks
Regular maintenance of your motorcycle forks is essential to ensure optimal performance and safety. One important aspect of fork maintenance is bleeding the oil, which helps remove any air bubbles and contaminants from the forks. Here are the step-by-step instructions to successfully bleed the oil in your motorcycle forks:
Step 1: Locate the fork caps on the top of each fork tube. These caps usually have a hexagonal shape and can be accessed by removing any protective covers or rubber plugs. Use the appropriate tool, such as a socket or wrench, to loosen and remove the fork caps.
Step 2: With the fork caps removed, extend the forks fully by applying downward pressure on the handlebars. This will push any excess oil out of the forks and make the bleeding process more effective.
Step 3: Locate the bleed screws on each fork leg. These screws are usually positioned near the bottom of the fork tubes, either on the inner or outer side. Use the appropriate tool, such as a screwdriver or Allen wrench, to loosen and open the bleed screws.
Step 4: As the bleed screws are opened, the excess oil and air bubbles will start to flow out of the forks. Make sure to catch this oil in a suitable container and avoid any spills. Gently pump the forks up and down to aid in the oil bleeding process.
Step 5: Once the oil flow becomes steady and free of air bubbles, close the bleed screws tightly to prevent any oil leakage. Be careful not to overtighten the screws.
Step 6: Reinstall the fork caps on top of each fork tube. Use the appropriate tool to tighten the caps securely, but avoid overtightening to prevent damage to the caps or fork tubes.
Step 7: Clean any spilled oil or dirt from the fork tubes and surrounding areas using a clean cloth or rag.
Step 8: Repeat these steps for the other fork leg, ensuring both forks are properly bled and the oil levels are equal.
Step 9: Finally, check the fork oil level using the manufacturer’s recommended method. Adjust the oil level if necessary by adding or removing oil.
Note: It’s important to consult your motorcycle’s owner’s manual for specific instructions and recommendations regarding the oil bleeding process for your particular make and model.


