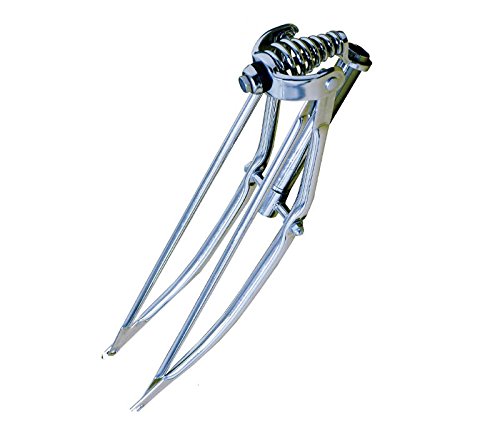
If you are a cycling enthusiast, you know how important it is to have a well-functioning and properly fitted set of cycle forks. Forks play a crucial role in ensuring a smooth and comfortable ride, absorbing shocks from the road and helping you maintain control on different terrains. Whether you are replacing your old forks or upgrading to a new set, fitting them properly is essential for optimal performance and safety.
Step 1: Choose the Right Fork
Before you start fitting your cycle forks, it is crucial to choose the right set for your bike. Consider factors such as the type of riding you do, your bike’s frame compatibility, and your budget. There are various types of forks available, including suspension forks, rigid forks, and carbon forks, each designed for specific riding styles. Make sure to consult with a professional or do thorough research to find the fork that best suits your needs.
Step 2: Prepare for Fitting
Prior to fitting your cycle forks, gather all the necessary tools, including a torque wrench, socket set, Allen keys, and a bike stand. It is also important to ensure that your bike is clean and stable, so use a bike stand or a stable surface to support your bike during the fitting process. This will make the task easier and safer.

Step 3: Remove the Old Forks
If you are replacing your old forks, start by removing them from your bike. Use the appropriate tools to loosen and remove the bolts or nuts that hold the forks in place. Carefully detach the brake caliper (if applicable) and any other components attached to the forks. Make sure to keep track of the sequence and position of all parts for easy reassembly.
Step 4: Install the New Forks
With the old forks removed, it’s time to install the new set. Place the new forks into the headset, ensuring that they are aligned properly and snugly fit into the frame. Use the torque wrench and appropriate tools to tighten the bolts and nuts according to the manufacturer’s specifications. Double-check that all components are securely in place and aligned correctly.
Step 5: Reassemble and Adjust

With the new forks securely installed, reattach the brake caliper and any other components that were removed during the disassembly process. Make sure everything is adjusted properly and functioning smoothly. Take the time to test your bike by going for a short ride to ensure that the forks are working as intended.
Fitting cycle forks may seem like a daunting task, but with the right tools and proper guidance, it can be a relatively straightforward process. However, if you are unsure or uncomfortable with the process, it is always recommended to seek assistance from a professional bike mechanic to ensure the forks are fitted correctly and safely.
Preparing for Fork Installation
Before you begin installing the cycle forks, there are a few preparatory steps that you need to take. These steps will ensure that the installation process goes smoothly and that the forks are properly aligned and secured. Follow the steps below to prepare for fork installation:
1. Gather the necessary tools and materials:
Make sure you have all the tools and materials required for the installation. This may include wrenches, a torque wrench, grease, a socket set, and any other specific tools mentioned in the manufacturer’s instructions.
2. Read the manufacturer’s instructions:
It is important to familiarize yourself with the manufacturer’s instructions for installing the cycle forks. These instructions will provide you with specific guidance and safety precautions that you need to follow. Read through the instructions carefully before proceeding.

3. Clean the fork steerer tube:
Before installing the forks, it is essential to clean the fork steerer tube to remove any dirt, debris, or old grease. Use a clean cloth or a degreaser to clean the tube thoroughly. This will help to ensure a smooth installation and prevent any potential issues.
4. Apply grease:
Apply a thin layer of grease to the inside of the fork steerer tube and the headset bearings. This will provide lubrication and help prevent corrosion. Make sure to spread the grease evenly using a clean cloth or your fingers.
5. Secure the bike frame:
Before attempting to install the forks, make sure the bike frame is securely positioned. You can use a bike stand or have someone hold the bike steady for you. This will prevent any movement or instability during the installation process.
By following these steps to prepare for fork installation, you will be ready to proceed with the actual installation process. Taking the time to properly prepare will ensure that the forks are installed correctly and that your bike functions properly and safely.
Removing the Old Fork
Replacing the forks on your cycle is not a difficult task, but it does require some basic mechanical skills and the right tools. Before you begin, you’ll need a set of Allen keys, a wrench, and a workstand to hold your bike securely.

Step 1: Preparation
Before you start, make sure your bike is in a stable position and won’t fall over unexpectedly. A workstand is ideal for this, but if you don’t have one, find a secure place to prop your bike up.
Step 2: Remove brake components
Begin by removing any brake components that are attached to the fork. This may include the brake caliper, brake pads, and brake cable. Use an Allen key or a wrench, depending on the type of connector used.
Step 3: Loosen the stem bolts
Next, loosen the stem bolts at the top of the fork. This will release the handlebars from the old fork. Use the appropriate size Allen key or wrench to loosen the bolts. Once they are loose, you should be able to slide the handlebars off the fork.
Step 4: Remove the fork
Now it’s time to remove the old fork. Start by removing the headset cap at the top of the fork. This is usually held in place with a bolt or a threaded ring that can be loosened with an Allen key or a wrench. Once the cap is removed, you should see the bearings and the crown race.
Use a wrench to loosen the bolts on the headset. Once they are loose, lift the fork out of the frame. Be cautious as the fork may be heavy and may have sharp edges.
Step 5: Clean and inspect
Before installing the new fork, take a moment to clean and inspect the headset and the frame. Remove any dirt, debris, or old grease from the bearings and frame. Inspect for any signs of damage or wear that may need to be addressed before installing the new fork.
Now that you have successfully removed the old fork, you are ready to install the new one. Follow the manufacturer’s instructions or consult a professional if you are unsure of the specific steps for your particular bike and fork combination.
Installing the New Fork
Installing a new fork on your bike can improve its performance and handling. Here are the steps to properly install a new fork:
1. Gather the necessary tools and materials
Before starting the installation process, make sure you have all the necessary tools and materials. You will need a set of allen keys, a torque wrench, a headset press or mallet, a crown race setter, and a new fork suitable for your bike.
2. Prepare the bike
Begin by removing the front wheel, brake caliper, and any other components connected to the fork. Then, loosen the stem cap bolt and the stem bolts to separate the stem from the fork steerer tube.
3. Remove the old fork
Using the appropriate tools, carefully remove the old fork from the frame. Start by loosening and removing the fork crown race from the old fork. Next, unthread the top cap and remove the spacers and stem from the fork steerer tube. Finally, remove the lower headset bearings and any washers or spacers.
4. Install the new fork
Start by applying a thin layer of grease to the crown race seat on the new fork. Then, carefully insert the crown race into the crown of the fork, making sure it is fully seated. Next, insert the new fork into the bike’s head tube. Make sure the fork is aligned properly and that the steerer tube is inserted all the way into the head tube.
Once the fork is in place, reinstall the lower headset bearings, washers, and spacers according to your bike’s specifications. Use a headset press or mallet to gently press the lower bearings into the head tube.
5. Reassemble the stem and components
Now reassemble the stem by attaching it to the fork steerer tube and tightening the stem bolts. Gradually tighten the bolts in a crisscross pattern to ensure even tension. Once the stem is secure, adjust its position and tighten the stem cap bolt to the manufacturer’s specifications.
Finally, reattach the front wheel and brake caliper, making sure they are properly aligned and tightened.
6. Test the bike
After installing the new fork, take the bike for a test ride to ensure everything is functioning properly. Pay attention to the bike’s handling and braking performance. If you notice any issues, double-check all the connections and adjustments.
By following these steps and taking the time to properly install a new fork, you can improve your bike’s performance and enjoy a smoother ride.