
Getting precise and accurate cuts on a table saw can be a challenge, especially when it comes to mitre cuts. However, with the right jig, you can easily tackle this task and achieve professional-level results. In this article, we will guide you through the process of making a mitre jig for your table saw, step by step.
First and foremost, it’s important to understand what a mitre jig is and how it works. A mitre jig is a simple yet effective tool that helps you create angled cuts on your table saw. It consists of two pieces that are connected at a specific angle, allowing you to securely hold your workpiece and guide it smoothly through the saw blade.
To start making your mitre jig, you will need a few materials. These include a piece of plywood or MDF, measuring tape, a pencil, a combination square, a saw, a drill, screws, and a screwdriver. Once you have gathered all the necessary materials, you can proceed to the next step.
The first step in making the mitre jig is to determine the angle at which you want to make your cuts. This will depend on the specific project you are working on. Once you have decided on the angle, mark it on your plywood or MDF using a pencil and a combination square. Make sure the angle is accurate and aligned properly.
How to Create a Miter Jig
A miter jig is a useful tool that can be used with a table saw to create accurate and precise angled cuts. It is especially handy when working with trim, molding, or other woodworking projects that require precise angles.
Materials You Will Need
Before you get started, gather the following materials:

- Plywood
- Measuring tape
- Pencil
- Mitre gauge
- Screws or nails
- An adjustable square
Steps to Create a Miter Jig
Follow these steps to create your own miter jig:
- Measure and mark the desired length of the miter jig on the plywood using the measuring tape and pencil. A length of 12-18 inches is typically suitable for most woodworking projects.
- Cut the plywood along the marked line using a table saw or a circular saw. Make sure to hold the plywood securely to prevent any accidents.
- Take the mitre gauge and adjust it to the desired angle for your cut. Use the adjustable square to ensure the angle is accurate.
- Secure the mitre gauge to the miter jig using screws or nails. Make sure it is tightly attached to ensure stability during cuts.
- Place the miter jig onto the table saw’s surface, with the mitre gauge facing towards the blade.
- Hold the material you wish to cut against the miter gauge and slide it along the jig, keeping it firmly against the gauge as you make the cut.
Remember to always wear appropriate safety gear, such as safety goggles and gloves, when working with power tools.
With your new miter jig, you can now confidently make accurate and clean angled cuts for your woodworking projects using a table saw.
Gather Necessary Materials
To make a mitre jig for a table saw, you will need the following materials:
- 1. Plywood: Select a sturdy plywood sheet that is at least 1/2 inch thick. This will serve as the base of the jig.
- Ruler or Measuring Tape: You will need a ruler or measuring tape to accurately measure and mark the dimensions of your jig.
- Pencil or Marker: Use a pencil or marker to mark the measurements on the plywood and guide your cutting.
- Table Saw: A table saw is essential for making precise cuts.
- Mitre Gauge: Ensure you have a mitre gauge that fits your table saw. This will be used to slide the jig through the saw.
- Screws and Screwdriver: You will need screws to secure the jig together. A screwdriver or drill with a screwdriver bit will be necessary for this step.
- Wood Glue: Wood glue will help strengthen the joints of the jig.
- Clamps: Clamps will be useful for holding the pieces of the jig together while the glue dries.
Once you have gathered all the necessary materials, you will be ready to start building your mitre jig for the table saw.
Measure and Cut the Wood
Before building your mitre jig for a table saw, you’ll need to measure and cut the wood pieces to the appropriate sizes. The wood pieces you’ll need are described below:
Base Piece
The base piece is the foundation of the jig and should be made from a sturdy and flat piece of wood. Measure and cut it to the desired length and width, depending on the size of your table saw.
Guide Fence
The guide fence is the part that will help you make accurate mitre cuts. It should be cut to the appropriate length and width, and attached perpendicular to the base piece. The width of the guide fence will determine the maximum width of the material you can cut with the jig.
Make sure to measure and mark the position on the base piece where the guide fence will be attached, ensuring that it is perfectly perpendicular. You can use a combination square or a framing square for accurate measurements.
Mitre Slot
The mitre slot is the groove on the guide fence that the table saw’s mitre gauge will slide into. Measure and mark the position of the mitre slot on the guide fence. The width of the slot should be slightly larger than the width of your table saw’s mitre gauge.
To cut the mitre slot, you can use a router with a straight bit or a table saw with a dado blade. Make sure to make multiple passes and gradually increase the depth until you achieve the desired width.
Once you have measured and cut all the required wood pieces, you are ready to assemble your mitre jig for the table saw.
Assemble the Base
Begin by gathering all the necessary materials and tools for the project. You will need the following:
- 4 pieces of plywood measuring 12 inches by 12 inches
- 4 pieces of plywood measuring 18 inches by 3 inches
- Wood screws
- Power drill
- Screwdriver bit
- Tape measure
Start by laying out two of the 12×12 plywood pieces on a flat and level surface. Place them parallel to each other and make sure they are evenly spaced. Take one of the 18×3 plywood pieces and place it perpendicular to the other two pieces, aligning it with the edges. Attach the pieces together using wood screws.
Repeat this process with the remaining 12×12 plywood pieces and the other two 18×3 plywood pieces. Once completed, you should have two L-shaped structures.
Now, take one of the L-shaped structures and place it on top of the other one, forming a rectangular shape. Make sure the edges are aligned and the corners are square. Attach the pieces together using wood screws.
Finally, double-check that the assembled base is level and stable. Adjust if necessary. You now have the base of your mitre jig ready for use with your table saw.
By following these instructions, you can assemble the base of your mitre jig for your table saw and continue building the rest of the jig.
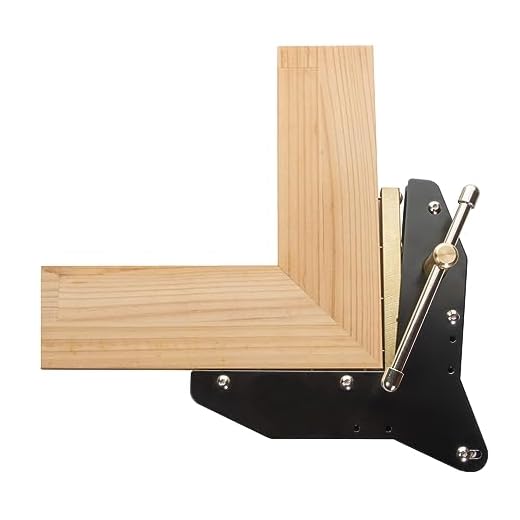
Attach the Fence
Once you have prepared the base for your mitre jig, it’s time to attach the fence. The fence is the part of the jig that helps to guide your workpiece as you make your cuts.
To attach the fence, start by creating a groove along the length of the base. This groove should be wide and deep enough to securely fit the fence. You can use a router or a dado blade on your table saw to make this groove.
Next, cut a piece of plywood or hardwood to the desired width for your fence. The length of the fence should be determined by the size of your workpiece and the type of cuts you will be making. Make sure the fence is straight and square before attaching it to the base.
Once the fence is cut to the correct size and shape, align it with the groove in the base and slide it into place. Use clamps or screws to secure the fence to the base, making sure it is parallel to the saw blade and square to the table.
After attaching the fence, double-check its alignment and adjust if necessary. It’s important for the fence to be perfectly straight and perpendicular to the table saw blade to ensure accurate cuts.
Now that the fence is securely attached, you can start using your mitre jig on your table saw. Remember to always use appropriate safety precautions and follow the manufacturer’s instructions when operating power tools.
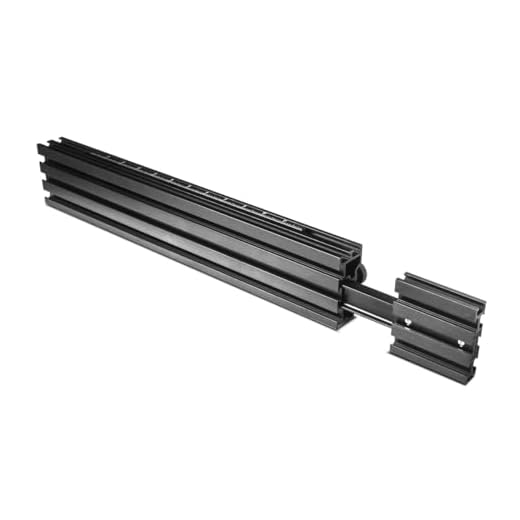
Add Sliding T-Tracks
Adding sliding T-tracks to your mitre jig can greatly increase its versatility and allow for even more precise cuts. T-tracks are metal channels that can be mounted to the surface of your jig, providing multiple points for clamping and securing your workpiece.

To add T-tracks, you will need:
- T-tracks: These can be purchased from your local hardware store or online.
- Drill and drill bits
- Screws
- Ruler or measuring tape
Here are the steps to add sliding T-tracks to your mitre jig:
- Measure and mark the desired location for the T-tracks on your jig. Make sure to evenly space them and align them parallel to the mitre gauge slot.
- Using a drill and an appropriate drill bit, drill pilot holes at each marked location on the jig.
- Align the T-tracks over the pilot holes and screw them into place using screws that are long enough to securely fasten the tracks to the jig.
- Once the T-tracks are installed, you can use them to attach accessories such as stop blocks, featherboards, or hold-down clamps.
Having sliding T-tracks on your mitre jig will allow you to easily adjust and secure your workpiece in place, giving you more control and accuracy during your cuts. It also opens up the possibility of adding additional accessories to enhance the functionality of your jig.
Test and Adjust the Jig
Once you have constructed your mitre jig, it is important to test and adjust it to ensure that it is working correctly with your table saw. Here are some steps to follow:
- Set up your table saw and mitre jig in a well-lit and spacious area.
- Make sure the table saw blade is aligned properly and securely fastened in place.
- Place a scrap piece of wood on the table saw and align it with the mitre jig.
- Hold the wood firmly against the jig and slowly push it through the table saw.
- Inspect the cut to see if it is smooth and accurate.
- If the cut is not satisfactory, you may need to make adjustments to your jig.
- Check if the angles are accurate by using a protractor or angle finder.
- Make any necessary adjustments to the jig to achieve precise angles.
- Repeat the test cuts and adjustments until you are satisfied with the results.
Remember to always prioritize safety when working with power tools. Wear safety glasses and keep your fingers away from the blade. Take your time and be patient when testing and adjusting your mitre jig to ensure that it works properly and produces accurate cuts.