Are you a honey enthusiast and want to enjoy fresh and pure honey at home? One of the essential steps in honey processing is sieving. Sieving honey helps remove impurities such as wax, bee parts, and other debris, ensuring a smooth texture and a pristine taste.
Why sieve honey?
When honey is extracted from the honeycomb, it often contains small particles and impurities. Sieving the honey helps in removing these unwanted substances, making it more appealing both in terms of appearance and taste. It also aids in the honey’s preservation, as impurities can lead to spoilage and fermentation.
How to sieve honey?
To sieve honey at home, you will need a few simple tools and materials. First, ensure that you have a clean and food-safe sieve – preferably one with fine mesh to capture even the smallest impurities. Place the sieve over a bowl or container that can collect the strained honey.
Preparing the Honey
Before sieving the honey, it is important to prepare it properly. Follow these steps to ensure the honey is ready for the sieving process:
- Gather the necessary equipment: You will need a honey bucket or container, a fine-mesh sieve or strainer, and a clean spoon or spatula. Make sure all the equipment is clean and dry.
- Warm the honey: Place the honey container in a warm water bath or set it in a sunny spot for a few hours. This will help the honey become more fluid and easier to sieve.
- Remove any impurities: Before sieving, check the honey for any impurities such as wax or debris. Use a clean spoon or spatula to remove any unwanted particles from the surface.
- Set up the sieving station: Place the fine-mesh sieve or strainer over a clean container or bowl. Make sure the container is big enough to hold all the honey you plan to sieve.
- Pour the honey into the sieve: Slowly pour the warmed honey into the sieve, allowing it to flow through the small holes while catching any remaining impurities or debris.
- Stir the honey in the sieve: Use the back of a clean spoon or spatula to gently stir the honey in the sieve. This will help it pass through the sieve more efficiently and remove any stubborn impurities.
- Scrape off the filtered honey: Once the honey has passed through the sieve, use a clean spoon or spatula to scrape off any honey that may be stuck to the underside of the sieve. Transfer the filtered honey to a clean container.
Following these steps will ensure that your honey is properly prepared for sieving. This will result in a smooth and clean final product that is perfect for various culinary and medicinal purposes.
Cleaning the Equipment
After you have finished sieving the honey, it is important to clean the equipment properly to maintain its quality and prevent contamination. Here are some steps to follow:
Step 1: Remove the Sieve
Start by removing the sieve from the honey container. Carefully lift it up and place it on a clean surface.
Step 2: Scrape off Residue
Using a spoon or a spatula, scrape off any remaining honey or wax residue from the sieve. Be thorough to ensure all the sticky substances are removed.
Step 3: Rinse with Warm Water
Next, rinse the sieve with warm water to remove any remaining honey. Make sure to use warm water as it helps dissolve the honey easier.
Step 4: Use a Brush
If there are any stubborn honey or wax residues in the sieve, use a brush with soft bristles to gently scrub them off. Be gentle to avoid damaging the sieve.
Step 5: Repeat if Necessary
If the sieve is still not clean after the previous steps, repeat the rinsing and brushing process until it is completely clean.
Step 6: Dry Thoroughly
Once the sieve is clean, make sure to dry it thoroughly. You can air-dry it or use a clean cloth to wipe away any remaining moisture.
Remember, cleaning your equipment after every use is essential to maintain the quality of your honey as well as prevent any contamination. Make sure to follow these steps to keep your honey-making process hygienic and enjoyable.
Heating the Honey
Heating honey is an important step in the process of sieving it at home. The heat helps to make the honey more liquid and easier to strain. However, it is crucial to heat the honey gently to preserve its natural properties and avoid damaging its enzymes and beneficial nutrients.
Here are some guidelines to follow when heating honey:
1. Use a double boiler: Place the honey container in a larger pot filled with water. Heat the pot on low heat, allowing the honey to warm up slowly and evenly.
2. Avoid direct heat: Never heat honey directly on the stove or in the microwave, as this can cause overheating and caramelization, which alters its taste and quality.
3. Keep the temperature low: Maintain a temperature between 95°F (35°C) and 100°F (38°C) while heating the honey. Higher temperatures can destroy the honey’s beneficial enzymes and nutrients.
4. Stir gently: Stir the honey occasionally to distribute the heat and ensure it heats evenly. Use a wooden spoon or a silicone spatula to avoid introducing metallic flavors.
5. Test the consistency: After heating, test the consistency of the honey by pouring a small amount onto a spoon. It should flow smoothly and easily.
6. Allow the honey to cool: Once the honey is heated and sieved, allow it to cool down before transferring it to storage containers. This will prevent any condensation or moisture buildup.
Remember: Heating honey should be done with care to preserve its natural properties. Follow these guidelines to ensure you obtain a smooth and high-quality honey after the sieving process.
Sieving the Honey
Once your honey has been warmed, it’s time to sieve it to remove any impurities. Sieving the honey not only helps in achieving a smooth and consistent texture but also ensures that the final product is free from any bee debris, pollen, or other unwanted particles.
What You’ll Need
- A clean sieve or strainer
- A container to collect the sieved honey
- A honey dipper or spoon for stirring
Steps to Sieve the Honey
- Place the sieve or strainer over the container, ensuring that it is stable and won’t tip over during the sieving process.
- Slowly pour the warmed honey into the sieve. Use a honey dipper or spoon to help guide the honey into the sieve if needed.
- Allow the honey to pass through the sieve on its own. Avoid pressing or forcing the honey through the sieve, as this can lead to a slower sieving process and may result in trapping impurities.
- Once the honey has passed through the sieve, give it a gentle stir to ensure any remaining impurities are captured by the sieve.
- Discard the impurities collected in the sieve and transfer the sieved honey into a clean, airtight container for storage.
Remember to clean the sieve after each use to maintain its effectiveness for future sieving. Sieving your honey not only improves its quality but also enhances its appearance, making it a delightful addition to your pantry or as a gift.
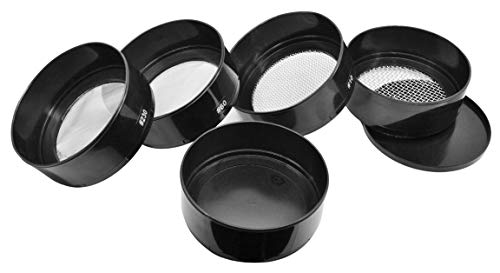
Choosing the Right Sieve
When it comes to sieving honey at home, choosing the right sieve is crucial for achieving the desired texture and quality of the final product. Here are some factors to consider when selecting a sieve:
| Factors | Considerations |
|---|---|
| Mesh size | Choose a sieve with a mesh size that is appropriate for the consistency of your honey. If your honey is thick and contains larger particles, opt for a sieve with a larger mesh size to allow those particles to pass through. On the other hand, if your honey is thin and has smaller particles, a sieve with a smaller mesh size will help remove any impurities. |
| Material | Sieves can be made from various materials, such as stainless steel, nylon, or plastic. Stainless steel is a popular choice as it is durable, easy to clean, and does not react with the honey. Nylon sieves are also a good option as they are lightweight and resistant to breaking, although they may retain some odor from previous uses. Plastic sieves are affordable but may not be as long-lasting as the other options. |
| Shape | Sieves come in different shapes, including round, conical, and flat. The shape of the sieve can affect how efficiently it separates the impurities from the honey. A conical sieve with a fine mesh size is often recommended for honey sieving, as it allows for easy draining due to its shape. |
| Handle | An ergonomic handle can make the sieving process more comfortable and convenient. Look for a sieve with a sturdy and comfortable handle that allows for a secure grip, especially when working with larger batches of honey. |
| Cleaning | Consider the ease of cleaning when choosing a sieve. Look for a sieve that can be easily disassembled and cleaned thoroughly to maintain optimal hygiene and prevent any build-up of honey residue. |
By considering these factors and choosing the right sieve for your honey sieving needs, you can ensure a smooth and efficient process that produces high-quality, pure honey.
Setting up the Sieve
Before you begin the sieving process, it’s important to properly set up the sieve. Here are the steps to follow:
1. Clean the Sieve: Start by thoroughly cleaning the sieve to ensure there are no particles or impurities present that could contaminate the honey.
2. Choose the Right Sieve: Select a sieve with the appropriate mesh size. The size of the mesh will determine the level of filtration and the consistency of the honey.
3. Position the Sieve: Place the sieve securely on top of a clean container or bowl. Make sure it is stable and will not tip over during the sieving process.
4. Prepare a Filter Cloth: If necessary, line the sieve with a filter cloth or cheesecloth to further enhance the filtration process and remove any larger impurities.
5. Pour the Honey: Slowly pour the honey into the sieve, ensuring that it is evenly distributed. Be careful not to overflow the sieve or apply too much pressure.
6. Allow the Honey to Drip: Let the honey drip through the sieve naturally. Avoid pressing or trying to force the honey through, as this may affect its quality and texture.
7. Collect the Filtered Honey: The filtered honey will collect in the container or bowl underneath the sieve. Gently stir the honey occasionally to facilitate the dripping process.
8. Store the Filtered Honey: Once the sieving process is complete, transfer the filtered honey to an airtight container or jar for storage. Store it in a cool, dry place away from direct sunlight.
Note: It’s important to be patient during the sieving process. Allow the honey to naturally pass through the sieve to obtain the best quality and clarity.