A plaster trowel is a versatile tool that is used by professional plasterers to apply and smooth plaster on walls, ceilings, and other surfaces. It is an essential tool in the field of plastering, as it allows for precise application and finishing of plaster.
The plaster trowel consists of a flat, rectangular blade made of stainless steel, carbon steel, or plastic, which is attached to a handle. The blade of the trowel is carefully designed to be smooth and flexible, allowing for easy manipulation of the plaster.
When using a plaster trowel, the plasterer will scoop a small amount of plaster onto the blade, and then spread it evenly across the surface being worked on. The plaster is then smoothed and shaped using the trowel, creating a neat and even finish.
Plaster trowels come in different shapes and sizes to suit different applications. For example, a large trowel with a wide blade is used for applying plaster to large areas, while a smaller trowel with a narrower blade is used for applying plaster to corners and edges.
Overall, a plaster trowel is an essential tool for anyone involved in plastering work. It allows for precise application and finishing of plaster, ensuring a professional and polished end result.
What is a Plaster Trowel?
A plaster trowel is a tool that is commonly used by professionals in the construction industry, specifically for applying and smoothing plaster or other finishing materials onto walls, ceilings, and other surfaces. It is an essential tool for plasterers and is designed to make the application process easier and more efficient.
The plaster trowel is typically made of a flat, rectangular-shaped metal blade, often stainless steel, which is attached to a handle. The blade is smooth and flexible, allowing for better control and precision during application. It is also important that the blade is properly cleaned and maintained to ensure a smooth and even finish.
Plaster trowels come in various sizes, ranging from small handheld trowels for detailed work to larger trowels for covering larger areas. The size of the trowel to be used depends on the size of the surface and the desired result.
Using a plaster trowel involves applying the plaster to the surface and then using the trowel to spread and smooth it out. The plaster is typically applied in layers, with each layer being smoothed out before the next one is added. This process helps to create a seamless and uniform finish.
Overall, the plaster trowel is a vital tool for any plasterer or professional involved in plastering work. It allows for precise application and smoothing of plaster, resulting in high-quality finishes on walls, ceilings, and other surfaces.
| Advantages | Disadvantages |
|---|---|
| – Enables precise application of plaster | – Requires proper maintenance and cleaning |
| – Flexible blade for better control | – Different sizes may be needed for different surfaces |
| – Helps create a smooth and uniform finish | – May require some skill and experience to use effectively |
Understanding the Basics
A plaster trowel is an essential tool used in the process of applying plaster to walls, ceilings, and other surfaces. It is a handheld instrument with a flat metal blade that is used to spread and smooth the plaster evenly.
Types of Plaster Trowels
There are various types of plaster trowels available, each designed for a specific purpose. The most common types include:
1. Finishing Trowel
The finishing trowel, also known as a float, is used for the final smoothing and polishing of the plaster surface. Its flat, rectangular blade with rounded corners allows for a flawless finish.
2. Margin Trowel
The margin trowel, also called a pointing trowel, is a small, narrow trowel with a pointed tip. It is ideal for detailed work, such as filling in cracks and corners.
How to Use a Plaster Trowel
Using a plaster trowel requires precision and practice. Here are some basic steps to get you started:
- Prepare the plaster mixture according to the manufacturer’s instructions.
- Hold the plaster trowel at a slight angle and apply a thin layer of plaster to the surface.
- Using smooth, sweeping motions, spread the plaster evenly over the area, working from top to bottom.
- Once the plaster is applied, use the trowel’s straight edge to level the surface. Apply gentle pressure and glide the trowel across the plaster to achieve a smooth finish.
- For a textured finish, gently drag the trowel’s edge or use a separate tool, such as a sponge or brush, to create desired patterns.
Remember, practice makes perfect when it comes to using a plaster trowel. With time and experience, you’ll develop the skills necessary to achieve professional-looking plastered surfaces.
Types of Plaster Trowels
Plaster trowels are essential tools used by plasterers for applying, spreading, and finishing plaster on various surfaces. There are several types of plaster trowels, each designed for specific applications and purposes. Here are some common types:
| Type | Description |
|---|---|
| Finishing Trowel | Also known as a float trowel, it features a rectangular blade with rounded corners. It is used for applying the final smooth finish to the surface of the plaster. The rounded corners prevent gouging of the plaster. |
| Gauging Trowel | This small-sized trowel features a pointed tip and a rectangular blade. It is used for mixing small amounts of plaster, known as gauging, and for applying it to intricate areas such as corners and edges. |
| Bucket Trowel | Designed with a curved blade, it is used for scooping and transferring plaster from the mixing bucket onto the hawk or directly onto the surface being plastered. |
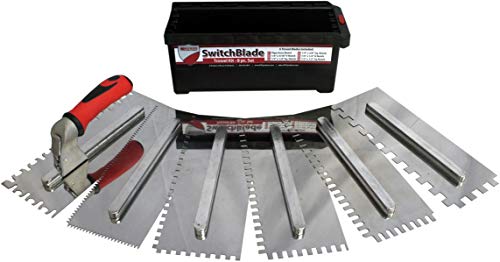
| Notched Trowel | Commonly used in tile installation, a notched trowel has a serrated blade with notches. It is used to apply adhesive or mortar evenly onto a surface before placing tiles. |
| Corner Trowel | This trowel has a flexible blade shaped like a triangle. It is used for achieving a smooth finish when plastering corners, especially internal corners. |
| Pool Trowel | With a curved and pointed blade, a pool trowel is used for applying and finishing plaster on curved or irregular surfaces, such as the inside of swimming pools. |
These are just a few examples of plaster trowels available in the market. Plasterers often have a collection of different types of trowels, each serving a specific purpose in their work. Having the right trowel for the job helps ensure a professional and high-quality plastering finish.
How to Choose the Right Plaster Trowel
Choosing the right plaster trowel is essential for achieving a professional and smooth finish when working with plaster. Here are some factors to consider when selecting a plaster trowel:
- Size: Plaster trowels come in various sizes, typically ranging from 11 to 14 inches in length. The size you choose depends on the scale of your project and your personal preferences. Smaller trowels are easier to maneuver in tight spaces, while larger trowels can cover more surface area.
- Material: Plaster trowels are commonly made from stainless steel or carbon steel. Stainless steel trowels are more resistant to rust and are easier to clean, while carbon steel trowels are generally more affordable. Consider the durability and maintenance requirements of each material.
- Blade Type: Plaster trowels have different blade types, such as a square-end blade or a rounded-end blade. Square-end blades are ideal for applying plaster on flat surfaces, while rounded-end blades are better suited for corners and curved surfaces.
- Flexibility: The flexibility of a plaster trowel determines how well it can adapt to the contours of the surface. Flexible trowels are better for achieving a smooth finish on irregular surfaces, while rigid trowels work well for flat surfaces.
- Handle Grip: Choose a plaster trowel with a comfortable and ergonomic handle grip. A good grip reduces hand strain and allows for better control during plaster application. Look for handles made from materials like rubber or soft-grip plastic.
- Brand Reputation: Consider purchasing plaster trowels from reputable brands known for their quality and reliability. Reading customer reviews and seeking recommendations can help you make an informed decision.
By carefully considering these factors, you can select a plaster trowel that suits your needs and helps you achieve professional results in your plastering projects.
Techniques for Using a Plaster Trowel
Using a plaster trowel correctly is essential for achieving a smooth and professional finish on plastered surfaces. Here are a few techniques to keep in mind:
1. Loading the trowel: Start by ensuring that the trowel is clean and free from any dried plaster. To load the trowel, dip it into a bucket of plaster, holding it at a slight angle. Use a twisting motion to evenly distribute the plaster onto the blade of the trowel.
2. Applying the plaster: Begin by holding the trowel at a slight angle against the surface you are working on. Apply light pressure and use smooth, sweeping motions to spread the plaster evenly. Avoid pressing too hard, as this can cause the plaster to build up unevenly and create bumpy areas.
3. Feathering the edges: To achieve a seamless finish, feather the edges of the plaster as you go. This involves applying less pressure towards the outer edges of the trowel stroke, allowing the plaster to blend smoothly with the surrounding areas. Feathering helps to prevent visible lines or ridges in the finished surface.
4. Building up layers: Depending on the thickness of the plaster required, you may need to apply multiple layers. Allow each layer to dry before adding the next, and use the same techniques described above for each layer. This ensures a consistent and even finish across the entire surface.
5. Clean as you go: Regularly clean excess plaster from the trowel blade during use, as this can cause an uneven distribution and affect the final result. A clean trowel ensures that the plaster remains smooth and easy to work with.
By mastering these techniques and practicing on small surfaces, you can become proficient in using a plaster trowel and achieve professional-looking results for all your plastering projects.
Maintaining and Cleaning Your Plaster Trowel
A plaster trowel is an essential tool for any plasterer. It is used to apply and smooth plaster on walls, ceilings, and other surfaces. To ensure that your plaster trowel performs optimally and lasts for a long time, proper maintenance and cleaning are crucial. Here are some tips on how to maintain and clean your plaster trowel:
1. Regular Cleaning
After each use, it is important to clean your plaster trowel thoroughly. Start by removing any excess plaster from the blade using a scraper or a brush. Then, wipe the blade with a damp cloth to remove any remaining plaster. Make sure to remove any debris from the handle as well. This will prevent the plaster from hardening and sticking to the trowel, making it easier to clean.
2. Proper Storage
When not in use, store your plaster trowel in a dry place. Moisture can cause the blade to rust and the handle to deteriorate. If possible, hang the trowel with the blade facing down to prevent any bending or warping. You can also wrap the blade in a cloth or paper towel to absorb any moisture and protect it from dust and debris.
3. Rust Prevention
To prevent rust from forming on the blade of your plaster trowel, it is advisable to apply a thin layer of oil or grease. This will create a barrier between the blade and moisture, preventing oxidation. After applying the oil or grease, wipe off the excess with a clean cloth. Regularly check the blade for any signs of rust and reapply the protective layer as needed.
4. Blade Maintenance
Over time, the blade of your plaster trowel may become worn or damaged. To maintain optimal performance, you should regularly inspect and replace the blade if necessary. Most plaster trowels allow for blade replacement, so consult the manufacturer’s instructions for guidance. Remember to choose a blade that is compatible with your trowel to ensure proper fit and functionality.
5. Handle Care
The handle of your plaster trowel can also require maintenance. Check for any loose or damaged parts and tighten or replace them as needed. If the handle becomes worn or uncomfortable to grip, you can consider adding a grip or handle wrap for better ergonomics. Taking care of the handle will make your trowel more comfortable to use and reduce the risk of hand fatigue or injury.
By following these tips, you can prolong the life of your plaster trowel and ensure that it always performs at its best. Remember to clean it after each use, store it properly, prevent rust, maintain the blade, and take care of the handle. Happy plastering!
| Cleaning Steps | Tools Needed |
|---|---|
| Remove excess plaster | Scraper or brush |
| Wipe with damp cloth | Damp cloth |
| Remove debris from handle | Brush |
| Apply oil or grease | Cloth |
| Inspect and replace blade | Replacement blade |
| Check handle for damage | Screwdriver or replacement parts |
Common Mistakes to Avoid When Using a Plaster Trowel
Using a plaster trowel can be a skill that takes time and practice to perfect. However, there are some common mistakes that beginners often make when using a plaster trowel. Avoiding these mistakes will help you achieve a smoother, more professional finish on your plastering projects.
| Mistake | Explanation | Solution |
|---|---|---|
| 1. Applying too much pressure | Pressing down too hard on the trowel can cause the plaster to be spread unevenly and result in a rough finish. | Use light to medium pressure when applying the plaster. Let the weight of the trowel do most of the work. |
| 2. Not keeping the trowel clean | If the trowel is not kept clean, dried plaster can build up and affect the smoothness of the finish. | Regularly wipe off excess plaster with a damp cloth. Clean the trowel thoroughly after each use. |
| 3. Using the wrong trowel size | Using a trowel that is too large or too small for the job can make it difficult to achieve a smooth finish. | Choose a trowel size appropriate for the area you are working on. A 12-inch trowel is a good choice for most plastering projects. |
| 4. Not applying enough plaster | If you don’t apply enough plaster, you may end up with a patchy or uneven finish. | Ensure that you apply a sufficient amount of plaster to cover the entire surface evenly. Add more plaster as needed. |
| 5. Not feathering out the edges | Leaving sharp edges on the plaster can create visible lines and make the finish look unprofessional. | After applying the plaster, use the edge of the trowel to feather out the edges, blending them into the surrounding surface. |
Avoiding these mistakes will help you achieve a smoother, more professional finish when using a plaster trowel. With practice and attention to detail, you can master the art of plastering and create beautiful, seamless surfaces.