When it comes to hanging shelves, pictures, or any other objects on your walls, finding the studs is essential for ensuring stability and safety. One tool that can help with this task is the Intersect Laser Level Stud Finder. This innovative device combines the functionality of a traditional stud finder with the accuracy of a laser level, making it easy to locate and mark studs with precision.
Step 1: Before using the Intersect Laser Level Stud Finder, make sure the device is fully charged or has fresh batteries. This will ensure that the laser level and stud finding features work properly.
Step 2: Turn on the Intersect Laser Level Stud Finder and allow it to calibrate. This usually takes a few seconds and is indicated by a series of beeps or a flashing light. Once the device is calibrated, it is ready to use.
Step 3: Hold the Intersect Laser Level Stud Finder against the wall where you want to locate a stud. Slowly move the device along the wall, allowing the laser level to project a straight line. The laser line will indicate the position of the stud.
Step 4: When the Intersect Laser Level Stud Finder detects a stud, it will emit a beep or a visual indicator, such as a flashing light. At this point, mark the position of the stud using a pencil or marker.
Step 5: Repeat the process to locate and mark additional studs as needed. The Intersect Laser Level Stud Finder can help you easily find multiple studs, providing you with a clear and accurate guide for hanging your objects securely.
Using the Intersect Laser Level Stud Finder can significantly simplify the process of finding and marking studs, making it an essential tool for any DIY enthusiast or professional. By following these simple steps, you’ll be able to hang your shelves, pictures, and other objects with confidence, knowing they are securely anchored to the studs in your wall.
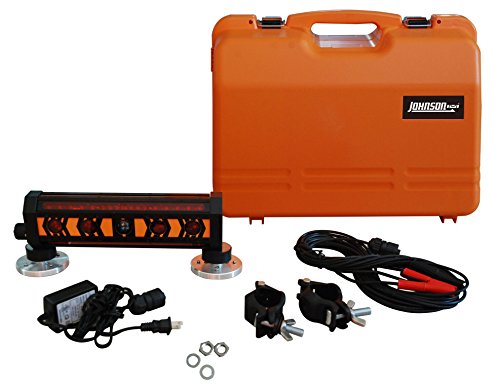
Overview of the Intersect Laser Level Stud Finder
The Intersect Laser Level Stud Finder is a versatile and reliable tool designed to help you locate studs in your walls with ease and precision. Whether you’re hanging shelves, installing a TV mount, or any other task that requires secure wall mounting, this stud finder is a vital tool for ensuring proper stability and safety.
Key Features
The Intersect Laser Level Stud Finder offers several key features that make it a must-have tool for any DIY enthusiast or professional contractor:
| 1. Laser Level | Equipped with a built-in laser level, this stud finder allows you to easily mark a straight line on your wall, ensuring accurate installation of shelves, artwork, or any other items that require a level surface. |
| 2. Stud Detection | Using advanced sensor technology, this stud finder can quickly and accurately locate the edges and center of studs within your wall, saving you time and effort compared to using traditional stud-finding methods. |
| 3. Deep Scanning | For thicker walls or when dealing with other obstacles, the deep scanning feature of this stud finder allows you to detect studs up to 1.5 inches deep, ensuring that you have a secure anchor point for your wall-mounted items. |
| 4. Live Wire Detection | With the added ability to detect live wires behind your walls, this stud finder provides an extra layer of safety and prevents accidents while you work. |
| 5. Easy-to-Read Display | The Intersect Laser Level Stud Finder features a clear and easy-to-read LCD display, providing you with accurate readings and ensuring that you can easily interpret the results. |
Conclusion
When it comes to accurately locating studs and ensuring precise installation of your wall-mounted items, the Intersect Laser Level Stud Finder is a tool you can rely on. With its range of features and user-friendly design, this stud finder will save you time and effort while providing peace of mind when it comes to the stability and safety of your walls.
Step-by-Step Guide on How to Use Intersect Laser Level Stud Finder
A stud finder is a useful tool for anyone who wants to hang heavy objects, install shelves, or mount a TV onto a wall. The Intersect Laser Level Stud Finder is a popular choice due to its accuracy and ease of use. Follow these simple steps to use the Intersect Laser Level Stud Finder effectively:
Step 1: Power on the device
Before using the Intersect Laser Level Stud Finder, make sure it is powered on. Press the power button located on the device to activate it.
Step 2: Position the stud finder
Hold the Intersect Laser Level Stud Finder against the wall or surface where you want to locate the stud. Make sure the device is level and firmly pressed against the wall.
Step 3: Start scanning
Press the scan button on the device to start the scanning process. Slowly move the stud finder along the wall in a horizontal or vertical direction. The device will emit a laser beam and make a beeping sound when it detects a stud.
Step 4: Mark the stud
When the Intersect Laser Level Stud Finder locates a stud, use a pencil or marker to mark the spot on the wall. This will help you remember the location of the stud for future reference.
Step 5: Repeat the process
If you are looking to locate multiple studs, repeat steps 2 to 4 until you have found all the desired studs. Make sure to scan the entire surface to ensure you don’t miss any studs.
Step 6: Turn off the device
After you have finished using the Intersect Laser Level Stud Finder, press the power button again to turn off the device. This will help preserve battery life and ensure the device is ready for future use.
By following these simple steps, you can effectively use the Intersect Laser Level Stud Finder to locate studs and make accurate measurements for your DIY projects. Remember to always double-check the location of the stud before drilling or installing any objects onto the wall.
Preparation for Using the Intersect Laser Level Stud Finder
Before you start using the Intersect Laser Level Stud Finder, there are a few important steps you need to take to ensure accurate and efficient measurements. By properly preparing for the task, you can save time and achieve more precise results.
1. Familiarize Yourself with the User Manual
Begin by reading the user manual that comes with your Intersect Laser Level Stud Finder. The manual will provide detailed instructions on how to operate the device, as well as important safety precautions to follow.
2. Fully Charge the Device
Ensure that the Intersect Laser Level Stud Finder is fully charged before you start using it. Connect the device to a power source and allow it to charge for the recommended amount of time according to the user manual.
3. Clear the Work Area
Clear the area where you will be using the Intersect Laser Level Stud Finder. Remove any obstacles, such as furniture or decorations, that could interfere with the accuracy of the measurements.
4. Gather the Required Accessories
Make sure you have all the necessary accessories and tools for using the Intersect Laser Level Stud Finder. This may include a tripod, batteries, or additional measurement devices depending on your specific needs.
5. Calibrate the Device
Calibrating the Intersect Laser Level Stud Finder is crucial for obtaining accurate measurements. Follow the instructions in the user manual to calibrate the device properly. Ensure that the device is level and aligned correctly before starting your measurements.
6. Test the Device on a Known Surface
Before using the Intersect Laser Level Stud Finder on the desired surface, it is advisable to test it on a known surface with known dimensions. This will allow you to verify the accuracy of the device and make any necessary adjustments if needed.
By following these preparation steps, you will be well-prepared to use the Intersect Laser Level Stud Finder effectively and achieve accurate measurements for your projects.
Locating the Studs with the Intersect Laser Level Stud Finder
When it comes to hanging heavy objects or installing shelves, it’s crucial to locate the studs in your walls. The Intersect Laser Level Stud Finder is a convenient tool that can help you easily find studs and ensure a secure installation. Here is a step-by-step guide on how to use the Intersect Laser Level Stud Finder to locate the studs in your walls.
- Prepare the Intersect Laser Level Stud Finder by installing the batteries. Make sure the device is properly functioning.
- Select the desired mode on the stud finder. You can choose between stud scan, metal scan, and AC scan.
- Hold the Intersect Laser Level Stud Finder against the wall where you want to locate the studs. Make sure to hold it level and flat against the surface.
- Press and hold the power button to turn on the stud finder.
- Slowly slide the Intersect Laser Level Stud Finder along the wall. The device will emit a beeping sound or light up when it detects a stud.
- Once you find a stud, mark the location using a pencil or tape. Repeat the process in different areas to locate multiple studs.
It’s important to note that the Intersect Laser Level Stud Finder can also detect electrical wires and metal objects. Make sure to be cautious when using the stud finder to avoid damaging any electrical wiring or causing injury.
With the Intersect Laser Level Stud Finder, locating studs in your walls becomes an effortless task. This handy tool ensures that your installations are secure and sturdy, providing peace of mind for all your home improvement projects.
Marking the Studs with the Intersect Laser Level Stud Finder
Once you have located the studs using the Intersect Laser Level Stud Finder, it’s time to mark them for reference. Marking the studs will ensure that you can easily find them later when you need to hang items on the wall.
Here is a step-by-step guide on how to accurately mark the studs using the Intersect Laser Level Stud Finder:
- Start by grabbing a pencil or a marker that contrasts with the color of your wall. This will make the marks more visible.
- Hold the Intersect Laser Level Stud Finder against the wall, ensuring that it is level. The laser should be pointing towards the wall.
- Once the laser is level, press the button on the stud finder to activate the laser. It will project a horizontal and vertical line onto the wall, intersecting at the center of the stud.
- Find the point where the laser intersects with the wall. This is where the center of the stud is located.
- Using the pencil or marker, make a small mark at the center point of the stud. You can also make additional marks on either side of the center to create a visual guide.
- Repeat the process for each stud you want to mark.
By marking the studs with the Intersect Laser Level Stud Finder, you can easily locate them in the future when you need to hang heavy items or install shelves on the wall. This will ensure that your wall remains in good condition, and your belongings are securely mounted.
Tips and Tricks for Using the Intersect Laser Level Stud Finder
Using the Intersect Laser Level Stud Finder can make finding studs in your walls much easier and more accurate. Here are some tips and tricks to help you get the most out of your stud finder and ensure accurate results:
| 1. Calibrate the Stud Finder |
|
Before starting your project, it’s important to calibrate the stud finder to ensure accurate readings. Follow the manufacturer’s instructions for calibrating your specific model. |
| 2. Start with an Empty Wall |
|
For the best results, start with an empty wall with no decorations or furniture. This will minimize interference and make it easier to detect studs. |
| 3. Move Slowly and Steadily |
|
When using the stud finder, move it slowly and steadily across the wall. This will give the tool enough time to detect the studs and provide accurate readings. |
| 4. Pay Attention to Signal Strength |
|
Most stud finders have a signal strength indicator that shows you when you’re getting closer to a stud. Pay attention to this indicator and adjust your position accordingly. |
| 5. Mark the Studs |
|
When you find a stud, mark its location directly on the wall with a pencil or tape. This will make it easier to locate the stud when you’re ready to hang or mount something. |
| 6. Double Check with Manual Methods |
|
While the Intersect Laser Level Stud Finder is a great tool, it’s always a good idea to double-check with manual methods like tapping the wall or using a traditional stud finder. This will ensure accuracy and provide extra confidence in your findings. |
| 7. Practice and Gain Experience |
|
The more you use the Intersect Laser Level Stud Finder, the better you’ll become at detecting studs accurately. Practice on different types of walls and gain experience to become a pro in no time. |
By following these tips and tricks, you’ll be able to use the Intersect Laser Level Stud Finder effectively and efficiently, making your wall mounting projects a breeze.