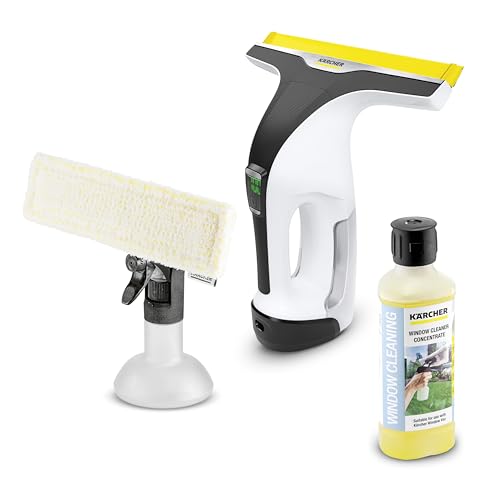


The Karcher Window Vac is a highly effective tool for cleaning windows, mirrors, and other glass surfaces. However, over time, the blades on the Window Vac can become worn or damaged, which can affect its performance. The good news is that replacing the blades on your Karcher Window Vac is a simple and straightforward process.
To replace the blades, you will need a few basic tools, including a Phillips screwdriver and a replacement set of blades. Start by removing the tank from the Window Vac and locating the blade release button. Press the button to release the old blades, then carefully slide them out of the slots.
Next, take the new blades and insert them into the slots, making sure they are securely in place. Once the new blades are in, press them down firmly to ensure a proper fit. Replace the tank and use the Phillips screwdriver to secure it back into place. Your Karcher Window Vac is now ready to use with its new blades.
It is recommended to replace the blades on your Karcher Window Vac every six to twelve months, depending on the frequency of use. Regularly replacing the blades will ensure that your Window Vac continues to deliver streak-free cleaning and optimal performance.
What is a Karcher Window Vac?
A Karcher Window Vac is a handheld appliance designed to make window cleaning quick and easy. It is a cordless device that uses vacuum suction to remove water and condensation from windows, leaving them streak-free and crystal clear.
Features of a Karcher Window Vac:
- Lightweight and ergonomic design for comfortable use
- Rechargeable battery for cordless operation
- Vacuum suction for efficient water removal
- Interchangeable blades for different window sizes and surfaces
- Water tank for collecting the extracted water
- Easy-to-empty tank for hassle-free maintenance
Benefits of Using a Karcher Window Vac:
- Saves time and effort compared to traditional window cleaning methods
- Leaves windows streak-free and crystal clear
- Can be used to clean windows, mirrors, and other smooth surfaces
- Reduces the need for excessive wiping and drying
- Perfect for cleaning condensation from bathroom windows and shower screens
Overall, a Karcher Window Vac is a versatile and convenient tool for achieving spotless windows with minimal effort. Whether for personal use or professional cleaning, it is a must-have appliance for anyone looking to simplify their window cleaning routine.
The Importance of Maintaining Blades
Proper maintenance of your Karcher Window Vac blades is crucial to ensure optimal and efficient performance. Over time, the blades can wear down or become damaged, which can affect the window vac’s ability to effectively clean your windows.
Regularly inspecting the blades and replacing them when necessary can help prolong the lifespan of your window vac and ensure that it continues to provide streak-free cleaning results.
When the blades become worn or damaged, they may not be able to effectively remove dirt, grime, and water from the window surface, resulting in streaks or unsatisfactory cleaning results. This can be frustrating and time-consuming, as you may need to go over the same area multiple times to achieve the desired cleaning effect.
By replacing the blades when needed, you can maintain the efficiency and effectiveness of your Karcher Window Vac. This will help you save time and effort in the long run by ensuring that you can achieve streak-free, sparkling-clean windows with each use.
In addition to replacing the blades, it’s also important to regularly clean and maintain them. This can be done by rinsing them under running water after each use to remove any debris or residue. You can also use a mild detergent if necessary.
Properly maintaining the blades will not only improve the performance of your window vac but also extend its overall lifespan. This means you can enjoy the convenience and effectiveness of your Karcher Window Vac for years to come.
Step-by-Step Guide
Replacing the blades on your Karcher Window Vac is a simple process that can be done in just a few steps. Follow this step-by-step guide to ensure a successful blade replacement:
|
Step 1: Make sure your Karcher Window Vac is turned off and unplugged. |
|
Step 2: Remove the dirty water tank from the Karcher Window Vac by pressing the release button. |
|
Step 3: Open the tank cover by sliding the latch on the front of the Karcher Window Vac. |
|
Step 4: Remove the used blades by gripping them firmly and pulling them out of the blade holder. |
|
Step 5: Carefully insert the new blades into the blade holder, making sure they are aligned properly. |
|
Step 6: Close the tank cover and make sure it is securely latched. |
|
Step 7: Reattach the dirty water tank to the Karcher Window Vac by aligning it with the vacuum and pushing it in until it clicks into place. |
|
Step 8: Your Karcher Window Vac is now ready to use with new blades. Test it out on a window or other smooth surface to make sure everything is working properly. |
Step 1: Safety Precautions
Before starting the process of replacing the Karcher Window Vac blades, it is important to take some safety precautions to ensure a safe and successful blade replacement. Follow these steps to ensure your safety:
|
|
By following these safety precautions, you can ensure a safe and successful replacement of the Karcher Window Vac blades.
Step 2: Removing the Old Blade
Before replacing the blades on your Karcher Window Vac, you’ll need to remove the old blade. Follow these steps to ensure a successful removal:
1. Turn off the Window Vac
Make sure that the Karcher Window Vac is turned off and unplugged from the power source. This will eliminate the risk of any accidents occurring during the blade removal process.
2. Open the Water Tank
Locate the water tank on your Karcher Window Vac. It is usually situated towards the bottom of the device. To open the water tank, lift up the latch or release button and pull the tank away from the main body of the Window Vac.
3. Remove the Dirty Water
Empty any remaining dirty water from the water tank into a sink or drain. This will prevent any spills or leaks during the blade removal process.
4. Access the Blade
Flip the Window Vac over so that the blade side is facing up. Look for the blade assembly, which is usually located towards the front or middle of the device. The blade assembly consists of the rubber blade and the plastic housing.
5. Detach the Blade Assembly
Using your fingers or a small tool, gently pull or pry away the blade assembly from the main body of the Window Vac. Be careful not to apply too much force, as this may damage the blade or the housing.
6. Remove the Old Blade
Once the blade assembly is detached, you can easily remove the old blade from the plastic housing. Slide the blade out of the housing, taking note of its orientation – how it is positioned within the housing.
It is recommended to wear gloves during this step to protect your hands from any sharp edges or debris.
Congratulations! You have successfully removed the old blade from your Karcher Window Vac. Now you’re ready to proceed with installing the new blade in the next step.
Step 3: Installing the New Blade
Once you have safely removed the old blade from your Karcher Window Vac, you can proceed to install the new blade. Follow these steps:
- Take the new blade out of its packaging and ensure that it is clean and free from any dust or debris.
- Align the new blade with the blade slot on the front of the Window Vac. Make sure that the rubber edges of the blade are facing towards the suction nozzle.
- Insert the new blade into the slot and push it firmly until it clicks into place. You should feel a slight resistance when pushing the blade in.
- Once the blade is securely in place, double-check that it is aligned correctly and there are no gaps between the blade and the window surface. A properly installed blade should sit flush against the window.
- Before using your Karcher Window Vac, turn it on briefly to make sure that the new blade is working properly and there are no issues with its installation.
Remember to dispose of the old blade properly and safely. You can either place it in a sealable plastic bag or wrap it in a piece of newspaper before throwing it away.
Tips and Tricks
Replacing the blades on your Karcher Window Vac is a relatively simple task, but there are a few tips and tricks to keep in mind to ensure a smooth and successful replacement process:
1. Read the instructions
Before you begin, it’s always a good idea to read the instructions that come with your Karcher Window Vac. This will give you a clear understanding of the steps involved in replacing the blades and any specific recommendations from the manufacturer.
2. Use the correct replacement blades
Make sure you purchase the correct replacement blades for your specific model of Karcher Window Vac. Using the wrong blades can result in poor performance or damage to your device.
3. Clean the blades before replacing
Before removing the old blades, it’s a good idea to clean them thoroughly. Use a soft cloth or sponge and some warm, soapy water to remove any dirt, debris, or residue that may have accumulated during use. This will help ensure the new blades provide optimal cleaning performance.
4. Replace one blade at a time
When replacing the blades, it’s best to work on one blade at a time. This will help ensure that you don’t mix up the order or positioning of the blades. Take note of the orientation of the old blade as you remove it, and then position the new blade in the same way.
Note: If your Karcher Window Vac has three blades, replace the middle blade first and then the outer blades.
5. Apply gentle pressure
When inserting the new blades, apply gentle pressure to ensure they are securely in place. Avoid using excessive force, as this can cause damage to the blades or the device itself.
6. Test the new blades
After replacing the blades, it’s a good idea to test your Karcher Window Vac to ensure the new blades are working properly. Clean a small window or glass surface and check for streaks or uneven cleaning. If there are any issues, double-check the positioning and installation of the blades.
Following these tips and tricks will help you successfully replace the blades on your Karcher Window Vac, ensuring optimal performance and longevity of your device.


