
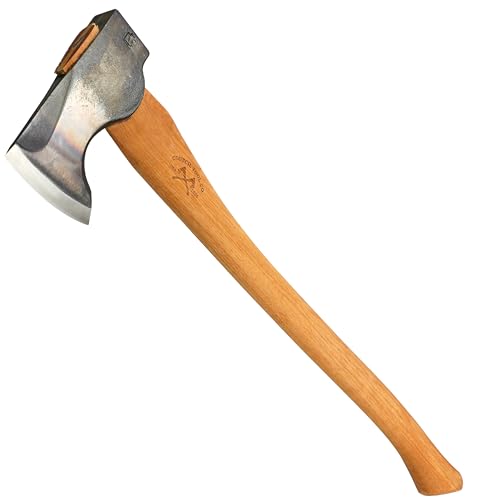


If you find yourself in the great outdoors, a wooden axe can be an essential tool for survival. Whether you’re camping, hiking, or simply need to chop firewood, knowing how to craft a wooden axe can come in handy. With just a few simple steps and some basic materials, you’ll be able to create your own axe that is both functional and durable.
Step 1: Gather the necessary materials.
Before you can begin crafting your axe, you’ll need to gather a few key materials. First and foremost, you’ll need a high-quality wooden handle. Look for a sturdy piece of wood that is comfortable to grip and has a straight grain. Additionally, you’ll need a strong and sharp metal blade that can be securely attached to the handle. Finally, you’ll need some strong cord or twine to bind the blade to the handle.
Step 2: Shape the wooden handle.
Using a saw or a hatchet, carefully shape the wooden handle to your desired length and thickness. Keep in mind that the handle should be long enough to provide leverage when chopping and thick enough to absorb the force of the blows. Smooth out any rough edges and ensure that the handle feels comfortable in your hand.

Step 3: Attach the metal blade.
Next, take your metal blade and carefully attach it to the wooden handle. You can do this by drilling holes into the blade and handle and then securing them together with screws or nails. Alternatively, you can use a strong adhesive to bond the blade and handle together. Ensure that the blade is securely attached and won’t come loose during use.
Step 4: Bind the blade to the handle.
To further secure the blade to the handle and add extra stability, use strong cord or twine to tightly bind the two together. Start by wrapping the cord around the top of the handle near the blade, then work your way down, making sure to wrap tightly and evenly. Once you reach the bottom of the handle, tie a secure knot to hold the cord in place.
Step 5: Test and refine your wooden axe.
Now that your wooden axe is complete, it’s time to test it out. Take it for a swing and see how it feels in your hands. If the axe feels unbalanced or the blade is wobbly, you may need to make some adjustments. Tighten any screws or nails, and reinforce the binding with additional cord if necessary.
Remember, crafting a wooden axe takes time and practice to perfect. With each axe you make, you’ll gain valuable experience and learn what works best for you. So don’t be discouraged if your first attempt isn’t perfect. Keep refining your skills, and soon you’ll have a trusty wooden axe that will serve you well in all your outdoor adventures.
Disclaimer: Crafting a wooden axe requires proper safety precautions. Always wear protective gear, such as gloves and goggles, and exercise caution when handling sharp tools. If you’re unsure about any step of the process, seek assistance from a knowledgeable individual.
What you need
To craft a wooden axe, you will need the following materials:
1. Wood
You will need to have some wood to create the handle of the axe. The type of wood you choose will affect the durability and efficiency of the axe.
Tip: Oak wood is a common choice for crafting wooden axes.
2. Stone or wooden plank
To create the axe head, you will need either a stone or a wooden plank. The choice of material will also affect the strength and efficiency of the axe.
Tip: If you have access to stone, it is recommended to use it as it will increase the durability of the axe.
3. Crafting table
In order to craft the wooden axe, you will need access to a crafting table. This is where you will combine the materials to create the axe.
Tip: If you don’t have a crafting table, you can easily create one using four wooden planks.
Make sure you have all these materials ready before starting to craft your wooden axe.
Choosing the right wood
When it comes to crafting a wooden axe, choosing the right type of wood is crucial. The type of wood you choose will determine the durability and effectiveness of your axe. Here are some considerations to keep in mind when selecting the wood for your project:
1. Hardwood versus softwood
Hardwood like oak or maple is ideal for crafting a sturdy and long-lasting wooden axe. It is dense and can withstand the repeated impact of chopping. Softwood like pine or cedar, on the other hand, may be easier to work with but lacks the durability required for a reliable axe.
2. Grain orientation
The grain orientation of the wood is also important. Straight-grained wood is preferable for making an axe handle as it provides strength and stability. Avoid using wood with knots or irregular grain patterns as they can weaken the handle and make it more prone to breaking.
By selecting the right wood for your wooden axe, you can ensure that you have a tool that is not only functional but also durable. Take the time to choose the appropriate wood type and grain orientation to maximize the performance and lifespan of your handmade axe.
Building the handle
To craft a wooden axe, you will need to start by building the handle. The handle, also known as the shaft, is the main part of the axe that is used for gripping and swinging.
Here are the steps to build a sturdy and functional handle for your wooden axe:
- Select a suitable type of wood for the handle. Hardwoods like hickory or ash are commonly used due to their strength and durability.
- Begin by cutting a piece of wood that is approximately 30 inches long. This length can vary depending on your preference and the desired size of your axe.
- Use a saw to shape one end of the wood into a tapered point. This tapered end will serve as the striking end of the axe.
- Smooth out any rough edges or splinters on the handle using sandpaper. This will ensure a comfortable grip and prevent any potential injuries.
- Next, mark a spot on the handle that is 6-8 inches away from the striking end. This will be the location where the axe head will be attached.
- Drill a hole into the marked spot on the handle. Make sure the hole is wide enough to securely fit the axe head.
- Apply wood glue inside the hole and then insert the axe head into the hole. Allow the glue to dry completely according to the manufacturer’s instructions.
- Once the glue has dried, secure the axe head to the handle using wooden or metal wedges. Make sure the axe head is tightly attached to the handle to prevent any accidents during use.
- Finally, give the handle a final sanding to achieve a smooth finish. You can also apply a coat of varnish or wood oil to protect the wood from moisture and prolong its lifespan.
By following these steps, you can successfully build a strong and reliable handle for your wooden axe. Remember to take necessary safety precautions while working with tools and always wear protective gear.
Creating the Blade
To craft a wooden axe, you will first need to create the blade. The blade is the most important part of the axe and it is what you will use to cut through wood and other materials.
Gather your Materials
Before you can begin creating the blade, you will need to gather your materials. For this project, you will need a piece of strong and durable wood, such as oak or birch, that is about 2 feet long and 4 inches wide.
Shaping the Blade
Once you have your piece of wood, you will need to shape it into the desired shape of the blade. Start by using a saw to cut off one end of the wood at a diagonal angle. This will create the sharp pointed end of the blade. Next, use a chisel to carefully shave away the excess wood and shape the blade into a thin, flat shape. Be sure to smooth out any rough edges or bumps.
After shaping the blade, you can use sandpaper to further smooth and refine the surface. Start with a coarse grit sandpaper and gradually work your way up to a fine grit for a polished finish.
Finally, make sure to inspect the blade for any defects or imperfections. If you notice any cracks or weak spots, it is best to start over with a new piece of wood to ensure the blade is sturdy and durable.
Once you have completed shaping and refining the blade, you are ready to move on to the next step in crafting your wooden axe.
Finishing touches
Once you have assembled your wooden axe, there are a few finishing touches you can add to enhance its durability and aesthetics.

1. Sanding
Start by sanding the wooden components of the axe to smooth out any rough edges or imperfections. This not only improves the look and feel of the axe but also prevents any potential splinters while using it.
2. Staining or painting
If you want to add some color or protect the wood from moisture and damage, you can apply a wood stain or paint to the surface of the axe. This will not only enhance its appearance but also provide an added layer of protection.
Make sure to choose a stain or paint that is suitable for outdoor use and can withstand the wear and tear of chopping wood.
Allow the stain or paint to dry completely before moving on to the next step.
By following these finishing touches, you can ensure that your wooden axe is not only functional but also visually appealing and long-lasting.


