

If you own a Karcher Window Vac WV2, you know how helpful it can be in keeping your windows clean and streak-free. However, knowing how to properly empty the vacuum’s dirty water tank is essential to ensure its optimal performance. In this article, we will guide you step-by-step on how to empty your Karcher Window Vac WV2 and maintain its efficiency for a long-lasting use.
Step 1: Firstly, make sure that your Karcher Window Vac WV2 is switched off. This is important to avoid any accidents or damage during the emptying process. Remember, safety always comes first!
Step 2: Locate the dirty water tank, which is positioned at the back of the device. You can easily identify it by its transparent design and the “dirty water” label. The transparency allows you to monitor the water level and know when it’s time to empty the tank.
Step 3: Once you have located the dirty water tank, gently remove it from the Karcher Window Vac WV2. To do this, hold the tank’s handle firmly and pull it upward, away from the device. Be cautious not to spill the dirty water while removing the tank.
Step 4: Find a suitable drainage area to empty the dirty water from the tank. It’s recommended to pour the water down a sink or drain, as it may contain dirt, dust, and other debris collected from the windows. If necessary, use a sieve or a cloth to filter the water and prevent any potential clogging.
Step 5: After emptying the dirty water, rinse the tank thoroughly with clean water. This will help remove any remaining dirt or residue and maintain the hygiene of your Karcher Window Vac WV2.
Step 6: Finally, dry the tank before reattaching it to your Karcher Window Vac WV2. Make sure it is firmly secured in place to prevent any leaks or spills during use.
Following these simple steps will ensure that your Karcher Window Vac WV2 remains in top-notch condition and continues to provide excellent window cleaning results. Remember to regularly check the water level and empty the tank when necessary for optimal performance.

Disclaimer: Always refer to the manufacturer’s instructions and guidelines for specific details related to your Karcher Window Vac WV2 model.
Understanding the Karcher Window Vac WV2
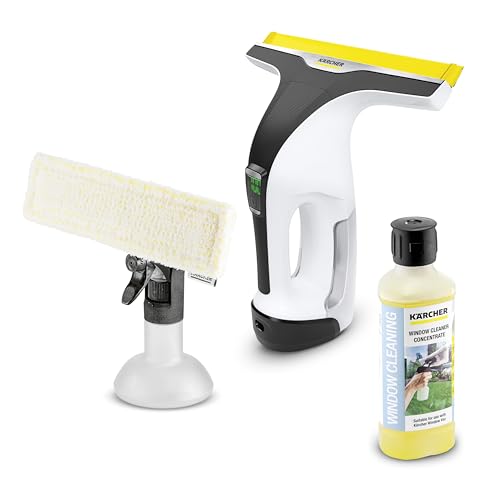
The Karcher Window Vac WV2 is a convenient and efficient tool for cleaning windows and other smooth surfaces. It utilizes a powerful suction technology that effectively removes dirt, residue, and water, leaving surfaces streak-free and spotless.
One of the key features of the Karcher Window Vac WV2 is its lightweight and easy-to-use design. It has a compact size which makes it easy to maneuver and carry around. The vacuum also comes with a rechargeable battery that provides a long-lasting cleaning performance.
To empty the Karcher Window Vac WV2, follow these simple steps:
- First, ensure that the vacuum is turned off and unplugged from the power source.
- Next, locate the dirty water tank on the back of the vac. It can be easily removed by pressing the release button or lever.
- Once the tank is removed, carefully empty the contents into a sink or toilet.
- Rinse the tank with clean water to remove any remaining residue.
- After rinsing, reattach the tank securely back onto the vac.
It is important to regularly empty and clean the dirty water tank to maintain the performance of the Karcher Window Vac WV2. Failure to do so may result in reduced suction power and less effective cleaning.
In addition to emptying the dirty water tank, it is recommended to clean the vacuum’s suction nozzle after each use. This can be done by gently removing any debris or dirt that may have accumulated on the nozzle.
Overall, the Karcher Window Vac WV2 is a reliable and user-friendly cleaning tool that can greatly simplify the task of window cleaning. By understanding how to properly empty and maintain the vacuum, you can ensure its longevity and optimal performance.
Why Emptying the Karcher Window Vac WV2 is Important
Regularly emptying the Karcher Window Vac WV2 is crucial for maintaining its performance and prolonging its lifespan. Here are a few reasons why emptying this device is so important:
- Optimal Suction Power: When the collection tank of the Window Vac WV2 is full, its suction power can be compromised. This can result in streaks or water residue on your windows, hindering the effectiveness of the device. By emptying the tank regularly, you ensure that the vacuum maintains its maximum suction power for streak-free and spotless windows.
- Preventing Damage: Sludge, dirt, and debris can accumulate in the collection tank over time. If left unemptied, these particles can clog the vacuum system, leading to reduced performance and potentially causing damage to the motor. Regularly emptying the tank prevents the buildup of harmful substances and ensures the Window Vac WV2 operates smoothly and efficiently.
- Hygiene and Maintenance: Keeping the collection tank empty helps maintain hygiene and cleanliness. Water trapped in the tank can become a breeding ground for bacteria and mold, which can lead to unpleasant odors. By emptying the tank after each use and properly cleaning it, you ensure that your Karcher Window Vac WV2 remains in top condition and reduces the risk of bacterial growth.
- Longevity: Emptying the Karcher Window Vac WV2 regularly is a simple yet effective way to extend its lifespan. By preventing the accumulation of dirt and debris, allowing for proper airflow, and reducing strain on the motor, you can ensure that your Window Vac WV2 lasts longer, providing you with reliable and efficient window cleaning for years to come.
Overall, emptying the Karcher Window Vac WV2 is an essential maintenance task that should not be overlooked. By performing this simple step regularly, you can enjoy optimal performance, prevent damage, maintain hygiene, and prolong the life of your Window Vac WV2.
Step-by-Step Guide
- Make sure the Karcher Window Vac WV2 is turned off and unplugged from the power source.
- Remove the dirty water tank from the Window Vac by pressing the button at the top of the handle and pulling it upwards.
- Take the dirty water tank to a sink or other suitable area for emptying.
- Remove the rubber plug from the top of the dirty water tank by pulling it out.
- Pour the contents of the dirty water tank into the sink or suitable area.
- Rinse out the dirty water tank with clean water to remove any remaining debris.
- Replace the rubber plug on the top of the dirty water tank by pushing it back in.
- Reattach the clean and empty dirty water tank to the Window Vac by sliding it back onto the handle until it clicks into place.
- Ensure that the dirty water tank is secure before turning on the Window Vac again.
Following these steps will allow you to effectively and safely empty the Karcher Window Vac WV2.
Step 1: Prepare the necessary tools
In order to empty your Karcher Window Vac WV2, you will need the following tools:
- A Karcher Window Vac WV2 (with a full dirty water tank)
- A sink or bucket to empty the dirty water into
- A cloth or towel to clean up any spills
Make sure that you have these tools ready before you begin the emptying process.
Step 2: Turn off and unplug the Karcher Window Vac WV2
Before emptying the Karcher Window Vac WV2, it is important to turn off the device and unplug it from the power source. This ensures your safety and prevents any electrical accidents.
To turn off the Karcher Window Vac WV2, locate the power switch on the device. The switch is usually located on the handle of the window vacuum. Simply slide the switch to the “off” position to turn off the device.
Once the Karcher Window Vac WV2 is turned off, unplug the power cord from the electrical outlet. This will fully disconnect the device from the power source. It is essential to unplug the device to prevent any accidental powering on while emptying the vacuum or performing maintenance.
Double-check that the power switch is in the “off” position and the device is unplugged before proceeding to the next steps of emptying the Karcher Window Vac WV2.
Step 3: Remove the dirty water container
After you have switched off and unplugged your Karcher Window Vac WV2, it is time to remove the dirty water container. This container holds the water that has been suctioned up from your windows, and it needs to be emptied regularly to maintain optimal performance.
To remove the dirty water container, follow these steps:
- Locate the dirty water container at the front of the vacuum.
- Press the release button or latch located on the container.
- Slide the container out of the vacuum.
Make sure to hold the container over a sink or bucket to avoid spilling any dirty water. The container may be full, so handle it with care and avoid tipping it over.
Once the container is removed, you can either empty the dirty water down the sink or dispose of it in a suitable drainage area.
With the dirty water container emptied, you are now ready to continue using your Karcher Window Vac WV2 for streak-free window cleaning.
Step 4: Empty the dirty water container
Once the vacuuming process is complete, it is crucial to empty the dirty water container to maintain the performance and efficiency of your Karcher Window Vac WV2.
To empty the dirty water container, follow these steps:
-
Switch off the device
Before emptying the dirty water container, ensure that the Karcher Window Vac WV2 is switched off and unplugged from the power source. This will prevent any potential accidents while handling the device.
-
Remove the dirty water container
Gently press the button or latch located on the top or side of the Karcher Window Vac WV2 to release and remove the dirty water container. Take care not to spill any dirty water during this process.
-
Dispose of the dirty water
Find a suitable drain or sink to dispose of the dirty water. Slowly pour the contents of the dirty water container into the drain or sink while being cautious to avoid splashing or spilling.
-
Clean the dirty water container
Once the dirty water has been emptied, it is essential to clean the container thoroughly. Use warm water and mild detergent to wash the container. Rinse it well to ensure no soap residue remains.
Trending Now Versatile Cordless Window Vacuum SqueegeeStrong suction, detachable water tankThis cordless window vacuum provides powerful suction for effortless cleaning of smooth surfaces, featuring a long-lasting battery and a lightweight design for user comfort. -
Allow the container to dry
After washing, leave the dirty water container to air dry completely before reattaching it to the Karcher Window Vac WV2. This will prevent any moisture or mold buildup that could affect its performance.
By regularly emptying and cleaning the dirty water container, you can ensure that your Karcher Window Vac WV2 continues to provide optimal cleaning results each time you use it.
Step 5: Clean the dirty water container
After emptying the dirty water from the Karcher Window Vac WV2, it is important to clean the dirty water container to prevent any build-up or residue.
To clean the dirty water container, follow these steps:
- Remove the dirty water container from the Window Vac by pressing the release button located on the top.
- Open the lid of the dirty water container by twisting it counterclockwise.
- Empty any remaining water and debris from the container into a sink or drain.
- Rinse the container thoroughly with warm water to remove any remaining dirt or grime.
- Optional: If the container is particularly dirty, you can also use a mild detergent or disinfectant to clean it.
- Dry the container completely before reattaching it to the Window Vac.
| Note: | Make sure the container is completely dry before using it again to avoid any potential damage or malfunction of the Window Vac. |
By regularly cleaning the dirty water container of your Karcher Window Vac WV2, you can ensure its optimal performance and extend its lifespan.