

Throwing axes has become a popular sport and hobby for many outdoor enthusiasts. Whether you’re a beginner or an experienced axe thrower, having a well-sharpened hand axe is essential for accuracy and precision in your throws. In this article, we will guide you through the process of sharpening a hand axe specifically for throwing, so you can improve your skills and hit your target with ease.
Step 1: Choose the Right Tools
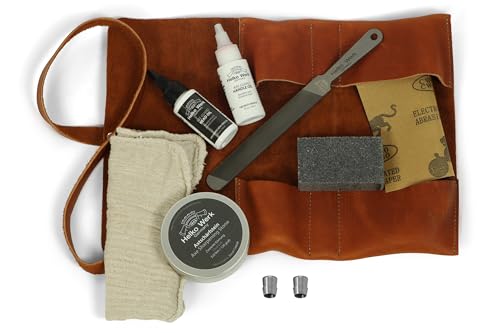
Before you begin sharpening your hand axe, it’s important to gather the necessary tools:
1. Sharpening Stone: Look for a sharpening stone that is designed for sharpening axes. It should have a coarse side and a fine side.
2. Axe File: An axe file will help you remove any burrs or nicks from the blade.
3. Honing Oil: Honing oil will lubricate the sharpening stone and prevent the axe from overheating.
By having these tools ready, you’ll be well-prepared and equipped to sharpen your hand axe effectively.
Why Is It Important
Sharpening a hand axe is an essential skill for those who enjoy throwing axes. A sharp axe head not only improves your accuracy but also ensures the safety of both yourself and others around you.
When a hand axe is properly sharpened, it will have a keen edge that bites into the target upon impact. This allows for a clean stick and prevents the axe from bouncing off the target, which could potentially cause injuries.
Sharp axes are also more predictable in flight. A dull axe, on the other hand, may veer off course or fail to penetrate the target properly. This can be frustrating and potentially dangerous, especially when throwing axes in a controlled environment.
Additionally, regularly sharpening your hand axe helps maintain the overall integrity of the tool. Dull edges can lead to chips and nicks in the axe head, which can weaken its structure over time. By keeping the edge sharp, you extend the longevity of your axe and ensure that it performs at its best.
In conclusion, sharpening a hand axe is vital for anyone who enjoys throwing axes. It improves accuracy, enhances safety, ensures predictability in flight, and maintains the overall quality of the tool. By taking the time to sharpen your axe, you’ll be able to achieve better throwing results and prolong the lifespan of your axe.
To Keep Your Hand Axe Sharp
Maintaining a sharp axe is crucial for its performance and longevity. Here are a few tips to help you keep your hand axe sharp:
1. Regular Sharpening
Regular sharpening is essential to maintain the sharpness of your hand axe. Use a sharpening stone or file to remove any nicks or burrs on the blade. Start by wetting the stone and then hold the axe at a 10 to 15-degree angle. Move the blade back and forth across the stone, applying even pressure to both sides. Repeat this process until you achieve a sharp edge.
2. Storing Properly
Proper storage of your hand axe is important to prevent dulling or damage. Keep it in a sheath or cover to protect the blade from moisture and other elements that can cause corrosion. Hang it on a wall or store it in a dry place away from other tools to avoid accidental contact that can dull the blade.
3. Avoid Hard Surfaces
Avoid using your hand axe on hard surfaces like rocks or metal, as they can quickly dull the blade. Instead, use it on softer targets like wood or tree stumps. If you accidentally hit a hard surface, inspect the blade for any damages or dullness and sharpen it if necessary.
4. Proper Handling
Handle your hand axe with care to prevent unnecessary wear and tear. Avoid striking the ground or other hard objects with the axe as this can damage the blade. Additionally, make sure to use the correct technique when throwing the axe to prevent it from hitting the ground or other surfaces that can cause damage or dulling.
5. Regular Maintenance
Performing regular maintenance on your hand axe will help keep it sharp and in good condition. Check the blade for any signs of wear or damage, such as chips or cracks, and address them promptly. Lubricate any moving parts, such as the axe head or handle, with a suitable oil to prevent rusting and ensure smooth operation.
By following these tips, you can ensure that your hand axe stays sharp and ready for throwing. Remember to always prioritize safety and use caution when handling and sharpening your axe.
| Hand Axe Maintenance Checklist |
|---|
| Regularly sharpen the blade |
| Store in a sheath or cover |
| Avoid hard surfaces |
| Handle with care |
| Perform regular maintenance |
Tools You Will Need
Before you begin sharpening your hand axe for throwing, make sure you gather the following tools:
Axe Vice
An axe vice is a tool that will securely hold your hand axe in place while you work on sharpening it. This is an essential tool to have as it will prevent the axe from moving or slipping as you apply pressure to the blade.
Sharpening Stone or File
To sharpen your hand axe, you will need a sharpening stone or file. This tool will help you remove any nicks or burrs on the blade, resulting in a sharp and clean cutting edge. Choose a sharpening stone or file that is appropriate for the size and type of hand axe you have.
Gloves
Wearing gloves is recommended as it will protect your hands from any potential injuries while sharpening the hand axe. Choose gloves that offer good grip and are made from durable materials.
Safety Glasses
Because sharpening a hand axe involves metal particles and sparks, it is important to wear safety glasses to protect your eyes from any potential hazards. Opt for safety glasses that provide both side and front protection.
Having these tools on hand will ensure that you can sharpen your hand axe safely and effectively. Now that you have gathered everything you need, let’s move on to the next step: preparing the axe for sharpening.
Sharpening a Hand Axe
Sharpening a hand axe is essential for ensuring optimal performance and accuracy when throwing. Here are some steps to help you sharpen your hand axe:
Step 1: Gather the necessary materials
Before you begin sharpening your hand axe, gather the following materials:
- Sharpening stone or file
- Water or honing oil
- Towel or rag
- Safety goggles and gloves
Step 2: Clean the axe
Start by cleaning your hand axe to remove any dirt, debris, or rust. Use a towel or rag to wipe the axe clean.
Step 3: Position the axe on the sharpening surface
Place your hand axe on a sturdy surface, such as a workbench or table, with the blade facing upwards.
Step 4: Grind the edge
Using a sharpening stone or file, carefully grind the edge of the axe blade. Work in one direction, maintaining a consistent angle and applying light pressure.
Step 5: Preserve the angle
As you sharpen, it is important to preserve the original angle of the axe blade. This will ensure the axe maintains its balance and throwing accuracy.
Step 6: Apply water or honing oil
To prevent the axe blade from overheating during sharpening, apply water or honing oil to the surface. This will also assist in removing any metal shavings or residue.
Step 7: Test the sharpness
Test the sharpness of your hand axe by gently running your finger along the edge. Be cautious to avoid any accidental injury. The blade should feel sharp and smooth.
Following these steps will help you sharpen your hand axe effectively and improve your throwing accuracy. Remember to always prioritize safety and use caution when handling sharp tools.
Step by Step Guide
Sharpening a hand axe for throwing requires precision and attention to detail. Follow these steps to ensure your hand axe is ready for optimal throwing performance:
Step 1: Gather Materials
Start by gathering the necessary materials. You will need a hand axe, a sharpening stone, a file, and safety goggles. Ensure you have a flat and stable surface to work on.
Step 2: Prepare the Hand Axe
Put on your safety goggles to protect your eyes from any flying debris. Lay the hand axe on the flat surface with the blade facing upwards. Check the blade for any existing nicks or damage.
Step 3: Remove Nicks and Damage
If you spot any nicks or damage on the blade, use a file to carefully remove them. Hold the file at a 20-degree angle and use smooth, even strokes along the edge of the blade. Be patient and take your time to ensure proper sharpening.
Step 4: Begin Sharpening
Hold the sharpening stone firmly in one hand and place it against the blade at a 20-degree angle. With the other hand, grip the handle of the hand axe and apply gentle pressure as you move the stone along the blade from the base to the tip. Repeat this motion several times on each side of the blade.
Step 5: Test and Adjust
After sharpening, carefully test the blade by throwing the hand axe at a safe target. Pay attention to how it sticks or if it wobbles in mid-air. If necessary, make further adjustments by repeating steps 3 and 4 to achieve the desired throwing performance.
Step 6: Maintain and Store
To keep your hand axe in optimal condition, regularly inspect and sharpen the blade as needed. Store it in a dry and secure place when not in use to prevent rusting or damage.
By following these steps, you can ensure that your hand axe is sharpened and ready for throwing. Remember to always prioritize safety when handling any sharp tools.
Sharpening Your Hand Axe
Sharpening a hand axe is a crucial step to improve its throwing accuracy and power. By sharpening the blade, you ensure that it makes clean cuts and penetrates the target easily. Here are some tips to help you sharpen your hand axe effectively.
1. Gather the necessary tools
Before you start sharpening your hand axe, make sure you have the right tools for the job. You will need a file, preferably a mill bastard file, and a sharpening stone. Additionally, it would be helpful to have a vice to hold the axe securely during sharpening.
2. Secure the axe
Place the axe head in a vice, making sure it is secure and won’t move while you sharpen it. This will allow you to have both hands free and apply consistent pressure during the sharpening process.
3. Assess the edge
Take a close look at the edge of your hand axe to determine its condition. Look for any nicks, chips, or dull spots that may affect its performance. You may need to remove these imperfections before starting the sharpening process.
4. Start filing
Using your file, begin sharpening the blade by moving it along the edge at a 20-degree angle. Apply even pressure and make consistent strokes in one direction only. Be sure to maintain the same angle throughout the sharpening process.
5. Switch to a sharpening stone
Once you are satisfied with the filing, switch to a sharpening stone to hone the blade further. Wet the stone with water or oil, and move it in circular motions along the edge of the axe blade. This will remove any burrs left by the filing process and refine the edge.
6. Test the sharpness
After sharpening, carefully remove the axe from the vice, and test its sharpness on a piece of wood or another suitable material. If it cuts cleanly and effortlessly, then you have successfully sharpened your hand axe.
Regularly sharpening your hand axe will ensure its longevity and maintain its throwing efficiency. Remember to take the necessary safety precautions and maintain a steady hand while sharpening. Happy throwing!


