
When it comes to hiking in icy and snowy conditions, having an ice axe can be a lifesaver. It provides extra stability and security when traversing steep slopes and icy terrains. One popular backpack among hikers is the OMM Classic, known for its functionality and durability. In this article, we will guide you on how to properly attach an ice axe to your OMM Classic backpack.
Step 1: Choose the correct attachment points
Before attaching the ice axe to your backpack, make sure to identify the correct attachment points. Most OMM Classic backpacks have dedicated loops or straps specifically designed to hold ice axes. These attachment points are usually located on the sides or the front of the backpack. It’s important to use the designated attachment points to ensure a secure and balanced fit.
Step 2: Loop the ice axe through the attachment point
To attach the ice axe to your OMM Classic backpack, start by looping the shaft of the axe through the designated attachment point. The attachment point should be large enough to accommodate the shaft of the axe. Make sure the axe is facing downward, with the spike pointing towards the ground. This will help prevent any accidental injuries or damages to yourself or others.
Step 3: Secure the ice axe
Once you have looped the ice axe through the attachment point, it’s time to secure it. Many OMM Classic backpacks have adjustable straps or buckles near the attachment points. Use these straps to tighten and secure the ice axe in place. Make sure the axe is snug and doesn’t sway or move around during your hike. This will ensure a safe and comfortable hiking experience.
Remember, attaching an ice axe to your OMM Classic backpack requires proper knowledge and understanding of the equipment. Always consult the manufacturer’s instructions and guidelines to ensure a secure fit. Additionally, it’s important to practice using the ice axe in a controlled environment before venturing out into more challenging terrains.
What is an ice axe?
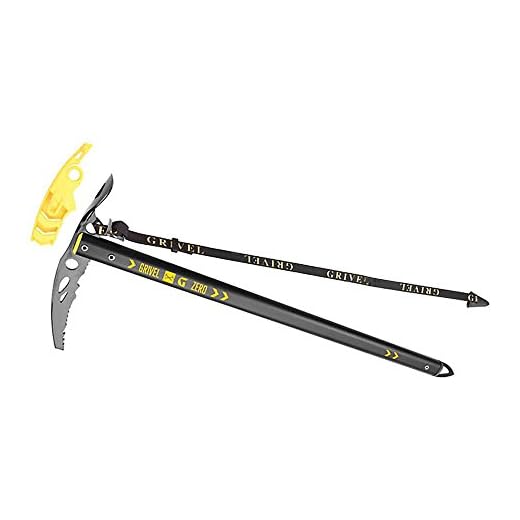
An ice axe is a specialized tool used in mountaineering and climbing to provide stability and aid in navigating snowy and icy terrain. It typically consists of a long metal shaft with a spike at one end and a pick at the other. The spike is used for stability, while the pick is used for self-arrest techniques, such as stopping a fall on steep slopes.
Ice axes are designed to be held with one hand while the other hand is free to hold onto other equipment or the mountain surface. They feature a curved shaft to provide a secure grip and prevent slippage. The length of the ice axe depends on the user’s height and the type of terrain they will be traversing.
Components of an ice axe:
Pick: The pick is the pointed end of the ice axe that is used to dig into the ice or hard snow. It is typically curved and sharp to provide a secure grip and ice penetration.
Adze: The adze is a flat, wide blade located just below the pick. It is used for chopping steps or clearing away loose snow and ice.
Spike: The spike is the pointed end of the ice axe opposite the pick. It is used for stability and can also be used as a makeshift anchor in certain situations.
Shaft: The shaft is the long metal tube that connects the pick and the spike. It provides structure and a grip for the user.
Leash: Many ice axes feature a leash that attaches the axe to the user’s wrist. This prevents the axe from being dropped and lost in the event of a fall.
Overall, the ice axe is an essential tool for mountaineers and climbers, providing them with stability and safety in challenging and icy conditions.
Why do you need to attach an ice axe to an OMM Classic?
When venturing into mountainous or icy terrains, having an ice axe attached to your OMM Classic backpack is essential for safety and stability. The ice axe serves as a critical tool for both climbing and self-arresting while traversing steep slopes or slippery surfaces.
Here are a few reasons why you need to attach an ice axe to an OMM Classic:
- Enhanced safety: An ice axe provides an extra point of contact with the mountain or glacier surface, improving stability and preventing slips or falls. It can be used as an anchoring tool to prevent yourself from sliding down steep slopes.
- Self-arresting: In the event of a fall, an ice axe can be used for self-arresting, which involves using the spike of the axe to dig into the snow or ice to stop or slow down your descent. This skill is crucial for preventing potentially serious accidents and injuries.
- Climbing aid: When tackling steeper or more technical sections of a climb, an ice axe can be used as a tool for climbing and making secure placements in the ice or snow. It provides crucial support and stability, especially when ascending or traversing icy slopes or couloirs.
- Emergency situations: Having an ice axe readily accessible on your backpack allows for quick access in case of emergencies. It can be used for building snow anchors, creating emergency shelters, or performing self-rescue techniques if needed.
- Adapting to changing terrain: Mountains and glaciers present various types of surfaces and conditions. Attaching an ice axe to your OMM Classic enables you to adapt to changing terrains and react to unexpected challenges, ensuring a safer and more efficient journey.
Overall, attaching an ice axe to an OMM Classic backpack is crucial for ensuring safety, stability, and preparedness in alpine environments. It is an essential piece of equipment that can potentially save lives and enhance your overall mountaineering experience.
Step-by-step guide
Attaching an ice axe to an OMM Classic backpack is a simple process that requires a few basic steps:
- Locate the designated attachment points on the backpack. These are usually located on the front or sides of the pack and are designed to securely hold ice axes.
- Insert the pick of the ice axe into the attachment point, ensuring that it is snug and secure. Some attachment points may have straps or clips to further secure the ice axe.
- If your backpack has additional straps or loops specifically designed for ice axe attachment, use them to further secure the axe. These straps can help prevent the axe from moving or swinging while you are hiking or climbing.
- Repeat the process with any additional ice axes you need to attach to your backpack. Make sure each axe is properly secured and balanced to prevent any accidents.
Following these steps will ensure that your ice axe is securely attached to your OMM Classic backpack, allowing you to safely carry it while hiking or climbing.
Step 1: Choose the right ice axe
When attaching an ice axe to your OMM Classic backpack, it is important to choose the right ice axe for your needs. There are different types of ice axes available, each with its own features and intended use. Here are a few factors to consider when selecting an ice axe:
Length
The length of the ice axe is an important consideration. A longer ice axe may provide more leverage and stability on steep slopes, while a shorter ice axe may be more maneuverable in tight spaces. Choose a length that is appropriate for your intended use and personal preferences.
Shaft material
Ice axes are typically made from either aluminum or carbon fiber. Aluminum axes are more durable and better suited for general mountaineering, while carbon fiber axes are lighter and better suited for technical ice climbing. Consider the type of terrain you will be encountering and choose a shaft material accordingly.
Pick type
Ice axe picks come in two primary types: curved and straight. Curved picks are better suited for general mountaineering as they provide more stability while self-arresting, while straight picks are better for technical ice climbing as they penetrate ice more effectively. Depending on your intended use, choose a pick type that suits your needs.
| Factor | Consideration |
|---|---|
| Length | Choose a length appropriate for your needs and preferences |
| Shaft material | Consider the type of terrain and choose aluminum or carbon fiber accordingly |
| Pick type | Choose curved picks for general mountaineering and straight picks for ice climbing |
Step 2: Locate the attachment points on the omm classic
Attaching your ice axe to the omm classic requires finding the appropriate attachment points on the backpack. These attachment points are designed to securely hold the ice axe in place while you’re on the move.
To locate the attachment points, follow these steps:
- Start by examining the exterior of the omm classic backpack. Look for any reinforced loops or straps specifically designed for attaching equipment.
- Once you’ve identified these attachment points, check if they have adjustable straps or buckles. This will allow you to secure the ice axe tightly and prevent it from moving around during your outdoor activities.
- If your backpack doesn’t have pre-defined attachment points, you can use the backpack’s compression straps or webbing loops as alternative attachment options. However, make sure these areas are sturdy enough to handle the weight and movement of the ice axe.
It’s important to note that the exact location of the attachment points may vary depending on the specific model and design of the omm classic backpack. Therefore, it’s always a good idea to refer to the backpack’s instruction manual or contact the manufacturer for guidance on where to attach your ice axe.
Step 3: Attach the ice axe to the omm classic
Once you have prepared the omm classic backpack and adjusted it to your liking, it is time to attach the ice axe. Here is a step-by-step guide:
1. Locate the ice axe loops
The omm classic backpack comes with ice axe loops, usually located on the left and right sides of the pack. These loops are designed to securely hold your ice axe in place during your adventure.
2. Prepare the ice axe
Before attaching the ice axe, make sure it is properly prepared. Remove any covers, straps, or sheaths from the axe to ensure that it is ready for use. Check that the pick is sharp and the shaft is secure.
3. Insert the ice axe
Take the ice axe and carefully slide it through one of the ice axe loops on the omm classic backpack. Make sure the pick is facing downwards and the shaft is positioned horizontally. Repeat the same process for the other ice axe loop.
Note: If your omm classic backpack has only one ice axe loop, insert the axe into that loop and secure it tightly.
4. Secure the ice axe
Once the ice axe is inserted into the loops, tighten the loops to secure the axe in place. You can usually find adjustable straps or buckles near the loops that allow you to tighten or loosen the loops as needed. Make sure the axe is securely fastened and does not wobble or move around.
5. Test the attachment
After securing the ice axe, give it a gentle tug to ensure it is securely attached to the omm classic backpack. Check that it does not easily come loose or slide out of the loops. If it feels loose, readjust the loops and tighten them further.
Remember: It is important to regularly check the attachment of your ice axe throughout your hike or climb to maintain its security. You do not want to risk losing or misplacing your ice axe during your adventure.
Tips and Precautions
When attaching the ice axe to your OMM Classic backpack, it is important to follow these tips and precautions to ensure your safety and the security of your equipment:
- Make sure the ice axe is securely fastened to the backpack. Double-check all straps and buckles to ensure they are tight and properly adjusted.
- Position the ice axe in a way that it is easily accessible but does not interfere with your movement or cause any discomfort.
- Do not attach the ice axe in a way that it could accidentally pierce or damage the backpack or any other gear inside.
- Regularly inspect the attachment points and straps to ensure there is no wear or damage that could compromise the ice axe’s security.
- Practice attaching and detaching the ice axe to the backpack before your trip to ensure familiarity and efficiency.
- Be cautious when walking with the ice axe attached to the backpack, as it can extend your overall height and potentially snag on branches or other obstacles.
- Consider using a dedicated ice axe loop or attachment point on the backpack, if available, for added security and convenience.
- Always store and transport your ice axe responsibly to prevent accidental injuries or damage to yourself and others.
- Follow the manufacturer’s instructions for your specific ice axe model and consult with experienced climbers or outdoor enthusiasts if you have any questions or concerns.
By following these tips and taking necessary precautions, you can safely and effectively attach your ice axe to your OMM Classic backpack for your next outdoor adventure.