

Descending with an ice axe is a crucial skill for mountaineers and climbers. Whether you are navigating a steep snow-covered slope or a winter climb, knowing how to properly use an ice axe for descent can save your life. In this article, we will guide you through the essential steps and techniques to descend safely with an ice axe.
Step 1: Assess the slope
Before you start descending, it’s important to assess the slope and the conditions. Check for any hazards such as crevasses, loose rocks, or icy patches. Evaluate the angle of the slope and determine whether it is safe to descend. If the slope is too steep or exposes you to significant risks, consider finding an alternative route.
Step 2: Choose your grip
Next, you need to choose the appropriate grip on your ice axe. The two most common grips for descending are the self-arrest grip and the walking grip. The self-arrest grip involves holding the ice axe with your hand above the ice pick, while the walking grip involves gripping the shaft of the ice axe closer to the head. Practice both grips and determine which one feels more comfortable and secure for you.
Step 3: Face the slope
When descending with an ice axe, it is important to face the slope and position yourself securely. Keep your feet shoulder-width apart and your knees slightly bent to maintain balance. Position your ice axe diagonally across your body, with the pick pointing upwards and the shaft resting on the slope. This position provides stability and control during descent.
Step 4: Make controlled steps
As you start descending, make controlled steps to maintain balance and control your speed. Plant the pick of your ice axe into the snow or ice below you, using it as an anchor. Shift your weight onto the ice axe and release the step you were standing on. Repeat this process with each step, making sure to maintain your balance and avoid sudden movements.
Step 5: Adapt to the conditions
Adapt your technique according to the slope conditions. If the slope becomes steeper, you may need to dig the pick of your ice axe deeper into the snow or ice for better stability. If the slope becomes less steep, adjust your grip and steps accordingly to maintain control. Continuously evaluate the conditions and adjust your technique as necessary.
Remember, descending with an ice axe requires practice and experience. It is advisable to take a mountaineering course or learn from an experienced climber before attempting difficult descents. Always prioritize safety, and never hesitate to turn back if you encounter unsafe conditions.
The Basics of Ice Axe Descending
When descending on steep, icy slopes, it’s crucial to understand and practice the proper techniques for using an ice axe. Here are the basics of ice axe descending:
| Step | Description |
|---|---|
| 1 | Plant the ice axe firmly into the slope, using the pick to dig into the ice or snow. |
| 2 | Position your body perpendicular to the slope, with your feet slightly wider than shoulder-width apart. |
| 3 | Lean back and sit on the ice axe, allowing it to support your weight. |
| 4 | Lock your elbows and use your abs to control your descent. Maintain a slow and controlled pace. |
| 5 | Keep your feet pointed downhill and lightly drag your crampons or boots on the surface of the slope for additional control. |
| 6 | Regularly check your axe placement and make adjustments as needed to ensure a secure hold. |
| 7 | Continue descending, maintaining a balanced and controlled position until you reach a safer area. |
| 8 | If the slope becomes too steep or icy, consider using other techniques such as self-arrest or snow anchors. |
These are the fundamental steps for ice axe descending. It’s important to practice these techniques in a controlled environment and under the supervision of an experienced instructor before attempting them in more challenging conditions.
Choosing the Right Ice Axe
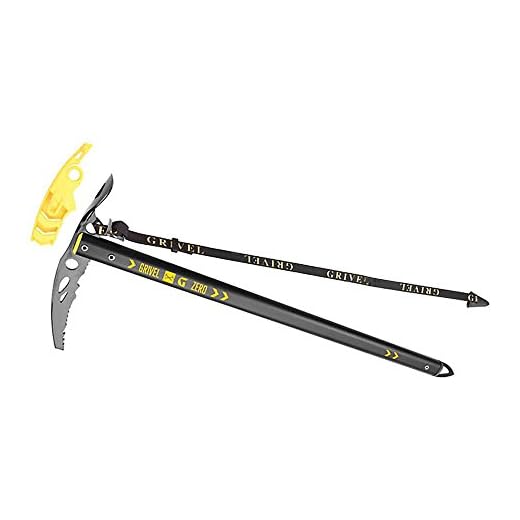
When it comes to descending with an ice axe, having the right equipment is crucial for safety and efficiency. Choosing the right ice axe involves considering several factors that will determine how well it suits your needs.
Length
The length of your ice axe is an important consideration. Generally, shorter ice axes are more suitable for technical climbing and work well on steep terrain. They provide better control and allow for more precise placements. Longer ice axes, on the other hand, are better for general mountaineering and provide additional support when traveling over less steep terrain or during self-arrest maneuvers.
Type of Pick
The type of pick on your ice axe will depend on the specific activities you plan to undertake. If you’ll be mostly hiking and glacial travel, a general mountaineering pick with a moderate amount of curvature is a good choice. For more technical ice climbing, a pick with more aggressive curvature and a tip that penetrates the ice easily will be beneficial.
Additionally, consider the material of the pick. Most ice axes have picks made from steel, which provides durability and resistance to wear. Some ice axes have picks made from aluminum alloy, which are lighter but may not be as durable.
Adze or Hammer
Another consideration is whether to choose an ice axe with an adze or a hammer. The adze is a flat, digging tool on one side of the ice axe head, while the hammer is a blunt tool used for pounding pitons or removing ice. If you plan to do technical climbing, having an adze can be useful for cutting steps or clearing snow. If you’ll be primarily mountaineering, a hammer can be more beneficial for anchoring or hammering stakes.
Ultimately, the right ice axe for you will depend on your specific needs and the activities you plan to undertake. Consider factors such as the length of the ice axe, the type of pick, and whether you need an adze or a hammer. It’s always a good idea to consult with experienced climbers or mountaineers for recommendations before making a decision. Remember, choosing the right ice axe is essential for a safe and enjoyable descent.
Mastering the Self-Arrest Technique
Mastering the self-arrest technique is essential for any ice climber or mountaineer. It is a crucial skill that can save your life in the event of a slip or fall on steep icy slopes. Here are some key steps to help you perfect your self-arrest technique.
1. Proper Body Positioning
When executing a self-arrest, it’s important to position your body correctly. Lie flat on your back with your ice axe firmly gripped in both hands. Keep your arms extended and the pick of the axe pointing up towards your head. Your feet and knees should be pointing downhill.
2. Driving the Pick into the Ice
To execute a self-arrest, quickly and forcefully drive the pick of the ice axe into the ice. Aim for a spot just above your head and slightly off to the side. This will help create a stable anchor point. The pick should penetrate the ice deeply enough to provide enough friction to stop your slide.
Remember to keep your arms extended throughout the self-arrest. Avoid bending your elbows, as this can reduce the effectiveness of the technique.
3. Applying Pressure and Controlling the Slide
Once the pick is securely planted in the ice, apply pressure to the axe by leaning into it. Keep your body weight centered over the axe to maintain control. Use your legs and the edges of your boots to help slow down and control your slide.
It’s important to practice this technique on less steep slopes before attempting it on more challenging terrain. Familiarize yourself with the feeling of stopping and controlling your slide with the ice axe.
4. Releasing the Pick and Recovering
After you’ve successfully stopped your slide, release the pick from the ice by lifting it straight up. Be careful not to jerk the pick or create unnecessary movements that can throw off your balance.
Once the pick is removed, carefully roll onto your stomach and regain your footing. This will allow you to stand up and continue your descent or take necessary safety precautions.
Remember that mastering the self-arrest technique takes practice. Regular training and repetition are essential to build muscle memory and react quickly in case of an emergency. Always take proper safety measures and use appropriate protective gear when engaging in ice climbing or mountaineering activities.
Descending Safely on Steep Slopes
When descending on steep slopes with an ice axe, it is crucial to prioritize safety and take proper precautions to avoid accidents. Here are a few guidelines to follow:
Choose the Right Technique:
There are two primary techniques for descending on steep slopes with an ice axe: the front-point technique and the self-arrest technique. The front-point technique involves using the front points of your crampons to provide traction and stability while descending. The self-arrest technique, on the other hand, is used when you need to stop a slide or fall. It involves using the ice axe as an anchor and pushing the pick into the snow or ice to halt your descent.
Assess the Conditions:
Before starting the descent, thoroughly evaluate the slope’s conditions. Look for any potential hazards or obstacles such as crevasses, loose rocks, or ice. Assess the snow conditions and make sure they are stable enough to support your weight without causing a slide or avalanche.
Choose the Right Path:
Identify the safest route down the slope. Look for areas with softer snow or patches of stable ice that can provide better traction. Avoid areas with steep drop-offs or cornices, as they can be dangerous and prone to collapsing.
Use Proper Footwork:
When descending, maintain three points of contact with the slope whenever possible. Make sure to keep your weight centered and use your ice axe and crampons for stability. Take short, deliberate steps and place your feet securely, using your front points if necessary.
Control Your Speed:
Descend at a controlled speed to prevent losing balance or control. Use the self-arrest technique to slow down or stop if necessary. Keep your ice axe in hand and ready to use at all times.
Stay Alert and Prepared:
Continuously monitor the slope and be aware of any changes in conditions or terrain. Stay focused and avoid distractions to ensure your safety. Keep your ice axe securely attached to your wrist or harness to prevent accidentally dropping it.
Descending steep slopes with an ice axe requires proper training and experience. It is recommended to seek guidance from a certified mountain guide or take a mountaineering course before attempting such descents.


