

Imagine the satisfaction of holding an axe that you’ve crafted with your own hands. Making an axe from scratch is a rewarding and fulfilling project that allows you to connect with nature, unleash your creativity, and acquire a useful tool for various outdoor activities. Whether you’re a camping enthusiast, a woodworker, or simply curious about the process, this article will guide you through the steps of making an axe from scratch.
Before you embark on this journey, it’s important to gather the necessary materials and tools. You’ll need a high-quality axe head, preferably made of steel, as it provides durability and strength. Additionally, you’ll require a wooden handle, which should be sturdy and resistant to cracking. Other essential tools include a hammer, chisel, saw, sandpaper, and linseed oil for finishing.

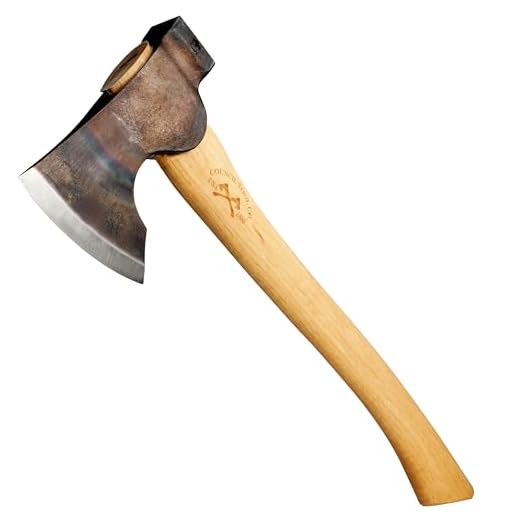
The first step in making an axe from scratch involves attaching the axe head to the wooden handle. This requires careful consideration and precise measurements to ensure a secure and comfortable grip. Begin by marking the desired length of the handle and cut off any excess wood. Next, using a chisel and hammer, create a slit at the top end of the handle where the axe head will be inserted. Slowly and firmly tap the axe head into place until it fits snugly. To reinforce the connection, you can insert a wooden wedge into the slit and secure it with a hammer.
How to Make an Axe from Scratch
Creating your own axe from scratch is a rewarding and fulfilling project that allows you to experience the satisfaction of using a tool you crafted with your own hands. In this guide, we will walk you through the steps of making an axe from scratch using traditional woodworking techniques.
Gather the Necessary Materials
Before you begin, make sure you have all the necessary materials. You will need:
- A piece of high-quality steel for the axe head
- A wooden plank for the handle
- Axe wedges
- Wood glue
- Sandpaper
- Files
- A saw
- A hammer
- A vise
- Protective gloves and goggles
Creating the Axe Head
Start by drawing the desired shape of your axe head on the steel. Then, secure the steel in a vise and use a saw or grinding wheel to cut out the shape. Once the rough shape is cut out, use files to refine the edges and create the bevels.
Next, heat the steel to a cherry red color using a forge or torch. Once heated, carefully place the axe head in a bucket of oil to quench it. This process will harden the steel and increase its durability.
After quenching, temper the axe head by heating it again, but this time to a straw or blue color. Once heated, let it cool slowly to reduce brittleness.
Creating the Handle
Choose a wooden plank that is comfortable to hold and durable enough to withstand the force of chopping. Cut the plank to the desired length, taking into consideration the length of your arm and the size of the axe head.
Using a saw, create a slot in the top of the handle for the axe head to fit into. Make sure the slot is deep enough to securely hold the axe head. Apply wood glue to the slot and insert the axe head, ensuring it is aligned with the handle.
Place axe wedges into the slots at the top of the handle to secure the axe head in place. Use a hammer to drive the wedges in, making sure they are tightly holding the axe head.
Finishing Touches
Once the axe head is securely attached, use sandpaper to smooth out any rough edges on the handle. You can also sand and polish the axe head to give it a shiny finish.
Before using your newly crafted axe, make sure to test it for stability and balance. Swing it a few times to ensure it feels comfortable and well-balanced in your hands.
Remember to always use caution and wear protective gear when handling and using sharp tools. With proper care and maintenance, your homemade axe will serve you well for years to come.
Now that you have the knowledge and steps to make an axe from scratch, grab your tools and get crafting!
Gathering Necessary Materials
Before you can begin making your axe from scratch, it’s important to gather all the necessary materials. Here is a list of items you will need:
| 1. Steel: | Look for a high-quality steel that is strong and durable. You can often find suitable steel at local hardware stores or online. |
| 2. Wood: | Select a hardwood for the handle of your axe. Popular options include hickory, ash, and oak. |
| 3. Rivets: | You will need rivets to secure the axe head to the handle. These can be purchased from a hardware store. |
| 4. Sandpaper: | Get different grits of sandpaper to smooth out the wood and steel surfaces. |
| 5. Protective Gear: | Ensure you have safety goggles, gloves, and a dust mask to protect yourself from flying debris and metal filings. |
| 6. Tools: | Collect a range of tools including a hacksaw, files, a drill with various bits, a hammer, and a clamp. |
Once you have gathered these materials, you will be ready to move on to the next step: shaping the axe head. Be prepared to dedicate some time and effort to this project, as it requires precision and attention to detail.
Preparing the Axe Head
Before you can start shaping the axe head, you’ll need to prepare the metal. Follow these steps to get your axe head ready for shaping:
- Choose a suitable piece of metal for your axe head. Ideally, the metal should be durable and strong, such as carbon steel.
- Cut the metal into a rectangular shape using a metal saw or grinder. Make sure the dimensions of the rectangle match the desired size of your axe head.
- Smooth the rough edges of the metal using a metal file. This will help prevent any injuries and make the shaping process easier.
- Heat the metal using a forge or torch until it reaches a bright orange color. This will make the metal easier to shape.
- Quench the heated metal in a bucket of water or oil to cool it down quickly. This process, known as annealing, will help reduce the metal’s hardness and make it more malleable.
- Inspect the metal for any cracks or imperfections. If you notice any, use a grinder or file to remove them and ensure the surface is smooth and even.
- Drill holes in the metal where the axe handle will be attached. The location and size of the holes will depend on the design of your axe head.
- Finally, clean the metal thoroughly to remove any debris or contaminants. This will ensure a solid bond between the handle and the axe head.
Once you have completed these steps, your axe head will be ready for the next stage, which is shaping the blade and bevels.
Shaping the Handle
After you have selected a suitable piece of wood for the handle of your axe, the next step is to shape it to the desired form. This process requires careful measurements and precise cuts to ensure the handle fits comfortably in your hand and provides the necessary leverage for effective use.
1. Marking the Handle
To begin, mark the desired length of the handle on the piece of wood. Use a measuring tape or ruler to ensure accuracy. It is important to consider factors such as personal preference and the intended use of the axe when determining the length.
Next, mark the center point of the handle lengthwise. This will help guide your shaping process.
2. Carving the Handle
Using a sharp knife or a carving tool, begin removing the excess wood from the handle. Start by creating a rough shape that follows the desired design. Be cautious not to remove too much wood at once, as it may be difficult to fix any mistakes.
As you carve, periodically check the shape of the handle by gripping it with your hand. Make adjustments as necessary to ensure a comfortable fit.
Pay attention to the thickness of the handle. It should be sturdy enough to withstand the force exerted during use, but not too thick to cause discomfort. Aim for a balance between strength and ergonomics.
Consider adding subtle contours to the handle to provide better grip and prevent slippage. This can be achieved by carving grooves or indentations where your fingers will naturally rest.
3. Sanding and Finishing
Once you are satisfied with the shape of the handle, use sandpaper or a sanding block to smooth out any rough edges or imperfections. Start with a coarse-grit sandpaper and gradually move to finer grits for a polished finish.
Apply a wood finish or oil to protect and enhance the appearance of the handle. This will also help prevent the wood from drying out and splintering over time.
Allow the finish to dry completely before attaching the handle to the axe head.
By carefully shaping the handle of your axe, you can create a tool that is not only functional but also ergonomic and comfortable to use. Take your time during this process to ensure the best results.
Attaching the Handle to the Axe Head
Once you have finished shaping and sharpening the axe head, the next step is to attach the handle. The handle, also known as the haft, provides the grip and leverage needed to effectively use the axe.
First, choose a handle that is the right size and shape for your axe head. It should fit securely without any wobbling. You can purchase a pre-made handle from a hardware store or you can craft one yourself from a sturdy piece of wood.
Before attaching the handle, you will need to create a hole in the axe head to receive the handle. Use a drill or a hot punch to make the hole. It should be slightly smaller than the diameter of the handle to ensure a snug fit.
Next, apply some epoxy or wood glue to the end of the handle that will be inserted into the axe head. This will strengthen the connection and prevent the handle from becoming loose over time.
Insert the handle into the hole in the axe head, making sure it goes in straight and all the way to the bottom. You can use a mallet or a hammer to gently tap the handle into place, but be careful not to damage the handle or the axe head.
Once the handle is in place, give it a few firm taps to ensure that it is secure. You can also use a wedge or wooden dowel to reinforce the connection between the handle and the axe head.
Finally, allow the epoxy or wood glue to dry completely before using the axe. This will ensure that the handle is firmly attached and ready for use.
Attaching the handle to the axe head is a critical step in the axe-making process. With a secure and well-fitted handle, you can confidently wield your axe and complete any chopping or cutting tasks with ease.
Sharpening the Axe
Once you have finished crafting the body of the axe, it is important to properly sharpen the blade to ensure its effectiveness. Here is a step-by-step guide on how to sharpen the axe:

- Gather the necessary tools: Before you start sharpening the axe, make sure you have the following tools: a file, a sharpening stone, and a leather strop.
- Secure the axe: Use a vice or clamp to securely hold the axe in place. This will ensure stability and prevent accidents while sharpening.
- Start with the file: Begin by using the file to remove any nicks or dents on the blade. Hold the file at a 20-degree angle and stroke it along the entire length of the blade. Repeat this process until the blade is smooth and even.
- Move on to the sharpening stone: Wet the sharpening stone with water or honing oil to lubricate the surface. Hold the axe with one hand and the stone with the other, angling the blade at a 20-degree angle. Make long, smooth strokes along the blade, from the base to the tip. Repeat this process several times, alternating sides, until you achieve a sharp edge.
- Finish with the leather strop: Apply some polishing compound to the leather strop. Holding the axe with one hand and the strop with the other, slide the blade back and forth along the strop. This will help refine the edge and give it a final polish.
- Test the sharpness: Once you have finished sharpening, carefully touch the blade with your fingertip to check for sharpness. It should easily catch on your skin. If not, repeat the sharpening process.
Remember to always exercise caution while sharpening an axe and wear protective gloves and goggles. A sharp axe is a valuable tool, but it can also be dangerous if not handled properly. With some practice and patience, you can create a well-sharpened axe that will be ready for any task.
Testing and Using Your Homemade Axe
Once you have finished making your own axe from scratch, it’s important to ensure that it is safe and effective before using it. Testing your homemade axe will give you confidence in its performance and prevent any accidents while using it.
Inspecting the Axe Head
Start by inspecting the axe head closely. Look for any cracks, chips, or signs of damage that may affect its durability. Use your fingers to check the sharpness of the blade, making sure it is evenly honed.

If you notice any issues with the axe head, it is best to repair or replace it before proceeding. Using a damaged axe head can lead to breakage and potential injury.
Sharpening the Blade
Before using your homemade axe, you need to ensure that the blade is properly sharpened. This will make your cutting tasks easier and safer. Use a sharpening stone or file to sharpen the blade, following the natural bevel of the cutting edge.
Remember to maintain a consistent angle and apply even pressure while sharpening. Take your time and periodically check the blade’s sharpness by running your finger gently along the edge. Be careful not to cut yourself during this process.
Caution: Always wear protective gloves and eye protection while sharpening the blade.
Testing the Axe
Now it’s time to test your homemade axe. Find a suitable chopping block or log and take a firm grip on the handle. Position yourself comfortably and swing the axe downwards, making sure to use your body weight to maximize the force.
Observe the effectiveness of the axe when making contact with the chopping block or log. It should cut smoothly and cleanly, without any noticeable wobbling or deflection. If you experience any issues, such as the blade getting stuck or the handle feeling weak, stop using the axe and assess the problem.
If everything goes well during testing, congratulations! You have successfully made a functional homemade axe. Remember to use your axe responsibly and maintain it regularly to ensure its longevity.
Disclaimer: The information in this article is for educational purposes only. Always prioritize safety and exercise caution when using tools, especially sharp objects like axes. If you are unsure or inexperienced, consult with a professional before attempting to make or use a homemade axe.