When it comes to using a pick axe, having a secure and sturdy handle is crucial for safety and effectiveness. Over time, the handle of your pick axe may wear out or break, requiring you to replace it. Whether you are a novice or an experienced user, putting a pick axe handle on can be a simple process if done correctly. In this article, we will guide you through the steps to ensure that your pick axe is properly fitted with a new handle.
Step 1: Choose the Right Handle
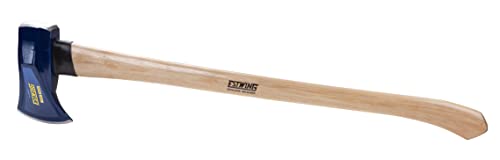
Before you start the process, it is important to select the right handle for your pick axe. Look for a handle that is made from durable and high-quality material, such as hickory or fibreglass. The handle should be the appropriate length for your needs and fit securely into the eye of the pick axe head. Remember that the handle should be comfortable to grip, so take this into consideration as well.
Note: It is always a good idea to have a spare handle on hand, so you can quickly replace it if needed.

Step 2: Remove the Old Handle
To begin, you will need to remove the old handle from your pick axe. Start by placing the head of the pick axe on a stable surface, such as a workbench or the ground, with the handle pointing upwards. Use a hammer or mallet to strike the end of the handle firmly, breaking the bond between the handle and the head. Once the handle is loose, wiggle it out of the eye of the pick axe head. Dispose of the old handle properly.
Note: Be careful during this process to avoid any injuries or damage to the pick axe head.
Choosing the right handle
When it comes to putting a new handle on a pick axe, choosing the right handle is crucial for ensuring a durable and effective tool. Here are some factors to consider when selecting a pick axe handle:
The material:
One of the most important considerations is the material of the handle. Pick axe handles are typically made of wood, fiberglass, or steel. Wood handles are traditional and offer a good balance of strength and flexibility. Fiberglass handles are lightweight and resistant to weather conditions and impact, making them a popular choice for heavy-duty work. Steel handles provide exceptional strength and durability, but they can be heavier and less comfortable to use than other materials.
The length:
The length of the handle should be suitable for your height and the type of work you will be doing. A longer handle allows for increased swing power, making it ideal for heavy digging or breaking tasks. However, a shorter handle offers more control and maneuverability, making it better suited for precise and lighter work.
It is essential to choose a handle length that you feel comfortable with and provides the right balance between power and control.
The grip:
The grip of the handle is another important factor to consider. Look for a handle with a comfortable, non-slip grip that will allow you to maintain control and minimize the risk of accidents. Some handles have a textured surface or rubberized grip, which can enhance grip and reduce hand fatigue.
Remember, the pick axe handle is the connection between you and the tool, so choosing a handle that feels comfortable and secure in your hands is crucial for safe and efficient work.
By considering these factors and selecting a handle that suits your needs, you can ensure that your pick axe will have a sturdy and reliable handle that will withstand the rigors of your work.
Guide for selecting appropriate pick axe handle materials
Selecting the right pick axe handle material is crucial for ensuring the longevity and effectiveness of your tool. Here are some factors to consider when choosing the best material for your pick axe handle:
- Durability: Look for materials that are known for their strength and durability. Options such as hickory, ash, or fiberglass are commonly used for pick axe handles due to their ability to withstand heavy use and resist breaking.
- Weight: Consider the weight of the handle material and how it will affect your comfort and control while using the pick axe. Lighter materials like fiberglass can reduce fatigue during prolonged use, while heavier options like hickory may provide more power and stability.
- Grip: The handle should provide a comfortable and secure grip to prevent slipping and improve control. Look for handles with ergonomic designs and textured surfaces.
- Availability: Consider the availability of the handle material in your area. While traditional materials like hickory and ash may be readily available, others like fiberglass may require special ordering.
- Budget: Determine your budget for the handle material. While some options may be more expensive upfront, they can offer long-term benefits in terms of durability and performance.
By taking these factors into account, you can select the most appropriate pick axe handle material for your needs. Remember to maintain and replace your handle as necessary to ensure the continued efficiency of your tool.
Preparing the handle and head
Before you can put a pick axe handle on, you need to prepare both the handle and the head of the axe. Follow these steps to ensure a secure and reliable attachment:
1. Measure and cut the handle:
Start by measuring the length of the handle you will need. The handle should be long enough to provide a comfortable grip, but not too long that it becomes unwieldy. Use a saw or a similar cutting tool to carefully cut the handle to the desired length. Make sure to measure twice and cut once to avoid any mistakes.
2. Smooth the handle:
With a piece of sandpaper or a sanding block, smooth out and remove any rough edges or splinters from the handle. This will ensure a comfortable and secure grip when using the pick axe.
3. Prep the head:
Inspect the head of the pick axe to ensure that it is clean and free of any debris or rust. If necessary, use a wire brush or sandpaper to remove any rust or dirt. Cleaning the head will help improve the overall performance and longevity of the axe.
4. Apply adhesive:
Using a strong adhesive, such as epoxy or wood glue, apply a generous amount to the end of the handle. Make sure to evenly coat the end of the handle to ensure a strong bond.
5. Attach the head:
Place the head of the pick axe onto the adhesive-coated end of the handle. Make sure it is aligned properly and firmly press the head onto the handle. Wipe away any excess adhesive that may have squeezed out during the attachment process.
6. Allow for drying time:
Once the head is attached, allow the adhesive to dry and cure according to the manufacturer’s instructions. This usually takes a few hours or overnight.
By following these steps, you can properly prepare the handle and head of a pick axe for a secure attachment, ensuring its durability and effectiveness during use.
Step-by-step instructions on how to prepare the handle and attach the head
When it comes to putting a pick axe handle on, it’s important to ensure the handle is prepared correctly and securely attached to the head. Here are the step-by-step instructions to guide you through the process:
Step 1: Gathering Materials
Before you begin, make sure you have the necessary materials and tools:
- A pick axe head
- A new pick axe handle
- Sandpaper
- A hammer
- A nail or a wooden wedge
Step 2: Preparing the Handle
Start by inspecting the new pick axe handle for any defects or rough surfaces. If you notice any, use sandpaper to smooth them out. This will help ensure a better grip and prevent blisters during use.
Step 3: Attaching the Head
Place the pick axe head on a stable surface, with the eye facing up. Hold the handle by the end and position the eye of the head onto the handle. Make sure the eye of the head fully encompasses the handle.
To secure the head to the handle, you have two options:
- Using a Nail: If you choose this method, gently tap a nail through the eye of the head and into the handle. This will create a secure hold between the head and the handle. Make sure to position the nail at an angle, slightly towards the striking end of the pick axe.
- Using a Wooden Wedge: Alternatively, you can use a wooden wedge for a more traditional approach. Start by creating a small groove in the handle, near the top of the eye. Then, insert the wooden wedge into the groove and gently tap it in using a hammer. The wedge will expand, creating a tight fit and securing the head to the handle.
Whichever method you choose, make sure the head is securely attached and does not wobble or come loose. Test it by gripping the handle firmly and giving it a few gentle swings.
With these step-by-step instructions, you are now ready to put the pick axe handle on like a pro. Remember to always prioritize safety and take caution when handling sharp tools.
Attaching the handle to the head
Once you have a replacement handle for your pick axe head, it’s time to attach it securely. Follow these steps to ensure a tight and durable connection between the handle and the head:
Step 1: Determine the proper length of the handle by holding it next to the head. The handle should reach your armpit when you hold the pick axe in a comfortable position.
Step 2: Use emery cloth to sand the top end of the handle and the inside of the eye of the pick axe head. Remove any dirt, rust, or debris that could prevent a proper fit.
Step 3: Apply a thin layer of epoxy adhesive to the inside of the eye. Be sure to spread it evenly to ensure a strong bond.
Step 4: Insert the top end of the handle into the eye of the pick axe head. Twist and push the handle until it is fully seated and the head is snug against the shoulder of the handle.
Step 5: Secure the handle to the head by driving a wooden or metal wedge into the slots or holes provided in the eye. Make sure the wedge is tight and flush with the top of the head.
Step 6: Trim any excess length from the top of the handle if necessary. Use caution and follow proper safety precautions when using cutting tools.
Step 7: Test the connection by giving the pick axe a few gentle swings. If the handle feels secure and there is no wobbling or movement, you can proceed to use the pick axe for your intended tasks.
By following these instructions, you can easily attach a new handle to your pick axe head and ensure a reliable and sturdy tool for all your digging and chopping needs.
Methods for securely fastening the handle to the pick axe head
When replacing the handle of a pick axe, it is important to ensure that it is securely fastened to the pick axe head. This will prevent the handle from becoming loose or detaching during use, ensuring optimal safety and performance.
There are several methods that can be used to securely fasten the handle to the pick axe head. The most common methods include:
1. Wedge and rivet: This method involves using a wedge and rivet to secure the handle to the pick axe head. First, a hole is drilled through the eye of the pick axe head. Then, a wedge is inserted into the hole, followed by the handle. Finally, a rivet is inserted through the hole to secure the handle and wedge in place. This method provides a strong and durable connection.
2. Epoxy adhesive: Another method is to use epoxy adhesive to bond the handle to the pick axe head. This involves applying epoxy adhesive to both the handle and the eye of the pick axe head. The handle is then inserted into the eye and held in place until the adhesive cures. This method creates a strong bond between the handle and the pick axe head, ensuring a secure connection.
3. Threaded fastener: A threaded fastener, such as a bolt or screw, can also be used to secure the handle to the pick axe head. This method involves drilling holes through the handle and the pick axe head, and then attaching the handle to the head using the threaded fastener. This method allows for easy removal of the handle if needed, but may not provide as strong of a connection as the other methods.
4. Through-bolt: The through-bolt method involves drilling a hole through the pick axe head and handle, and then inserting a bolt through the hole to secure them together. This method provides a strong and secure connection, but may require more effort and tools to install compared to the other methods.
Regardless of the method chosen, it is important to ensure that the handle is properly aligned with the pick axe head before fastening it. This will help ensure that the pick axe is balanced and comfortable to use.
Remember to follow the manufacturer’s instructions when replacing a pick axe handle, as different pick axes may have specific requirements for handle attachment.