


Removing the head of an axe might seem like a daunting task, but with the right tools and techniques, it can be a relatively simple process. Whether you need to replace a dull or damaged axe head or simply want to clean and maintain your tool, this guide will walk you through the steps to safely remove an axe head.
Step 1: Gather your tools
Before you start, make sure you have all the necessary tools. You will need a hammer, a small piece of scrap wood, and a wooden or metal wedge. These tools will help you loosen and remove the axe head without causing any damage to the handle.
Step 2: Secure the axe
To prevent any accidents, it’s important to secure the axe before removing the head. Place the axe on a sturdy work surface with the head facing up. You can use clamps or a vice to hold the axe in place, ensuring that it doesn’t move while you work.
Step 3: Loosen the wedge

Most axe heads are secured to the handle with a wooden or metal wedge. Start by tapping the wedge gently with a hammer to loosen it. Be careful not to hit too hard, as you don’t want to damage the handle. If the axe head is particularly stubborn, you can use a scrap piece of wood as a buffer between the hammer and the wedge. This will help distribute the force evenly.
Note: If your axe head is held in place by epoxy or glue, you may need to apply heat to loosen the bond. Use caution and follow manufacturer’s instructions if using this method.
Step 4: Remove the axe head
Once the wedge is loose, carefully lift the axe head off the handle. If the head is still stuck, you can use the wooden or metal wedge to gently pry it off. Insert the wedge into the gap between the head and the handle, and tap it with a hammer to create leverage. Slowly work your way around the head, repeating this process until it comes off.
Congratulations! You have successfully removed the axe head. Now you can clean, sharpen, or replace it as needed. Remember to always work carefully and wear appropriate safety gear to protect yourself during the process.
Step-by-step guide to remove an axe head
Removing the head of an axe can be helpful if you need to replace a worn-out handle or want to clean and sharpen the blade. Follow these step-by-step instructions to safely remove the axe head:
-
Gather the necessary tools
Before starting the process, make sure you have the following tools on hand:
- A wooden block or a sturdy surface to support the axe head
- A suitable size hammer or mallet
- A metal wedge or a thin piece of hardwood
- A pair of safety gloves
-
Secure the axe head
Place the axe head on the wooden block or sturdy surface to prevent any damage. Ensure that the blade is facing away from you and that the handle is stable.
-
Loosen the axe head
Using the hammer or mallet, gently tap the handle near the base of the head to loosen it. Start with light strikes and gradually increase the force if needed. Be careful not to hit the blade or handle directly.
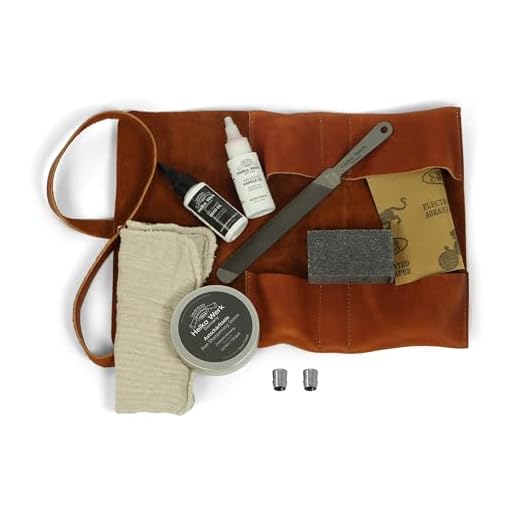
Trending Now 1844 Helko Werk Axe Care KitComplete set for axe maintenance needsThis comprehensive maintenance kit equips you with all essential tools for preserving your axe’s performance and longevity. Made in Germany and the USA, it ensures quality care for your tools. -
Insert the wedge
Once the head is loosened, place the metal wedge or thin piece of hardwood into the gap between the head and handle. The wedge should be positioned parallel to the handle and inserted as far as possible.
-
Remove the axe head
To remove the axe head completely, gently tap the wedge with the hammer or mallet. The wedge will create tension and force the head to slide off the handle. Continue tapping the wedge until the head is separated from the handle.
Following these steps will allow you to safely remove the axe head without causing any damage to yourself or the tool. Always exercise caution and wear protective gloves to prevent injuries during the process.
Prepare Your Tools
Before you begin removing the axe head, it’s essential to gather all the necessary tools. Having everything ready beforehand will save you time and prevent any delays in the process. Here is a list of tools you will need:
Axe Wedge
An axe wedge is a small, triangular-shaped piece of wood or metal that is used to secure the axe head to the handle. It helps keep the axe head in place and prevents it from coming loose during use. Make sure you have a sturdy and durable axe wedge.
Mallet or Hammer
To remove the axe head, you will need a mallet or hammer. This will be used to strike the axe wedge, helping to dislodge the axe head from the handle. Choose a mallet or hammer that is comfortable to hold and has enough weight to deliver a strong strike.
| Tool | Description |
|---|---|
| Axe Wedge | A small, triangular-shaped piece of wood or metal used to secure the axe head to the handle. |
| Mallet or Hammer | A tool used to strike the axe wedge and dislodge the axe head from the handle. |
Detach the Axe Head
Removing the axe head from the handle is a straightforward process that can be done with a few simple steps. Follow these instructions to safely detach the axe head:
Gather the necessary tools
Before getting started, gather all the tools you will need for this task. You will need a hammer, a wooden block, and a pair of pliers. These tools will help you loosen and remove the axe head.
Secure the axe head
Place the wooden block on a sturdy surface, such as a workbench or the ground. This will provide support and prevent any damage to the axe head during the removal process. Position the axe head on top of the wooden block, with the handle pointing upwards.
Caution: Ensure that the axe head is stable and securely positioned on the wooden block before proceeding. This will prevent any accidents or injuries.
Loosen the axe head
Using the hammer, gently tap the top of the handle to loosen the axe head. Start with light taps and gradually increase the force if necessary. The goal is to loosen the wedge or metal that is securing the head to the handle.
Note: Be careful not to strike the axe head directly as this may cause damage. Only target the top of the handle.
Remove the axe head
Once the axe head is sufficiently loosened, you can use the pliers to grip the head and pull it upwards. Apply firm and steady pressure, slowly rocking the head from side to side if needed. With enough force, the axe head should come off the handle.
Warning: Be cautious during the removal process as the axe head may be heavy and potentially dangerous if mishandled. Take your time and proceed with care.
By following these steps, you can safely detach the axe head from the handle. Remember to handle the axe head with caution and store it in a secure place when not in use.
Clean and Maintain the Axe
Once you have successfully removed the axe head, it is important to clean and maintain it to ensure its longevity and optimal performance. Here are some steps to follow:
1. Remove any dirt or debris from the axe head using a stiff brush or toothbrush. Pay special attention to the area where the axe head attaches to the handle.
2. For stubborn dirt or rust spots, use sandpaper or a wire brush to gently scrub the affected areas. Be careful not to scratch the surface of the axe head.
3. Rinse the axe head with water and pat it dry with a clean cloth. Make sure there is no moisture left on the head as it can lead to rusting.
4. Apply a thin layer of axe oil or any rust inhibitor to the axe head. This will help protect it from corrosion and keep it in good condition.
5. Store the axe head in a dry and cool place to prevent moisture and humidity from affecting it.
6. Regularly inspect the axe head for any signs of wear or damage. If you notice any issues, address them immediately to prevent further damage.
By following these steps, you can ensure that your axe head remains clean, free from rust, and ready to be used whenever needed.
Here is a table summarizing the steps:
| Step | Description |
|---|---|
| 1 | Remove dirt and debris |
| 2 | Scrub stubborn dirt or rust spots |
| 3 | Rinse and dry |
| 4 | Apply axe oil or rust inhibitor |
| 5 | Store in a dry place |
| 6 | Regularly inspect for wear or damage |


