


If you have a broom with a broken or worn-out handle, you might be wondering how to replace it. Fitting a new wooden handle to your broom is a simple process that you can easily do yourself. With just a few basic tools and some patience, you’ll have your broom ready for sweeping in no time.
Step 1: Measure and Cut
The first step in fitting a wooden broom handle is to measure and cut it to the appropriate length. Measure the length of the old handle and mark the same length on your new wooden handle. Use a saw to carefully cut the handle to the desired length. Remember to wear protective gloves and goggles while cutting the wood.
Tip: If you don’t have a saw, you can ask for assistance at your local hardware store or use a hacksaw as an alternative.
Instructions for attaching wooden broom handle
Step 1: Gather the necessary materials
Before beginning, make sure you have all the materials you need:
| – Wooden broom handle |
| – Broom head with pre-drilled hole |
| – Screws or nails |
| – Screwdriver or hammer |
Step 2: Align the broom head and handle
Insert one end of the wooden broom handle into the pre-drilled hole in the broom head. Make sure the handle is aligned properly and fits securely into the hole.
Step 3: Secure the handle
Once the handle is properly aligned, use screws or nails to secure the handle to the broom head. Insert the screws or nails through the holes in the broom head, into the wooden handle. Make sure they are tight and secure.
Step 4: Test the attachment
Give the broom a gentle shake to test the attachment. Make sure the handle feels secure and does not wobble or come loose. If necessary, tighten the screws or nails further.
Following these instructions will help you properly attach a wooden broom handle to the broom head. Now you are ready to start sweeping!
Step-by-step guide to fitting a wooden broom handle
Having a sturdy wooden broom handle is essential for efficient cleaning. If your broom handle is damaged or needs replacement, here is a step-by-step guide to fitting a new one.
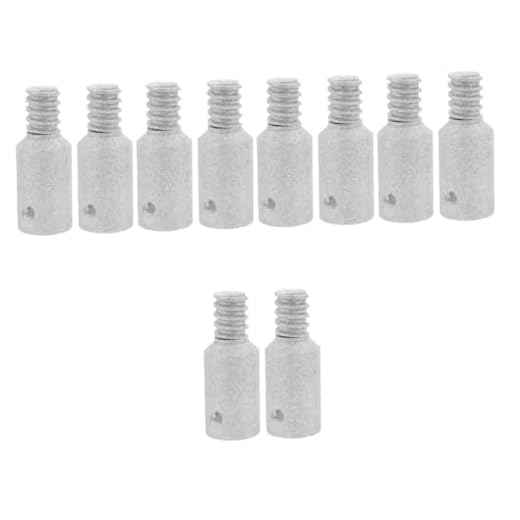
Materials you will need:
- A wooden broom handle
- A metal connector
- A screwdriver
- A hammer
- A saw (optional)
Step 1: Remove the old broom handle (if applicable)
If you already have a broom handle in place, start by removing it. Depending on the type of attachment, you may need to unscrew it or use a saw to cut it off. Be careful when using a saw and wear protective gloves.
Step 2: Measure the length
Take the new wooden broom handle and measure it against the broom head. Ensure that it is the right length and trim it down if necessary using a saw.
Step 3: Attach the metal connector
Insert one end of the broom handle into the metal connector. Make sure it fits securely. Use a hammer to gently tap the connector if needed.
Step 4: Align the broom head
Hold the broom head and align the attachment hole with the other end of the broom handle. Ensure that it is centered and straight.
Step 5: Secure the broom head
Insert the end of the broom handle into the attachment hole of the broom head. Use a screwdriver to tighten any screws or mechanisms to secure the handle in place. Ensure it is tight and stable.
Congratulations! You have successfully fitted a new wooden broom handle. Your broom is now ready to be used for efficient cleaning.
Note: If you encounter any issues while fitting the broom handle, refer to the manufacturer’s instructions or seek assistance from a professional.
Easy way to attach a wooden broom handle
Step 1: Start by selecting a wooden broom handle that is the appropriate size for your broom head.
Step 2: Before attaching the handle, make sure the broom head is clean and free of any debris.
Step 3: Once the broom head is clean, carefully align the hole in the broom head with the top of the wooden broom handle.
Step 4: Push the wooden broom handle firmly into the hole in the broom head, making sure it is securely fitted.
Step 5: If necessary, use a rubber mallet or hammer to gently tap the top of the handle until it is fully inserted into the broom head.
Step 6: To double-check that the handle is securely attached, give it a gentle tug to make sure it doesn’t come loose.
Step 7: Once you are satisfied with the attachment, your wooden broom handle is ready to use.
Note: It is important to regularly check the attachment of the handle to ensure it remains secure during use.


