
Fork oil is an essential component of a motorcycle’s suspension system. It plays a crucial role in maintaining proper damping and ensuring a smooth riding experience. Over time, fork oil can become contaminated or lose its viscosity, requiring replacement. Traditionally, changing fork oil involves disassembling the front forks, which can be a time-consuming task.
However, there is a common question among motorcycle enthusiasts: can you change fork oil through the damper bolt? The damper bolt is a valve located at the bottom of the fork leg, and it controls the oil flow in the damper rod. Some believe that removing this bolt and draining the oil through it is a less complicated and quicker method for changing the fork oil.
The short answer is no, you cannot change fork oil through the damper bolt. While removing the damper bolt may release some oil, it will only drain the oil in the damper rod, not the entire fork. This means that the majority of the old oil will remain in the fork tubes, which will limit the effectiveness of replacing the fork oil.
Changing fork oil requires a more thorough process that involves disassembling the fork tubes. This allows for a complete and proper replacement of the oil in the system. It also allows for an inspection of the fork components to ensure they are in good condition.
If you’re unsure about how to change the fork oil or if your motorcycle requires fork oil replacement, it is recommended to consult the owner’s manual or seek assistance from a professional mechanic. They have the knowledge and expertise to perform the necessary steps correctly and ensure the optimal performance of your motorcycle’s suspension system.
Changing fork oil: A step-by-step guide
Changing the fork oil in a motorcycle is a crucial maintenance task that should be performed regularly to ensure optimal fork performance. Here is a step-by-step guide to help you get started:
1. Gather the necessary tools and materials:
- Fork oil
- Drain pan
- Socket wrench
- Measuring cup
- Clean cloth
2. Prepare your workspace:
Find a well-lit and clean area to work on your bike. Make sure you have enough space to maneuver and work comfortably.
3. Elevate the front end:
Using a motorcycle stand or a jack, elevate the front end of your bike to ensure stability and easier access to the fork tubes.
4. Remove the front wheel:
Loosen the axle nut and remove the front wheel. This will provide better access to the fork tubes and make the oil changing process easier.
5. Loosen the fork caps:
Using a socket wrench, carefully loosen the fork caps. Be cautious as there may still be some residual pressure inside the forks.
6. Drain the old oil:
Place a drain pan underneath the fork tubes and slowly unscrew the damper bolt. Allow the old oil to drain completely.
7. Measure and pour new oil:
Consult your motorcycle’s manual to determine the recommended oil level and viscosity. Use a measuring cup to accurately pour the new oil into each fork tube.
8. Reassemble and tighten:
Carefully reassemble the fork tubes, making sure all the components are properly aligned. Tighten the fork caps securely but avoid over-tightening.
9. Reinstall the front wheel:
Place the front wheel back onto the bike and securely tighten the axle nut. Double-check that the wheel is properly aligned and spins freely.
10. Lower the front end:
Remove the motorcycle stand or jack and gently lower the front end of the bike. Ensure that the forks compress and extend smoothly.
Following these steps will help you change the fork oil in your motorcycle and improve its overall suspension performance. Remember to consult your motorcycle’s manual for specific instructions and to always use the recommended oil and quantities.
Enjoy a smoother ride with freshly changed fork oil!
Understanding fork oil and hydraulic dampers
Fork oil and hydraulic dampers are crucial components in the suspension system of a motorcycle or bicycle. They work together to provide a smooth and controlled ride by absorbing shocks and vibrations from the road or trail.
Fork oil, as the name suggests, is the type of oil used in the forks of the suspension system. It serves two primary purposes: lubrication and damping. Lubrication is important to reduce friction between the moving parts of the forks, while damping regulates the movement of the suspension to provide a comfortable ride.
The hydraulic damper, on the other hand, is responsible for controlling the speed at which the fork compresses and rebounds. It consists of a piston and cylinder filled with oil. When the fork compresses, the oil is forced through small holes or valves, creating resistance and slowing down the movement. This resistance allows the suspension to absorb the impact and maintain stability.
Changing fork oil through the damper bolt, however, is not recommended. The damper bolt is typically used for adjusting the damping settings and should not be used to replace the fork oil. Changing the oil requires disassembly of the forks and draining the old oil completely before adding fresh oil. This process should be done carefully following the manufacturer’s instructions or by a professional mechanic.
Maintaining proper fork oil level and quality is essential for optimal suspension performance. Over time, fork oil can become contaminated with dirt and debris, affecting its lubricating and damping properties. Regular maintenance and oil changes are necessary to ensure the suspension system works effectively and prolong the lifespan of the fork seals and bushings.
In conclusion, fork oil and hydraulic dampers play a vital role in the suspension system of motorcycles and bicycles. Understanding their functions and maintaining their performance is crucial for a smooth and controlled ride. While adjusting damping settings can be done through the damper bolt, changing fork oil should be done through proper disassembly and oil draining procedures.
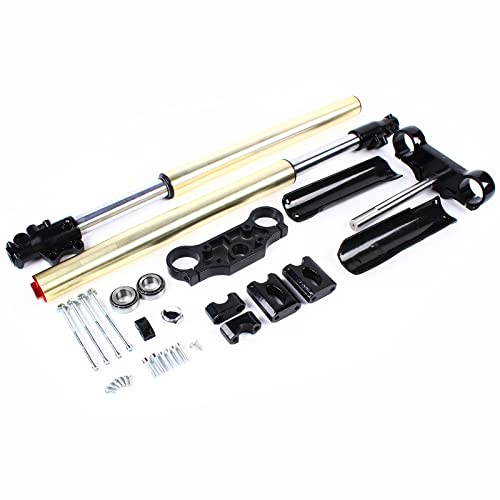
Tools and materials needed for fork oil change
Changing the fork oil in your motorcycle’s forks is an important maintenance task that can improve the performance and extend the lifespan of your suspension system. To complete this task, you will need the following tools and materials:
Tools:
- Socket wrench set
- Hex key set
- Oil drain pan
- Fork oil level gauge
- Spring compressor tool
- Soft cloth or rag
- Torque wrench
- Shop manual or service guide for your specific motorcycle model
Materials:
- Fork oil (appropriate viscosity for your motorcycle model)
- Fork seals (if necessary)
- Fork dust seals (if necessary)
- Grease (for lubricating parts)
- Threadlocker (if required for specific bolts or fasteners)
It is important to have the correct tools and materials to ensure a safe and effective fork oil change. Using the wrong tools or materials can lead to damage to your forks or a poor-quality oil change. If you are not confident in completing this task yourself, it is recommended to seek professional assistance or consult your motorcycle’s service manual for guidance.
Preparing your bike for fork oil change
Before changing the fork oil in your bike, it’s important to properly prepare the bike and gather all the necessary tools and materials. Follow these steps to ensure a smooth and successful fork oil change:
- Gather the necessary tools: You will need a socket wrench, Allen keys, a torque wrench, a fork oil syringe, fork oil, a drain pan, and clean rags.
- Lift and secure the bike: Use a motorcycle stand or lift to raise the front end of the bike off the ground. Make sure the bike is stable and secure before proceeding.
- Remove the front wheel: Loosen the front axle pinch bolts and remove the axle. Take off the front wheel and set it aside in a safe place.
- Loosen the fork caps: Locate the fork caps at the top of the forks and use the appropriate Allen key or socket wrench to loosen them. Be cautious as there may be spring tension created by fork springs.
- Remove the forks: Carefully take out the forks from the triple clamps by sliding them downward. Depending on your bike, you may need to detach other parts, such as brake calipers or fender, that may obstruct the fork removal process.
- Drain the old fork oil: Turn the forks upside down over a drain pan to allow the old fork oil to drain out completely. Move the forks up and down to ensure all the oil is drained.
- Disassemble the forks: Once the fork oil is drained, disassemble the forks by removing the fork caps, fork springs, and any other components necessary to reach the fork damper bolt.
- Remove the damper bolt: Use the appropriate Allen key or socket wrench to remove the damper bolt at the bottom of the fork. This will allow you to access the old fork oil.
With these steps completed, you are now ready to proceed with the fork oil change. It’s essential to follow the manufacturer’s instructions for the specific fork oil you are using and to ensure proper oil level and fork assembly. Remember to work carefully and methodically to maintain the integrity and performance of your bike’s suspension system.
Removing the damper bolt for fork oil change
When changing the fork oil, it may be necessary to remove the damper bolt in order to access the oil chamber. The damper bolt is typically located on the bottom of the front fork and is responsible for controlling the damping of the fork.
Before attempting to remove the damper bolt, it is important to ensure that the motorcycle is properly secured and stable. This can be done by placing the motorcycle on a sturdy stand or using a lift.
Once the motorcycle is secure, follow these steps to remove the damper bolt:
- Locate the damper bolt on the bottom of the front fork.
- Use the appropriate socket or wrench to loosen the damper bolt. It may be necessary to hold the damper rod in place while loosening the bolt.
- Once the damper bolt is loose, carefully remove it from the fork.
- The damper bolt may have a washer or other components attached to it. Take note of the order in which these components are installed for reassembly.
With the damper bolt removed, the oil chamber can now be accessed for the fork oil change. Be sure to follow the manufacturer’s instructions for the proper procedure to drain and refill the fork with new oil.
After the oil change is complete, reassemble the damper bolt and any associated components in the correct order, making sure to tighten the bolt securely.
It is recommended to consult the motorcycle’s service manual or a professional mechanic for specific instructions and torque specifications regarding the removal and reinstallation of the damper bolt.
Draining and replacing the fork oil
Changing the fork oil is an essential maintenance task for ensuring the smooth operation and performance of your motorcycle’s forks. Over time, the oil can become contaminated with dirt and debris, causing reduced damping and less effective suspension action. Here’s a step-by-step guide on how to drain and replace the fork oil:
Step 1: Preparation
Before starting the process, make sure you have the necessary tools and supplies, including a socket wrench, a container to collect the old oil, new fork oil, a cleaning cloth, and a torque wrench. It’s also a good idea to consult your motorcycle’s manual for specific instructions and torque specifications.
Step 2: Elevate the front wheel
To access the fork oil, you’ll need to elevate the front wheel of your motorcycle. This can be done by using a bike stand or by carefully propping the motorcycle on a secure surface, ensuring stability and safety.
Step 3: Remove the fork tubes
Loosen and remove the bolts or caps that hold the fork tubes in place. The process may vary depending on your motorcycle, so refer to the manual for specific instructions. Once the fork tubes are free, carefully pull them out of the triple clamps and place them on a clean and stable surface.
Step 4: Drain the old fork oil
Locate the drain bolt at the bottom of the fork leg and use a socket wrench to loosen and remove it. Allow the old fork oil to drain completely into the container. You can gently pump the fork tubes to help speed up the process.
Step 5: Clean and inspect the fork components
While the fork tubes are out, take the opportunity to clean them thoroughly with a cleaning cloth. Inspect the fork seals for any signs of damage or leaks, and replace them if necessary. Check the fork bushes and other components for wear or damage as well.
Step 6: Refill with new fork oil
Using a measuring device, pour the correct amount of new fork oil into each fork leg. The exact amount may vary depending on your motorcycle’s specifications, so consult the manual for the correct volume. Once filled, replace the drain bolts and tighten them to the specified torque using a torque wrench.
Step 7: Reassemble the fork tubes
Slide the fork tubes back into the triple clamps, making sure they are aligned correctly. Firmly tighten the bolts or caps to secure the fork tubes in place. Again, refer to the manual for the specific torque specifications.
With the fork oil changed, you can now enjoy improved suspension performance and a smoother ride on your motorcycle. Remember to regularly check and maintain your fork oil to keep your suspension in top condition.
Reassembling your bike after fork oil change
Once you have successfully changed the fork oil through the damper bolt, it’s important to reassemble your bike properly before taking it out for a ride. Follow these steps to ensure everything is put back together correctly:
|
Step 1: Place the fork tubes back into the triple trees and tighten the top clamp bolt securely to hold them in place. |
Step 2: Reinstall the front wheel, making sure the axle is aligned properly and securely tightened. |
|
Step 3: Attach the front brake calipers back onto the fork legs and tighten the mounting bolts to the manufacturer’s specifications. |
Step 4: Reconnect any cables or wiring that may have been disconnected during the fork oil change process, such as the brake line or speed sensor. |
|
Step 5: Check the fork seals for any signs of leakage or damage. If necessary, replace the seals before proceeding. |
Step 6: Finally, double-check all the connections and bolts to ensure they are tightened properly and secure. |
It’s important to take your time and pay attention to detail while reassembling your bike after a fork oil change. This will help ensure the safety and performance of your motorcycle when you hit the road again.


