Harley Davidson motorcycles are known for their power, style, and performance. However, like any vehicle, regular maintenance is crucial to keep them running smoothly. One important aspect of maintenance is changing the fork seals, which are responsible for keeping the forks lubricated and preventing oil leaks.
If you notice oil leaking from the forks or experience a loss of damping performance, it’s likely time to change the fork seals. While this task may seem daunting, with the right tools and a little know-how, you can easily change the fork seals on your Harley Davidson motorcycle.
Step 1: Gather the Necessary Tools and Materials
Before you begin the process of changing the fork seals, make sure you have all the necessary tools and materials. You will need a jack or lift to elevate the front end of the motorcycle, a socket set, a torque wrench, a seal driver, a fork oil seal kit, a fork oil level gauge, and a clean workspace.
Step 2: Elevate the Front End
Using a jack or lift, carefully elevate the front end of your Harley Davidson motorcycle. Make sure it is stable and secure before proceeding.
Step 3: Remove the Necessary Parts
Next, remove the front wheel and fender to access the fork tubes. Loosen the pinch bolts on the triple tree and remove the fork caps. Drain the fork oil into a drain pan and remove the fork tubes from the triple tree.
Step 4: Replace the Fork Seals
Using a fork seal driver, carefully remove the old fork seals from the fork tubes. Clean the fork tubes thoroughly and install the new fork seals using the seal driver. Make sure the new seals are seated properly and evenly.
Step 5: Reassemble the Front End
Reinstall the fork tubes into the triple tree, making sure they are properly aligned. Tighten the pinch bolts on the triple tree and install the fork caps. Refill the forks with the recommended amount of fork oil using a fork oil level gauge. Reinstall the front wheel and fender.
Step 6: Test and Adjust
Once everything is reassembled, lower the front end of the motorcycle and test the fork seals for leaks. If there are no leaks, take the motorcycle for a test ride and check the fork damping performance. Adjust the fork oil level if necessary.
By following these steps, you can successfully change the fork seals on your Harley Davidson motorcycle. Regularly maintaining your motorcycle’s forks will help ensure a smooth and safe ride for years to come.
Why Fork Seals on Harley Davidson Need to be Changed?
Fork seals play a vital role in the suspension system of a Harley Davidson motorcycle. They are responsible for keeping the fork oil sealed inside the fork tubes, preventing leaks and ensuring proper functioning of the front suspension. Over time, however, fork seals can wear out and develop leaks due to regular use, exposure to the elements, and general wear and tear.
1. Prevent Oil Leaks
One of the primary reasons why fork seals on Harley Davidson need to be changed is to prevent oil leaks. When the seals wear out or become damaged, fork oil can start to leak from the fork tubes. This not only results in a messy bike, but it also leads to a loss of fork oil, which can impact the performance and handling of the motorcycle. Regularly changing the fork seals helps maintain a proper oil seal and prevents unnecessary leaks.
2. Maintain Suspension Performance
Proper functioning of the front suspension is crucial for a smooth and comfortable ride. When the fork seals deteriorate, they can allow dirt, debris, and moisture to enter the fork tubes. This can contaminate the fork oil and lead to a decrease in suspension performance. By changing the fork seals, you ensure that the fork oil remains clean and free from contaminants, allowing the front suspension to operate at its best.
3. Extend Fork Lifespan
The forks are an essential part of the motorcycle’s front end, responsible for absorbing bumps and providing stability. Constant exposure to rough road conditions and varying weather can lead to the accumulation of dirt and debris on the fork seals, causing them to wear out faster. By regularly changing the fork seals, you can prevent premature wear and tear on the forks, extending their lifespan and avoiding the need for costly repairs or replacements.
Overall, changing the fork seals on a Harley Davidson is necessary to maintain the integrity of the front suspension, prevent oil leaks, and ensure a smooth and reliable ride. It is recommended to regularly inspect the fork seals and replace them as needed to avoid any potential issues and keep your Harley Davidson in optimal condition.
Understanding the Importance of Proper Fork Seal Maintenance
Proper fork seal maintenance is essential for the optimal performance of your Harley Davidson motorcycle. Fork seals play a crucial role in maintaining the integrity of the fork assembly, preventing oil leaks, and ensuring a smooth and comfortable riding experience.
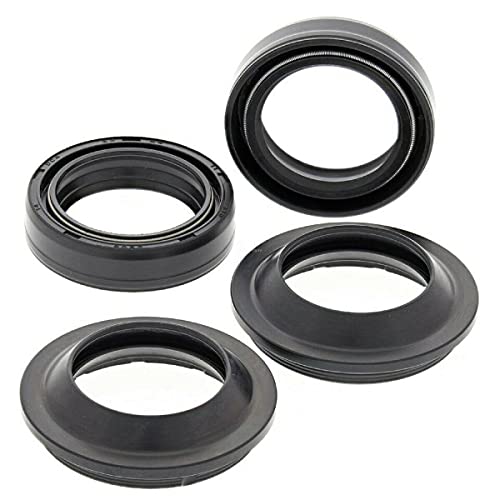
What are Fork Seals?
Fork seals are a vital component of the front suspension system of your Harley Davidson. They are designed to seal the gap between the inner and outer tubes of the fork assembly, preventing oil leaks and contamination.
When fork seals are in good condition, they act as a barrier, keeping the oil inside the fork assembly and protecting it from dirt, dust, and moisture. This allows the forks to move smoothly and effectively absorb impact while riding.
The Importance of Proper Fork Seal Maintenance
Regular maintenance of your fork seals is essential to ensure the longevity and performance of your motorcycle. Here are some reasons why it is important:
- Preventing Oil Leaks: Well-maintained fork seals help prevent oil leaks, which can damage other components of the front suspension system. Oil leaks can also affect the handling and stability of the motorcycle, compromising your safety.
- Preserving Fork Performance: Properly functioning fork seals ensure the smooth operation of the front suspension system. This helps in maintaining stability, control, and comfort while riding, especially on uneven or bumpy roads.
- Protecting Internal Components: Fork seals protect the internal components of the fork assembly from dirt, dust, and moisture. These contaminants can cause damage to the inner tubes, springs, and other critical components, leading to costly repairs.
- Reducing Fork Seal Wear: Regular maintenance, including cleaning and lubricating the fork seals, can help reduce wear and tear. By keeping the seals in good condition, you can extend their lifespan, saving you both time and money.
Fork Seal Maintenance Tips
Here are some tips to help you maintain your Harley Davidson’s fork seals effectively:
| Step | Description |
|---|---|
| 1 | Regularly inspect the fork seals for any signs of damage or leakage. |
| 2 | Clean the fork tubes and seals regularly to remove dirt and debris. |
| 3 | Apply a thin film of fork oil or silicone lubricant to the fork seals to enhance their performance. |
| 4 | Replace damaged or worn-out fork seals promptly to prevent further damage to the fork assembly. |
| 5 | Follow the manufacturer’s recommended maintenance schedule for your specific Harley Davidson model. |
By following these maintenance tips and paying attention to the condition of your Harley Davidson’s fork seals, you can ensure a safe, smooth, and enjoyable riding experience for years to come.
Tools Needed for Changing Fork Seals on Harley Davidson
Changing fork seals on a Harley Davidson requires a set of specific tools to ensure a successful and efficient job. Here are the essential tools you will need:
1. Fork Seal Driver: A fork seal driver is a tool specifically designed to install new fork seals. It helps to properly seat the seal without damaging it. Make sure to choose a driver that fits the size of your fork tubes.
2. Fork Oil: Fork oil is crucial for maintaining proper lubrication and suspension performance. Ensure that you have the correct type and viscosity of fork oil recommended for your Harley Davidson. Refer to the owner’s manual or consult a professional if necessary.
3. Fork Oil Level Tool: This tool allows you to accurately measure the amount of fork oil in each fork tube. It ensures that the correct amount of oil is added for optimal suspension performance.
4. Fork Cap Wrench: A fork cap wrench is necessary for removing and installing the fork caps. It provides a secure grip and prevents damage to the caps during the process.
5. Socket Set: A set of sockets in various sizes is required for removing and tightening bolts, nuts, and other components of the fork assembly. Make sure to have both standard and metric sizes, as the Harley Davidson may use a combination of both.
6. Torque Wrench: A torque wrench is essential for tightening bolts and nuts to the manufacturer’s recommended specifications. This helps to ensure proper assembly and prevents over or under tightening, which can lead to damage or failure.
7. Seal Cleaning Tool: A seal cleaning tool, such as a fork seal cleaner or a seal bullet, is used to remove any dirt, debris, or old seal material from the fork tubes. This ensures a clean surface for the new seals to properly seal and function.
8. Shop Rags or Paper Towels: Shop rags or paper towels are necessary for wiping and cleaning various parts and components during the fork seal replacement process. They help to remove excess oil, dirt, and debris.
9. Safety Glasses and Gloves: Safety glasses and gloves should always be worn when working on any motorcycle maintenance or repair task. They protect your eyes and hands from potential hazards, such as flying debris or chemicals.
Note: It’s important to ensure that you have all the necessary tools and equipment before starting the fork seal replacement process. The specific tools required may vary depending on the model and year of your Harley Davidson, so refer to the service manual or consult a professional if needed.
Essential Tools Required for Successful Seal Replacement
Replacing fork seals on a Harley Davidson can be a challenging task, but with the right tools, it can be done successfully. Here is a list of essential tools you will need to have on hand:
- Fork seal driver – This tool is used to properly install the new fork seals into the fork tubes. It ensures a tight and secure fit for optimal performance.
- Seal bullet – A seal bullet is a handy tool that helps guide the fork seals into the fork tubes without damaging them. It ensures a smooth and hassle-free installation process.
- Fork oil – It is important to have the correct type and amount of fork oil for your specific Harley Davidson model. Fork oil is essential for lubrication and smooth operation of the fork seals.
- Fork oil level gauge – This tool is used to measure and adjust the fork oil level inside the fork tubes. It ensures that the proper amount of fork oil is used for optimal performance.
- Torque wrench – A torque wrench is necessary to tighten the fork bolts and other components to the manufacturer’s recommended specifications. This ensures proper installation and prevents any damage or leaks.
- Socket set – A socket set is required to remove and install various bolts and screws during the seal replacement process. It allows for easy and efficient work.
- Circlip pliers – These pliers are used to remove and install circlips, which hold the fork seals in place. They ensure a secure and tight fit, preventing any leakage.
- Shop towels – Having shop towels on hand is essential for cleaning and wiping down the fork tubes and other components during the seal replacement process. It helps maintain a clean and tidy workspace.
- Service manual – It is highly recommended to have a service manual for your specific Harley Davidson model. It provides detailed instructions and guidelines for the seal replacement process, ensuring successful completion.
With these essential tools, you will be well-equipped to successfully replace the fork seals on your Harley Davidson. Remember to follow the manufacturer’s instructions and take necessary safety precautions throughout the process. Happy wrenching!
Step-by-Step Guide to Changing Fork Seals on Harley Davidson
Changing the fork seals on your Harley Davidson motorcycle is an essential maintenance task that can help improve the performance and safety of your ride. Here is a step-by-step guide to help you change the fork seals on your Harley Davidson.
Tools and Materials Needed:
- Socket set
- Allen wrenches
- Fork seal driver
- Fork oil
- Measuring cup or syringe
- Clean rags
Step 1: Preparation
Start by ensuring your motorcycle is parked on a level surface and that you have all the necessary tools and materials ready. It is also recommended to have the Harley Davidson service manual for your specific model on hand for reference.
Step 2: Drain the Fork Oil
Begin by removing the front wheel of your Harley Davidson motorcycle. Then, locate the drain screw on the lower part of the fork leg and using an Allen wrench, loosen and remove the screw. Allow the fork oil to completely drain into a suitable container.
Step 3: Remove the Fork Assembly
Next, remove the front fender and loosen the pinch bolts on the upper and lower triple trees. Using a socket set, loosen and remove the fork tube caps. Carefully slide the fork tubes out of the triple tree and remove the fork assembly from the motorcycle.
Step 4: Remove the Fork Seals
Using a fork seal driver, carefully remove the old fork seals from the fork tubes. Make sure to clean any debris or old seal material from the fork tubes using a clean rag. It is also recommended to inspect the fork tubes for any signs of wear or damage.
Step 5: Install the New Fork Seals
Apply a thin layer of fork oil to the inner diameter of the new fork seals. Install the new fork seals onto the fork tubes using the fork seal driver. Make sure they are seated properly and evenly.
Step 6: Reassemble the Fork Assembly
Reinstall the fork assembly back onto the motorcycle, making sure to align the fork tubes securely into the triple tree. Tighten the pinch bolts on the upper and lower triple trees to the manufacturer’s specifications. Then, reinstall the front fender and front wheel.
Step 7: Refill the Fork Oil
Using a measuring cup or syringe, carefully measure and pour the correct amount of fork oil into each fork tube. Refer to the Harley Davidson service manual for the recommended fork oil capacity for your specific model. Once filled, reinstall the fork tube caps and tighten them to the manufacturer’s specifications.
Step 8: Test and Adjust
With the fork seals replaced and the fork assembly reassembled, take your Harley Davidson for a test ride. Pay attention to the suspension and fork performance, and make any necessary adjustments or refinements to ensure optimal performance and safety.
Changing the fork seals on your Harley Davidson motorcycle can be a challenging task, but with the right tools, materials, and this step-by-step guide, you can successfully complete the job and enjoy a smoother and safer ride.
| Step | Task |
|---|---|
| 1 | Preparation |
| 2 | Drain the Fork Oil |
| 3 | Remove the Fork Assembly |
| 4 | Remove the Fork Seals |
| 5 | Install the New Fork Seals |
| 6 | Reassemble the Fork Assembly |
| 7 | Refill the Fork Oil |
| 8 | Test and Adjust |
Simple Instructions for DIY Fork Seal Replacement
If you own a Harley Davidson motorcycle and notice oil leaking from the forks, it may be time to replace the fork seals. While this task may seem daunting, you can tackle it yourself with the right tools and a little patience. Follow these simple instructions to replace the fork seals on your Harley Davidson:
- Start by securely parking your motorcycle on a level surface and ensuring that the front wheel is off the ground.
- Using a socket wrench, remove the front wheel axle nut and loosen the pinch bolts on the front forks.
- Now, carefully lower the front wheel and remove it from the fork legs.
- Next, loosen the lower fork bolt and slide it down the fork tube to expose the fork seal.
- Inspect the fork seal and make sure it is indeed the cause of the leakage, as sometimes other components can also cause oil leaks.
- To remove the old fork seal, carefully pry it out with a seal removal tool or a flathead screwdriver, taking care not to damage the fork tube.
- Clean the fork tube and ensure it is free from any dirt or debris.
- Apply a thin layer of fork oil to the new fork seal and carefully place it onto the fork tube, ensuring it is seated properly.
- Use a fork seal driver tool or a suitable socket to press the new seal into place, applying even pressure around the seal.
- Reinstall the lower fork bolt and tighten it to the manufacturer’s specifications.
- Raise the front wheel back into position and tighten the pinch bolts on the front forks.
- Finally, reinstall the front wheel axle nut and tighten it securely.
Once you have completed these steps, your Harley Davidson’s fork seals should be replaced and the oil leakage issue should be resolved. Remember to test ride your motorcycle after any maintenance work to ensure everything is functioning properly. If you are unsure or uncomfortable performing this task yourself, it is always recommended to seek professional assistance.