
Motorbike front forks play a crucial role in ensuring a smooth and comfortable ride. However, over time, the oil in the forks can degrade and lose its effectiveness, compromising the overall performance of your bike. To maintain optimal performance, it’s essential to regularly check and measure the oil levels in the front forks. In this article, we will guide you through the process of measuring the oil for motorbike front forks, step by step.
Step 1: Start by finding a suitable location to perform the measurement. Ideally, choose a well-lit and level ground area, where you can place your motorbike securely on its center stand or paddock stand.
Step 2: First, locate the fork tubes on the front end of your motorbike. Each fork tube will have a drain plug at the bottom and a cap at the top. Begin by loosening the top cap but do not remove it completely. This will help relieve any pressure built up inside the fork tubes.
Step 3: Next, remove the fork tubes’ drain plugs using a suitable wrench. Make sure to have a container ready to collect the old oil as it drains out. Allow the oil to drain completely from both fork tubes.
Step 4: Once the old oil has been drained, replace the drain plugs securely. Now, refill each fork tube with the recommended quantity and type of oil specified by your motorcycle’s manufacturer. You can refer to the owner’s manual for the exact specifications.
Step 5: After refilling, push the fork tubes up and down several times to distribute the new oil evenly. This will remove any air bubbles trapped inside the fork tubes.
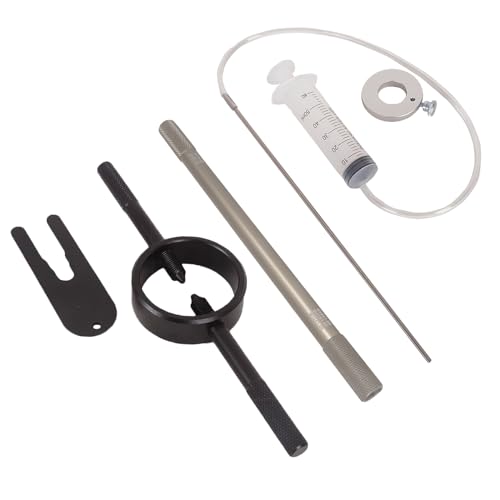
Step 6: To measure the oil level, you will need a measuring device specifically designed for motorbike fork oil, which usually has a glass tube marked with millimeter measurements. Remove the fork tube cap completely and insert the measuring device into the fork tube.
Step 7: Carefully adjust the measuring device until it touches the top of the fork tube and read the oil level. If the oil level is below the recommended range, add more oil. If it’s above the range, remove some oil using a suitable syringe or suction tool.
Remember, accurate oil measurement is crucial for ensuring optimal performance and safety of your motorbike. By following these steps, you can easily measure the oil for motorbike front forks and keep your ride smooth and enjoyable.
Step-by-Step Guide: Measuring Oil for Motorbike Front Forks
If you own a motorbike, a crucial aspect of maintenance is ensuring the front forks are properly lubricated with the correct amount of oil. In this step-by-step guide, we will walk you through the process of measuring oil for motorbike front forks.
Step 1: Gather the necessary tools and materials. You will need:
| 1. Measuring tape or ruler |
| 2. Clean container for collecting the old oil |
| 3. New fork oil |
| 4. Funnel or syringe for pouring the oil |
| 5. Rag or cloth for wiping any spills |
Step 2: Consult your motorbike’s manual for the recommended oil level. This information is usually found in the suspension section. It is important to use the manufacturer’s recommended specifications for your specific model, as different models may require different oil levels.
Step 3: Lift your motorbike and secure it on a stand to ensure stability during the oil measurement process. Make sure the front wheel is off the ground and the bike is in a vertical position.
Step 4: Locate the fork oil measurement level on your motorbike’s front forks. This could be a small window or a reference point on the fork tube. Clean the area around the measurement level using a rag or cloth.
Step 5: Using a measuring tape or ruler, measure the distance between the top of the fork tube and the oil level. Carefully remove any excess oil using a syringe or by draining it into a clean container. Be cautious not to remove more oil than necessary.
Step 6: Slowly pour the new fork oil into the fork tube using a funnel or syringe. Make sure to pour the oil to the recommended level as specified in your motorbike’s manual. Take your time and avoid overfilling the forks.
Step 7: Carefully wipe any spills or excess oil from the fork tubes using a rag or cloth. Ensure that the area is clean and no oil is dripping from the front forks.
Step 8: Repeat the oil measurement process on the other front fork, following the same steps outlined in Steps 4 to 7.
Step 9: Once both front forks have been filled with the correct amount of oil, lower your motorbike off the stand and check for any signs of leakage. Bounce the front forks a few times to distribute the oil evenly.
Step 10: Congratulations! You have successfully measured the oil for your motorbike’s front forks. Regularly check for any signs of oil leakage and refer to your motorbike’s manual for recommended oil change intervals.
By following this simple step-by-step guide, you can ensure that your motorbike’s front forks are properly lubricated for optimal performance and safety on the road.
Prepare the Necessary Tools
Before starting the process of measuring the oil for your motorbike front forks, it is important to make sure you have all the necessary tools at hand. Here is a list of essential tools you will need:
- A measuring cylinder or syringe for accurate measurement of the oil
- A funnel to help pour the oil into the forks without any spills
- A socket wrench or Allen key to remove the front forks cap
- A disposable cloth or rag to wipe off any excess oil or dirt
- Clean and empty container to drain the old oil into
- Fresh fork oil of the recommended viscosity for your motorbike
- Safety glasses or goggles to protect your eyes from any accidental splashes
- Nitrile gloves to keep your hands clean and protected from the oil
- A torque wrench to tighten the front forks cap to the recommended specifications
Having these tools ready before you begin will ensure a smooth and efficient process of measuring the oil for your motorbike front forks.
Find the Correct Oil Level
Step 1: Before measuring the oil level in your motorbike front forks, make sure your bike is on a level surface and the forks are clean and free from any debris.
Step 2: Remove the top cap or plug from one of the fork tubes using a suitable tool. This will allow the air to escape and ensure an accurate measurement of the oil level.
Step 3: Push the front forks down a few times to ensure all the air bubbles are released from the oil. This will help you get a more precise reading.
Step 4: Insert the oil measuring tool (usually a dipstick or an oil level gauge) into the fork tube until it touches the top of the oil.
Step 5: Take note of the oil level indicated on the measuring tool. It should be within the designated range specified by the manufacturer.
Step 6: If the oil level is too low, add small amounts of the recommended fork oil using a suitable syringe or bottle. If the oil level is too high, drain some oil using a suitable tool until it reaches the correct level.
Step 7: Repeat steps 2 to 6 for the other fork tube to ensure both forks have the same oil level.
Step 8: Once you have achieved the correct oil level, replace the top cap or plug securely and wipe off any excess oil.
Step 9: Test the front forks by compressing them a few times to ensure they are functioning smoothly with the correct oil level.
Note: It is important to consult your motorbike’s manual for the specific recommended oil type and oil level before performing any maintenance on your front forks.
Drain the Old Oil
Before measuring the oil for your motorbike’s front forks, you need to drain the old oil completely. Follow these steps to ensure a thorough drain:
Gather the Necessary Tools
Before you begin the draining process, make sure you have the necessary tools on hand:
- Socket wrench
- Drain pan or container to collect the old oil
- Rags or paper towels
Locate the Drain Screw
Next, locate the drain screw on the bottom of the fork leg. It is usually a hexagonal or allen bolt. If you are having trouble finding it, consult your motorbike’s user manual for specific instructions.
Prepare the Drain Pan
Place the drain pan or container underneath the drain screw to collect the old oil. Make sure it is positioned securely and can catch all the oil that will come out.
Loosen the Drain Screw
Using the appropriate socket wrench or allen key, loosen the drain screw counterclockwise to open it. Be careful not to drop the screw or lose any parts.
Let the Oil Drain
Allow the old oil to drain completely into the pan or container. This may take a few minutes, so be patient. You can gently pump the front forks up and down to help speed up the process.
Tighten the Drain Screw
Once all the old oil has drained, carefully tighten the drain screw clockwise to seal the fork leg. Make sure not to overtighten it to avoid stripping the threads.
With the old oil drained, you can now proceed to measure and replace the oil in your motorbike’s front forks.
Measure the Correct Amount of Oil
Measuring the correct amount of oil for your motorbike front forks is crucial to ensure optimal performance and safety while riding. Here is a step-by-step guide on how to measure the correct amount of oil:
- Start by referring to your motorbike’s owner’s manual to find the recommended oil capacity for the front forks. This information will be unique to your bike’s make and model.
- Prepare a clean and well-lit workspace. It is essential to work in a clean environment to prevent any contaminants from entering the fork oil.
- Ensure your motorbike is on a stable surface and in an upright position. This will provide accurate measurements as the forks will be in their regular position.
- Using the correct tools, remove the front fork caps. This step may involve removing the handlebars or other parts, depending on your motorbike’s design.
- Once the fork caps are off, extend and compress the forks a few times to ensure any trapped air is released.
- Position a measuring cup or graduated cylinder beneath the fork tubes to catch the oil that will be drained.
- With the bike in an upright position, slowly and carefully pour the old fork oil out of the fork tubes, allowing it to drain completely. Dispose of the used oil safely and responsibly.
- After draining, measure the exact amount of oil you removed from the forks. This measurement will help you determine the correct amount of oil required for the refill.
- Now, it’s time to refill the forks with the correct amount of fresh fork oil. Using a funnel, pour the recommended amount of oil into each fork tube. Make sure to pour slowly and avoid spilling.
- Replace the fork caps and tighten them according to the specifications in your motorbike’s manual.
- Finally, compress the forks gently a few times to allow the oil to distribute evenly inside the forks.
Remember, the correct amount of oil in your motorbike’s front forks is crucial for optimal suspension performance and overall safety. If you are unsure or uncomfortable performing this task yourself, it is advisable to seek professional assistance from a qualified mechanic or motorcycle technician.
Refill the Forks with New Oil
Once you have drained the old oil from your motorbike front forks, it’s time to refill them with new oil. Follow these steps to ensure a proper refill:
1. Clean the fork tubes and place them in an upright position.
2. Identify the recommended oil quantity and viscosity for your motorbike’s front forks. This information can usually be found in the owner’s manual or by contacting the manufacturer.
3. Using a measuring cup or syringe, carefully pour the specified amount of new oil into each fork tube. Make sure to pour the oil slowly and directly into the fork tube to avoid spills or air bubbles.
4. As you pour the oil, gently move the fork tube up and down to help remove any trapped air and ensure the oil is distributed evenly.
5. Continue filling the fork tube until it reaches the desired level. You can use a measuring tool or the markings on the fork tube to ensure accurate oil levels.
6. Once the oil is filled to the correct level, install the fork caps or plugs securely.
7. Give the fork tubes a final wipe to remove any excess oil.
It is important to note that different motorbikes may have specific requirements for oil quantity and viscosity, so always consult your owner’s manual or contact the manufacturer for the most accurate information. Additionally, regular maintenance and fork oil changes are essential for optimal performance and safety of your motorbike.
Test the Suspension
Once you have completed filling the forks with the correct amount of oil, it is important to test the suspension to ensure that it is balanced and functioning properly. Follow these steps to effectively test the suspension:
1. Set the Sag
The sag is the amount the forks compress under the weight of the rider. To set the sag, first, measure the distance from the ground to a reference point on the front fork while the bike is unloaded. Then, with the rider in full motorcycle gear in the normal riding position, measure the distance again. The difference between the two measurements is the sag.
Adjust the preload on the front forks by turning the preload adjustment screws or nuts using the appropriate tools. Increase the preload to reduce sag or decrease it to increase sag. Repeat the process until the sag falls within the recommended range for your specific motorcycle.
2. Test the Rebound
Rebound refers to the speed at which the suspension extends after being compressed. To test the rebound, perform the following steps:
- Find a smooth and straight road or track.
- Ride the motorcycle over a bump or rough surface at a controlled speed.
- Observe the front fork’s behavior as the suspension rebounds.
If the suspension rebounds too quickly or feels harsh, you may need to adjust the rebound damping. Consult your motorcycle’s owner’s manual for specific instructions on how to adjust the rebound damping.
3. Check for Leaks
After testing the suspension, inspect the front forks for any signs of oil leakage. Look for oil on the forks, around the seals, or on the ground below the motorcycle. If you notice any leaks, it may indicate a problem with the fork seals or other components. In such cases, it is recommended to take your motorcycle to a qualified mechanic or suspension specialist for further inspection and repairs.
| Test | Procedure | Result |
|---|---|---|
| Sag | Measure the distance between the reference point and the ground under unloaded and loaded conditions. | The sag falls within the recommended range. |
| Rebound | Ride over a bump or rough surface at a controlled speed. | The suspension rebounds smoothly and at an appropriate speed. |
| Leakage | Inspect the front forks for any signs of oil leakage. | No oil leaks are present. |


