Opening your bike fork can seem like a daunting task, but with the right tools and a little know-how, it can be easier than you think. Whether you’re looking to replace your fork or simply perform some maintenance, this step-by-step guide will walk you through the process.
Step 1: Gather the necessary tools
Before you begin, make sure you have all the tools you’ll need. This may include a hex wrench or Allen key set, a socket wrench, a fork seal driver, a crown race puller, and a bike stand.
Step 2: Remove the front wheel and brake caliper
Start by removing the front wheel from your bike. Then, using your hex wrench or Allen key, loosen the bolts that secure the brake caliper to the fork. Once loose, slide the caliper off the fork and set it aside.

Step 3: Loosen the stem bolts
Using your hex wrench or Allen key, loosen the stem bolts on the top of the fork. Gradually loosen each bolt, alternating between them, until they are all loose enough to spin freely.
Step 4: Remove the stem and handlebars
Gently lift the handlebars and stem away from the fork, being careful not to damage any cables or wires. Once removed, place the stem and handlebars in a safe location.
Step 5: Unscrew the fork crown race

Using a crown race puller tool, carefully unscrew the fork crown race from the fork. This may require some force, so be sure to use caution to avoid damaging the fork or the crown race.
Step 6: Push the stanchions out of the lower legs
With the fork crown race removed, firmly hold the lower leg of the fork and push down on the stanchions. This will unseat them from the lower legs. Once free, carefully remove the stanchions from the lower legs.
By following these steps, you’ll be able to open your bike fork and perform any necessary maintenance or replacements. Just remember to take your time and exercise caution to ensure the best results.
The Basics of Opening Bike Fork
Step 1: Before opening your bike fork, make sure you have the necessary tools for the job. Typically, you will need a socket wrench, a pair of pliers, and a fork oil seal pick.

Step 2: Start by removing the front wheel of your bike. This will make it easier to access the fork and perform the necessary maintenance.
Step 3: Locate the bolts that hold the fork legs in place. Depending on the type of fork you have, there may be a lower bolt and an upper bolt. Use your socket wrench to loosen and remove these bolts.
Step 4: Once the bolts are removed, you can begin to separate the fork legs. Gently pull the legs apart, being careful not to damage any of the components.
Step 5: With the fork legs separated, you can now inspect and clean the internal components. Use a cloth or brush to remove any dirt or debris that may have accumulated inside the fork.
Step 6: If you need to replace any parts, such as fork seals or bushings, now is the time to do so. Refer to your bike’s manual or consult a professional if you are unsure about the specific parts you need.

Step 7: Once you have completed the necessary maintenance and repairs, reassemble the fork by reversing the steps above. Tighten the bolts securely and make sure everything is aligned properly.
Step 8: Finally, reinstall the front wheel and test the fork to ensure it is functioning correctly. Bounce the bike up and down a few times to check for any abnormalities or unusual noises.
Opening your bike fork can be a straightforward process if you have the right tools and follow these basic steps. However, if you are unsure or uncomfortable with performing this maintenance yourself, it is always recommended to seek professional help.
Step-by-Step Guide to Open Bike Fork
Opening your bike fork may seem like a daunting task, but with the right tools and a step-by-step guide, it can be a relatively straightforward process. Follow these instructions to open your bike fork:
Tools You Will Need:
- Hex keys or Allen wrenches
- Crowfoot socket or a specialized fork wrench (if applicable)
- Soft-jawed vise or a fork-mounting tool
- Lubricant (appropriate for your fork type)
- Clean cloth or towel
Step 1: Prepare Your Bike
Before starting, make sure your bike is securely clamped in a workstand or place it upside down on a soft surface to avoid any damage. If your fork has a removable brake caliper, remove it and set it aside.
Step 2: Remove the Fork Crown Bolt
Locate the fork crown bolt, which is usually located at the bottom of the head tube. Use an appropriate hex key or Allen wrench to loosen and remove the bolt.
Step 3: Loosen the Stem’s Clamp Bolts
Next, use the appropriate hex key or Allen wrench to loosen the stem’s clamp bolts. Depending on your bike’s setup, there may be one or more bolts to loosen.
Step 4: Tap the Steerer Tube
Carefully tap the top of the steerer tube with a soft mallet or a block of wood to loosen it from the stem. This may require some gentle force, but be careful not to damage the tube or the bike frame.
Step 5: Remove the Fork from the Bike
Once the steerer tube is loosened, you can slowly slide the fork out of the head tube. Be cautious of any cables or wires attached to the fork, and disconnect them if necessary.
Step 6: Clean and Lubricate
Take this opportunity to clean the fork, inspect it for any damage or wear, and apply lubricant as needed. Wipe down any excess lubricant with a clean cloth or towel.
Step 7: Reassemble and Adjust
When you’re ready to reassemble the fork, follow the manufacturer’s instructions for your specific fork model. Make sure everything is properly aligned and tightened before taking your bike out for a ride.
| Warning: | Opening your bike fork may void any warranties or guarantees. If you’re unsure or uncomfortable with any step of the process, it’s best to consult a professional bike mechanic. |
|---|
Tools You Will Need to Open Bike Fork
Opening a bike fork requires some specific tools to ensure the job is done correctly and safely. Here are the essential tools you will need:
- Hex wrench set: This is used to remove the bolts that hold the fork in place. Make sure you have the correct size hex wrench for your specific fork.
- Socket wrench set: This is needed to remove the crown race and other large bolts on the fork. It’s important to have a variety of socket sizes to fit different bolt sizes.
- Flathead screwdriver: This tool is useful for prying apart any parts that are stuck or difficult to remove.
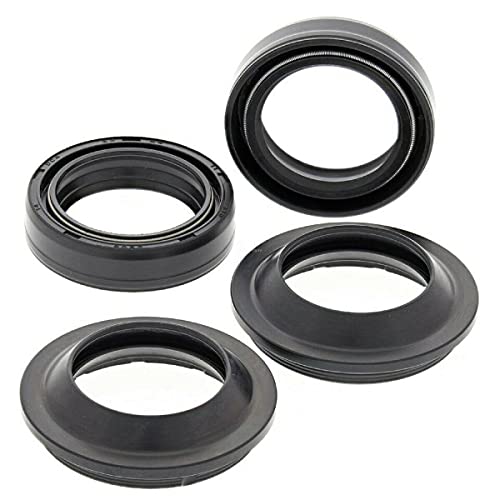
- Fork seal driver: If you need to replace the fork seals, a seal driver is essential for correctly installing the new ones.
- Fork tube clamp: This tool is used to prevent the fork from compressing while you work on it. It holds the fork in a fixed position, making it easier to perform maintenance tasks.
- Cable ties: These are handy for securing cables and hoses out of the way while you are working on the fork.
- Grease and lubricants: It’s always a good idea to have some grease and lubricants on hand to keep the fork running smoothly after you have opened it.
Having the right tools can make all the difference when it comes to opening a bike fork. Make sure you have these tools readily available before you begin the process.
Tips and Tricks for Opening Bike Fork
Opening the bike fork may seem like a daunting task, but with the right knowledge and tools, it can be done with ease. Here are some tips and tricks to help you get started:
1. Gather the Necessary Tools
Before you begin, make sure you have all the tools you need. This includes a fork seal driver, a socket set, a torque wrench, and a soft mallet. Having these tools on hand will make the process much smoother.
2. Prepare the Bike
Before you can open the fork, you’ll need to remove the wheel and brake caliper. This will give you better access to the fork and allow you to work more comfortably.
3. Loosen the Fork Caps
Start by loosening the fork caps on the top of the fork legs. Use a socket set to loosen the caps, but be careful not to overtighten or strip the bolts. Once the caps are loose, you can move on to the next step.
4. Remove the Fork Legs
With the caps loosened, you can now remove the fork legs from the bike. Gently tap the bottom of the fork legs with a soft mallet to dislodge them from the bike frame. Be careful not to damage the legs or the frame in the process.
5. Service or Replace the Fork Seals
Once the fork legs are removed, you can service or replace the fork seals. This may involve cleaning the seals, adding fresh lubrication, or installing new seals altogether. Follow the manufacturer’s instructions or consult a bike mechanic if you’re unsure how to proceed.
6. Reassemble the Fork
Once the fork seals have been serviced or replaced, it’s time to reassemble the fork. Slide the fork legs back into the bike frame and tighten the fork caps using a torque wrench to the manufacturer’s specifications. Double-check that everything is securely in place before moving on.
Following these tips and tricks will help you open your bike fork safely and effectively. Remember to take your time and double-check your work at each step of the process. If you’re uncertain about any part of the process, it’s always best to consult a professional bike mechanic for assistance.