


When it’s time to replace a ball joint in your vehicle’s suspension system, you may find yourself wondering how to separate the ball joint from the control arm or steering knuckle. One tool that can make this job easier is a pickle fork.
A pickle fork is a specialized tool designed to apply leverage and force to separate stubborn ball joints. It features two forks that fit between the ball joint and the control arm or knuckle. By striking the end of the pickle fork with a hammer, you can effectively separate the ball joint without damaging the surrounding components.
Before using a pickle fork, it’s important to take some safety precautions. First, make sure the vehicle is properly supported on jack stands and the wheels are securely chocked. Additionally, wear safety goggles and gloves to protect yourself from any potential flying debris.
To begin, locate the ball joint you need to separate. Depending on the vehicle, you may need to remove other components, such as the wheel and brake caliper, to access the ball joint. Once you have clear access to the ball joint, position the pickle fork between the ball joint and the control arm or knuckle.
Step-by-step Guide on Separating a Ball Joint with Pickle Fork
Separating a ball joint can be a challenging task, but with the right tools and techniques, it can be done successfully. One of the most commonly used tools for this job is a pickle fork. Here’s a step-by-step guide on how to separate a ball joint using a pickle fork:
- Start by ensuring that the vehicle is securely raised and supported on jack stands. This will provide you with enough clearance to work on the ball joint.
- Locate the ball joint that needs to be separated. It is usually found on the suspension or steering system.
- Inspect the ball joint for any dirt, rust, or other debris that may hinder the separation process. Clean it thoroughly if necessary.
- Place a pry bar or a large screwdriver under the ball joint and apply upward pressure to relieve some of the tension.
- Position the pickle fork between the ball joint and the control arm or steering component. The tines of the pickle fork should be placed around the base of the ball joint.
- Using a hammer, strike the end of the pickle fork forcefully. The impact should help separate the ball joint from its connection point.
- If the ball joint does not separate initially, you can try applying more pressure or tapping the pickle fork from different angles. Be cautious not to damage any surrounding components.
- Once the ball joint is separated, carefully remove the pickle fork and inspect the ball joint and its mating surfaces for any damage or wear. Replace if necessary.
Remember to exercise caution and wear protective gear, such as gloves and safety glasses, during the entire process. If you aren’t confident in performing this task yourself, it’s advisable to seek professional assistance.
Safety Precautions for Ball Joint Separation
When attempting to separate a ball joint using a pickle fork, it is important to take appropriate safety precautions to prevent injuries and damage to the vehicle. Follow these guidelines to ensure a safe and successful ball joint separation:
Proper Eye and Hand Protection
Always wear safety goggles or glasses to protect your eyes from flying debris or any potential damage caused during the separation process. Additionally, it is recommended to wear gloves to protect your hands from any sharp edges or pinching hazards.
Secure Vehicle Position
Park the vehicle on a flat and stable surface with the parking brake engaged. Before starting the separation, ensure that the wheels are chocked off and the vehicle is securely supported using jack stands or ramps. This will minimize the chances of the vehicle rolling or falling during the process.
By following these safety precautions, you can confidently and safely separate a ball joint using a pickle fork without causing any harm to yourself or the vehicle.
Required Tools and Equipment
Before you begin separating a ball joint with a pickle fork, you will need to gather the necessary tools and equipment. Having the right tools and equipment will make the process much easier and more efficient. Here is a list of what you will need:
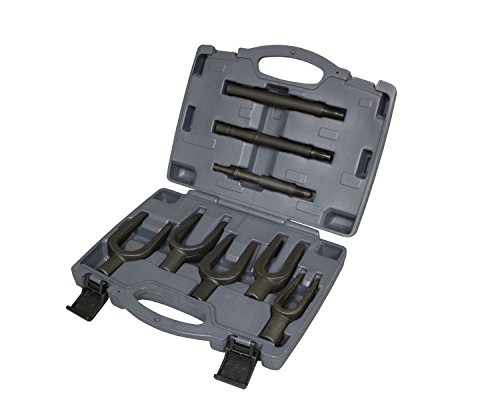
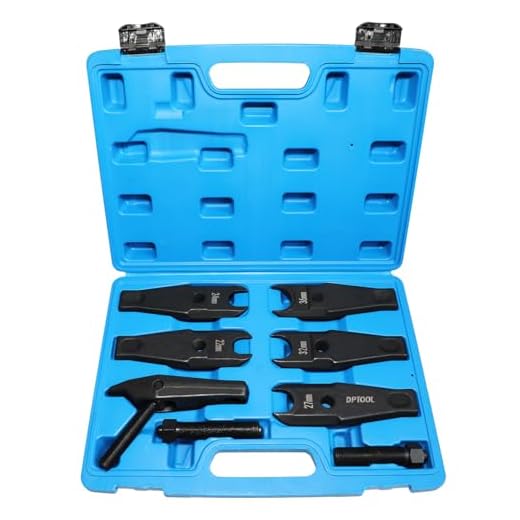
- Pickle Fork: This is the main tool you will need to separate the ball joint. A pickle fork is a specially designed tool with two prongs that are used to separate the ball joint from the control arm or knuckle.
- Hammer: A hammer is needed to strike the pickle fork and apply enough force to separate the ball joint. Make sure you have a sturdy hammer that can withstand heavy impact.
- Socket Set: A socket set is necessary to remove any bolts or nuts that may be holding the ball joint in place. Make sure you have a variety of socket sizes to accommodate different bolt sizes.
- Jack and Jack Stands: You will need a jack and jack stands to lift and support the vehicle while you work on separating the ball joint. Safety is crucial, so make sure you use jack stands to prevent the vehicle from falling.
- Pry Bar: A pry bar may be needed to provide leverage and help with separating the ball joint. It can be used in combination with the pickle fork and hammer to apply additional force.
- Lubricant: Using a lubricant such as penetrating oil can help loosen any rust or corrosion that may be causing the ball joint to stick. Apply lubricant to the ball joint and surrounding area before attempting to separate it.
- Safety Gloves and Goggles: It is important to protect your hands and eyes during this process. Safety gloves will prevent injuries and goggles will protect your eyes from any debris that may fly off during the ball joint separation.
Having these tools and equipment ready will make the process of separating a ball joint with a pickle fork much smoother. Make sure you have everything on this list before beginning the task to avoid any unnecessary delays or frustration.
Removing the Ball Joint Dust Cover
Before you can separate a ball joint with a pickle fork, you need to remove the dust cover that protects the joint. The dust cover can be damaged during the removal process, so it’s important to take care when removing it.
Tools Needed:
- Flat-head screwdriver
- Needle-nose pliers
Instructions:
1. Start by locating the ball joint dust cover. It is a rubber or plastic boot that covers the ball joint and protects it from dirt, grime, and moisture.
2. Use a flat-head screwdriver to gently pry off the dust cover from the ball joint. Be careful not to damage the cover or the ball joint itself.
3. If the dust cover is stubborn and won’t come off easily, you can use needle-nose pliers to grip the edge of the cover and pull it off. Take your time and be patient to prevent any damage.
4. Once the dust cover is removed, inspect it for any signs of damage or wear. If it’s in good condition, you can re-install it after separating the ball joint with the pickle fork. However, if it’s damaged, it’s recommended to replace it with a new dust cover for optimal protection.
| 1. | Work in a clean, well-lit area to prevent any small components like clips or springs from getting lost. |
| 2. | Take photos or make notes during the removal process for easier reassembly later. |
| 3. | Refer to the vehicle’s manual or a trusted online resource for specific instructions on removing the ball joint dust cover, as the exact procedure can vary depending on the make and model of your vehicle. |
Using the Pickle Fork to Separate the Ball Joint
When it comes to separating a ball joint, one of the most effective tools to use is a pickle fork. This handy tool is specifically designed to safely and efficiently separate the ball joint from the control arm or steering knuckle without causing damage.
Here is a step-by-step guide on how to use a pickle fork effectively:
- Ensure safety precautions: Before starting the process, make sure to wear appropriate safety gear such as gloves and goggles to protect yourself from any debris or flying parts.
- Loosen the nut: Use a wrench or socket to loosen the nut that secures the ball joint to the control arm or steering knuckle. Do not remove it completely at this stage, just loosen it enough to provide some play.
- Position the pickle fork: Insert the pickle fork between the ball joint and the control arm or steering knuckle. Make sure the fork is centered and positioned correctly to avoid damage.
- Apply pressure: Using a hammer or mallet, strike the handle of the pickle fork to exert downward pressure on the ball joint. This force will help separate the joint from its connection.
- Separate the joint: With enough force applied, the ball joint will begin to separate from the control arm or steering knuckle. Keep striking the pickle fork until the joint is fully separated.
- Remove the nut and ball joint: Once the ball joint is separated, remove the loosened nut and completely detach the joint from the control arm or steering knuckle.
Remember to exercise caution and care when using a pickle fork, as excessive force or incorrect positioning can cause damage to the surrounding components. It is also important to inspect the ball joint and the control arm or steering knuckle for any signs of wear or damage, as these may need to be replaced.
By following these steps, you can safely and effectively separate a ball joint using a pickle fork, saving you time and effort in the process.
Cleaning and Reassembling After Separation
Once you have successfully separated the ball joint using a pickle fork, it is important to clean and reassemble the components before proceeding with any further repairs or installations. Follow these steps to ensure the joint is properly cleaned and reassembled:
- Inspect the ball joint for any signs of damage or wear. Look for cracks, excessive play, or any other issues that may indicate the need for replacement.
- Use a suitable cleaning solution and a brush to thoroughly clean the ball joint and its surrounding components. Ensure that all dirt, grease, and debris are removed.
- Inspect the rubber boot on the ball joint for any tears or damage. If necessary, replace the boot to prevent any future contaminants from entering the joint.
- Apply a small amount of grease to the ball joint before reassembling. This will help reduce friction and ensure smooth operation.
- Carefully align the ball joint and insert it into its housing. Ensure that it is seated properly and securely.
- Reinstall any retaining clips or nuts that were removed during the separation process. Tighten them to the manufacturer’s specifications.
- Double-check the joint’s movement to ensure that it is functioning correctly. Test for any excessive play or binding.
By following these steps, you can ensure that the ball joint is properly cleaned and reassembled after separation. This will help prolong its lifespan and maintain optimal performance.


