


Sharpening a Helle knife is an essential skill for any outdoor enthusiast or professional woodsman. A Helle knife is known for its high-quality steel, excellent craftsmanship, and durability. However, even the best knives can become dull over time and lose their cutting edge. To maintain the peak performance of your Helle knife, regular sharpening is necessary.
Sharpening a Helle knife requires patience, precision, and the right tools. There are various methods and techniques to sharpen a Helle knife, but in this article, we will discuss the most effective and straightforward approach. Whether you are a beginner or an experienced user, this guide will help you bring back the razor-sharp edge to your Helle knife.
Before diving into the sharpening process, it is important to understand the anatomy of a Helle knife. A Helle knife typically has a Scandinavian grind, which means it has a single, flat bevel on one side and a convex bevel on the other side. This type of grind offers excellent slicing performance and durability. The sharpening process will involve maintaining this grind and angle to ensure optimal cutting performance.
Choosing the Right Sharpening Tools
When it comes to sharpening a Helle knife, selecting the right sharpening tools is crucial for achieving a sharp and durable edge. Here are some factors to consider when choosing the tools:
1. Whetstones
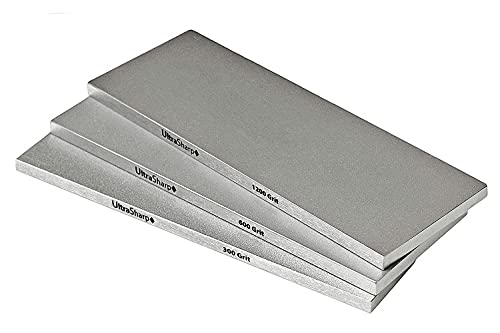
Whetstones, also known as sharpening stones, are commonly used to sharpen knives. They are available in various grits, ranging from coarse to fine. Coarse grit stones are used for repairing chipped or damaged blades, while finer grit stones are used for refining and honing the edge. Consider having a combination of coarse and fine stones to cover different sharpening needs.
2. Honing Steel
A honing steel, also referred to as a sharpening rod or sharpening steel, is a long, rod-shaped tool with a handle. It is used to realign the edge of the knife and maintain its sharpness between sharpenings. When using a honing steel, it is important to maintain the correct angle and apply consistent, light pressure to avoid damaging the blade.
3. Sharpening Systems
Sharpening systems provide a guided approach to achieving a consistent and accurate edge. These systems typically include a base or clamp to hold the knife securely and allow controlled movement across the sharpening surface. They may also include interchangeable sharpening stones or diamond plates of different grits.
4. Stropping Tools
Stropping tools, such as leather strops or strop blocks, are used in the final stage of sharpening to refine and polish the edge. They are typically coated with a fine abrasive compound, such as chromium oxide or diamond paste. Stropping helps remove any remaining burrs and enhances the knife’s cutting performance.
When choosing the right sharpening tools, consider the type of Helle knife you have and the level of sharpening required. It is also important to learn and practice proper sharpening techniques to ensure the best results. With the right tools and skills, you can maintain your Helle knife’s sharpness and prolong its lifespan.
Proper Sharpening Technique
Sharpening a Helle knife requires attention to detail and the use of proper technique. Follow these steps to ensure a sharp and precise edge:
Step 1: Gather Necessary Tools
Before you begin, make sure you have the following tools ready:
- A sharpening stone or honing rod
- Lubricating oil or water
- A cleaning cloth
Step 2: Prepare the Knife
Before sharpening, clean the knife blade to remove any debris or oil. Use a cleaning cloth to wipe it down thoroughly, ensuring a clean surface to work on.
Step 3: Choose the Right Angle
Hold the knife at a consistent angle for sharpening. The ideal angle for Helle knives is around 20 degrees. You can use a sharpening guide or simply practice maintaining a consistent angle using the natural curvature of the knife.
Step 4: Start Sharpening
Using a sharpening stone or honing rod, start sharpening the blade in a smooth and controlled motion. Work from the base of the blade to the tip, maintaining the chosen angle throughout. Apply lubricating oil or water to the stone or rod to reduce friction and aid in the sharpening process.
Step 5: Test the Edge
Once you are satisfied with the sharpness, test the edge of the knife on a piece of paper or your thumb. Be careful not to cut yourself. If the knife cleanly slices through the paper or makes a clean cut on your thumb without slipping, then the blade is properly sharpened.
Remember, practice makes perfect when it comes to sharpening Helle knives. With time and experience, you will develop your own technique and achieve the desired sharpness for your knives.
Maintaining the Sharpness
Once you have sharpened your Helle knife, it is important to maintain its sharpness. Here are some tips to help you keep your knife sharp for a long time:
- Store your knife in a sheath or a knife block to protect the blade from getting dull.
- Avoid cutting on hard surfaces like metal or glass, as they can damage the sharp edge of the blade.
- Use a cutting board made of wood or plastic to minimize wear and tear on the blade.
- Clean your knife after each use to remove any dirt or debris that can dull the blade.
- Hand wash your knife with warm water and mild soap, and dry it thoroughly before storing.
- Avoid using abrasive cleaners or scouring pads that can scratch the blade.
- Regularly hone your knife with a honing rod or sharpening steel to realign the blade and maintain its sharpness.
- If your knife starts to feel dull, you can use a sharpening stone or a knife sharpener to restore its sharp edge.
By following these tips, you can ensure that your Helle knife stays sharp and ready for use whenever you need it.