
If you are an avid cook or simply someone who uses a knife regularly, you know how important it is to have a sharp blade. A dull knife not only makes your cutting tasks more difficult, but it can also be dangerous. Luckily, there are many tools available on the market to help you maintain the sharpness of your knives. One such tool is an all-in-one sharpener.
An all-in-one sharpener is a versatile tool that can be used to sharpen various types of blades, including kitchen knives, pocket knives, and even scissors. It typically features different sharpening stages, such as coarse, fine, and ceramic, to suit different types of blades and sharpening needs. Using an all-in-one sharpener is an easy and effective way to keep your knives in top condition.
To sharpen a knife with an all-in-one tool, start by determining the sharpness of your blade. This can be done by running your finger gently along the edge of the knife. If you feel any nicks or dullness, it’s time to sharpen it. Begin by selecting the appropriate stage on the sharpener.
Place the knife blade in the designated slot or groove of the sharpener, making sure to hold it at the correct angle. Usually, a 20-degree angle is recommended for most knives. Slowly slide the blade through the slot, exerting light pressure. Repeat this process a few times, alternating between the coarse, fine, and ceramic stages, until you achieve the desired sharpness.
Remember to take your time and be patient when sharpening your knife. Rushing the process can result in an inconsistent edge. Once you are satisfied with the sharpness, carefully wipe off any metal shavings or debris from the blade. Your knife is now ready to be used for all your cutting needs!
Things you will need
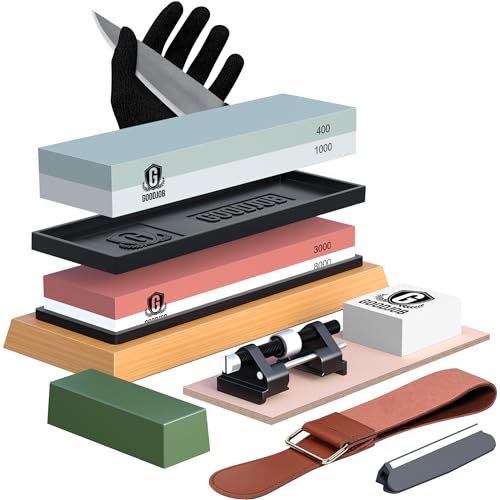
Sharpening stone: A sharpening stone is essential for sharpening your knife. It can be a water stone, oil stone, or diamond stone. Choose the type of stone that best suits your needs.
Honing guide: A honing guide helps maintain a consistent angle while sharpening your knife. This ensures that you sharpen the blade evenly and avoid any nicks or uneven sharpening.
Lubricant: Using a lubricant, such as water or honing oil, on the sharpening stone helps to reduce friction and heat buildup. This allows the knife to glide smoothly across the stone and ensures an effective sharpening process.
Water source: If you are using a water stone, you will need a water source to keep the stone wet during the sharpening process. A bowl of water or a sink can serve as a suitable water source.
Cloth or towel: Having a cloth or towel on hand is useful for wiping off any excess lubricant or water from the knife blade and stone.
Pencil or marker: A pencil or marker can be used to mark the bevel of the blade before starting the sharpening process. This helps you keep track of your progress and ensure an even sharpening angle.
Safety gloves: While not required, wearing safety gloves can help protect your hands while handling the knife and sharpening tools. This is especially important if you are a beginner or not confident in your knife sharpening skills.
Flat surface: Find a stable and flat surface to place the sharpening stone on. This will ensure that the stone remains steady during the sharpening process and provides a consistent angle for sharpening.
Time and patience: Sharpening a knife takes time and patience. Make sure you have enough time set aside for the sharpening process and approach it with a calm and focused mindset.
Sharpening Stone
A sharpening stone is a tool used to sharpen knives and other cutting tools. It is typically made of a hard material such as natural stone or synthetic materials like diamond or ceramic. Sharpening stones come in different shapes, sizes, and grits. They are essential for maintaining the sharpness and edge of a knife.
When using a sharpening stone, it is important to choose the right grit for the desired level of sharpness. Coarse grit stones are used for repairing or re-establishing the edge of a dull knife. Medium grit stones are used for regular maintenance and sharpening, while fine grit stones are used for refining and polishing the edge.
Using a sharpening stone involves holding the knife at a consistent angle against the stone and moving it back and forth in a controlled motion. This helps to remove the dull metal and create a new sharp edge. A lubricant, such as water or oil, is often used on the stone to aid in the sharpening process and prevent the blade from overheating.
Sharpening stones require regular maintenance to keep them in good condition. They should be cleaned after each use to remove any metal particles and debris. Some stones may need to be flattened periodically to ensure a flat and even surface for sharpening.
Overall, a sharpening stone is a valuable tool for anyone who wants to keep their knives sharp and efficient. With proper technique and care, it can help prolong the life of a knife and ensure a clean and precise cut every time.
All-in-one Knife Sharpener
If you are looking for a convenient and efficient solution to sharpen your knife, then an all-in-one knife sharpener is the perfect tool for you. This compact and versatile device is designed to provide accurate and consistent sharpening results, ensuring that your knives stay razor-sharp at all times.
Features
An all-in-one knife sharpener typically comes with a range of features that make it easy to use and highly effective. Some of the common features you can expect to find include:
- Diamond-coated sharpening wheels for precision sharpening
- A built-in angle guide to maintain the ideal sharpening angle
- Multiple sharpening stages for different levels of blade repair and maintenance
- A sturdy and slip-resistant base for stability during sharpening
These features are designed to ensure that you achieve optimal results every time you sharpen your knife with an all-in-one sharpener. Whether you have a chef’s knife, a pocket knife, or a hunting knife, this tool can handle them all.
How to Use
Using an all-in-one knife sharpener is straightforward and requires minimal effort. Here is a step-by-step guide:
- Place the sharpener on a flat and stable surface
- Insert the knife blade into the appropriate sharpening slot
- Hold the knife handle securely and pull it through the slot, following the angle guide
- Repeat this process for each stage of sharpening if your sharpener has multiple stages
- Clean the knife blade to remove any metal shavings
By following these simple steps, you can quickly and easily restore the sharpness of your knife using an all-in-one sharpener.
Benefits
An all-in-one knife sharpener offers several benefits that make it a must-have tool for any kitchen or workshop. These benefits include:
- Convenience: The all-in-one design eliminates the need for multiple sharpening tools
- Time-saving: Sharpening a knife with an all-in-one sharpener takes only a few minutes
- Cost-effective: Investing in an all-in-one sharpener is more affordable than buying individual sharpening tools
- Consistency: The built-in angle guide ensures consistent and precise sharpening
- Versatility: An all-in-one sharpener can be used on various types and sizes of knives
With an all-in-one knife sharpener, you can keep your knives in top-notch condition, ensuring that they remain sharp and ready for any task.
| Brand | Features | Price |
|---|---|---|
| Brand A | Diamond-coated wheels, multiple sharpening stages, slip-resistant base | $29.99 |
| Brand B | Angle guide, ceramic sharpening wheels, compact design | $24.99 |
| Brand C | Quick and easy sharpening, adjustable angle guide, non-slip base | $34.99 |
These recommended all-in-one knife sharpeners offer excellent value for money and have received positive reviews from users. Choose one that suits your needs and start sharpening your knives with ease.
Step-by-step guide
Sharpening a knife with an all-in-one tool is a simple process that anyone can learn. Follow these steps to bring your dull knife back to razor-sharpness.
Step 1: Set up your workspace
Before you begin, ensure that you have a clean and well-lit workspace. Place a towel or cutting board on the table to protect the surface and prevent the knife from slipping.
Step 2: Prepare the all-in-one tool
Start by familiarizing yourself with the features of your all-in-one sharpening tool. It may have different slots or stages for different types of blades. Make sure you understand how to properly adjust and use the tool.
Step 3: Assess the condition of the knife
Examine the knife to determine its condition. Look for any nicks, chips, or excessive wear. If the blade has any major damage, it may require professional repair. For minor issues, proceed to the next step.
Step 4: Begin sharpening
Hold the knife securely and position the blade into the coarsest slot of the all-in-one tool. Apply slight pressure and draw the knife towards you, following the manufacturer’s instructions. Repeat this action several times until you feel a significant improvement in sharpness.
Note: Some all-in-one tools have multiple stages with varying levels of abrasiveness. Move to a finer stage if your knife still needs more sharpening.
Step 5: Hone the edge
After achieving the desired level of sharpness, switch to the honing stage of the all-in-one tool. Draw the knife through this slot several times to refine the edge and remove any burrs created during the sharpening process.
Step 6: Test the sharpness
Carefully test the sharpness of your knife by performing a simple slicing test on a piece of paper or a tomato. If the blade cuts effortlessly, then it is sharp and ready to use. If not, repeat the sharpening process from step 4.
Remember to always handle sharp knives with care and store them properly when not in use. Regularly maintaining your knives using an all-in-one tool will ensure they stay sharp and ready for any cutting task.
Step 1: Choose the right sharpening method
When it comes to sharpening a knife with an all-in-one tool, it’s important to choose the right sharpening method for the type of knife you have. There are several different methods available, each suited to different types of knives and levels of sharpening proficiency.
One of the most common sharpening methods is the honing rod or sharpening steel. This method is best for maintaining the sharpness of already sharp knives and can be done quickly and easily. To use a honing rod, hold the knife at a 20-degree angle to the rod and swipe the blade along the rod, starting from the base and moving towards the tip. Repeat this process several times on each side of the blade.
Another sharpening method that works well with all-in-one sharpening tools is the sharpening stone. Sharpening stones come in various grits, which determine the coarseness of the stone and the level of sharpening it provides. To sharpen a knife with a stone, wet the stone with water or oil, depending on the stone’s instructions. Hold the knife at a 20-degree angle to the stone and slide the blade along the stone, starting from the base and moving towards the tip. Repeat this process several times on each side of the blade, gradually moving to a finer-grit stone for a sharper edge.
It’s important to note that while all-in-one sharpening tools are versatile and convenient, they may not be suitable for all types of knives. Some knives, particularly those with serrated edges or delicate blades, may require specialized sharpening methods. In these cases, it’s best to consult the manufacturer’s instructions or seek professional sharpening services to ensure the longevity and sharpness of your knife.
| Advantages | Disadvantages |
|---|---|
| – Versatile and can be used for a variety of knives. | – May not provide the same level of precision as specialized sharpening methods. |
| – Convenient and saves time compared to other sharpening methods. | – Some knives may require specialized sharpening methods not offered by all-in-one tools. |
| – Can be easily stored and transported for on-the-go sharpening needs. | – Not all all-in-one tools offer the same quality and effectiveness. |
Step 2: Prepare the knife
Before you begin sharpening your knife, it’s important to prepare the knife properly. This will ensure that you get the best results and maintain the integrity of your knife.
Clean the knife
Start by cleaning the knife to remove any dirt, grime, or food particles that may be present. Use warm soapy water and gently scrub the blade with a sponge or brush. Rinse the knife thoroughly and pat it dry with a clean towel.
Inspect the knife
Take a close look at the knife to check for any chips, dents, or other damage that may affect the sharpening process. If you notice any significant damage or issues, it’s best to consult a professional for repair before proceeding with sharpening.
Gather necessary tools
Make sure you have all the necessary tools for sharpening your knife. This may include an all-in-one knife sharpener, sharpening stones, honing oil, or a honing rod. Refer to the instructions provided with your specific sharpener to ensure you have everything you need.
Once you have cleaned the knife, inspected it for damage, and gathered all the necessary tools, you are ready to move on to the next step, which is actually sharpening the knife.
Step 3: Follow the sharpening instructions
Now that you have selected the appropriate sharpening tool for your knife, it’s time to follow the instructions to restore its sharpness. Different knife sharpeners have different methods, so make sure to read the manufacturer’s instructions carefully.
If you are using a sharpening stone or whetstone, start by wetting the stone with water or honing oil. Then, hold the knife at a 20-degree angle and gently slide the blade across the stone, moving from the base to the tip in a smooth motion. Repeat this process several times, alternating sides of the blade, until you have achieved the desired sharpness.
If you are using a pull-through sharpener, simply place the knife into the designated sharpening slot and pull it through, following the instructions provided. Most pull-through sharpeners have multiple slots for different levels of sharpening, so choose the appropriate one for your needs.
Be sure to apply consistent pressure and maintain the proper angle as you sharpen. It’s important to take your time and be patient, as rushing the process can result in an uneven edge or even damage to the knife.
After sharpening, you can test the sharpness by gently running the blade across a piece of paper. If it cuts through with ease and doesn’t tear the paper, then your knife is properly sharpened. If not, you may need to repeat the sharpening process or adjust your technique.
| Pros | Cons |
|---|---|
| Can restore the sharpness of dull knives | Requires some practice to master the technique |
| Various options available for different sharpening needs | May take some time to achieve desired sharpness |
| Can prolong the lifespan of your knives | Requires the use of sharpening tools |
Tips and tricks
Here are some useful tips and tricks to keep in mind when sharpening your knife with an all-in-one sharpening tool:
- Make sure the knife is clean and dry before sharpening.
- Hold the knife firmly and at the correct angle against the sharpening surface.
- Start with the coarse grit side of the sharpening tool and gradually move to the finer grit side.
- Use steady and consistent pressure while sharpening to achieve the best results.
- Take breaks if needed to prevent overheating the blade.
- Always follow the instructions provided with the sharpening tool for best practices.
- Test the sharpness of the knife periodically during the sharpening process to track progress.
- After sharpening, clean the knife and remove any metal shavings or debris.
- Regularly maintain and clean your sharpening tool to ensure optimal performance.
- Consider practicing on a less expensive or disposable knife before sharpening your favorite or valuable knife.
By following these tips and tricks, you can sharpen your knife effectively and safely using an all-in-one sharpening tool.


