
If you’re looking to sharpen your knife and achieve a razor-sharp edge, a Norton sharpening stone is the perfect tool for the job. Norton has been a trusted name in sharpening since 1823, offering high-quality stones that are renowned for their durability and effectiveness. In this guide, we will walk you through the steps to sharpen your knife using a Norton sharpening stone, ensuring that you can achieve professional-level results right from the comfort of your own kitchen.
Step 1: Prepare Your Norton Sharpening Stone
Befo
Choosing the right Norton sharpening stone
When it comes to sharpening your knives, choosing the right sharpening stone is crucial. Norton offers a variety of sharpening stones that are designed to meet different needs and preferences. Here are some factors to consider when selecting a Norton sharpening stone:
Grit size
One of the most important factors to consider is the grit size of the sharpening stone. The grit size determines how coarse or fine the stone is and directly affects the sharpening process. Norton offers sharpening stones with different grit sizes ranging from coarse to fine. Coarser stones are ideal for repairing damaged or dull blades, while finer stones are better for polishing and refining the blade’s edge.
Stone type
Norton sharpening stones are available in different materials, each offering unique advantages. Oil stones are made of abrasive particles bonded with oil, and they are known for their versatility and ease of use. Water stones, on the other hand, use water as a lubricant and are known for their fast cutting action. Diamond stones, which have industrial-grade diamonds embedded in the surface, are known for their exceptional durability and speed. Each stone type has its own benefits, so it’s important to choose one that suits your preferences and sharpening needs.
Stone size
Consider the size of the sharpening stone that you will need. Norton offers sharpening stones in various sizes, from small pocket-sized stones to larger bench stones. Smaller stones are portable and convenient for on-the-go sharpening tasks, while larger stones provide a more stable and comfortable sharpening experience.
Stone shape
Norton sharpening stones come in different shapes, including rectangular, square, and round. The shape of the stone can influence your sharpening technique and the areas of the blade you can effectively sharpen. Rectangular stones are versatile and suitable for most sharpening tasks, while round stones are great for sharpening curved blades. Consider the type of knives you usually sharpen and choose a stone shape accordingly.
In summary, choosing the right Norton sharpening stone involves considering factors such as grit size, stone type, stone size, and stone shape. By selecting the stone that best suits your needs and preferences, you can achieve optimal results and maintain the sharpness of your knives for a long time.
Selecting the appropriate grit size
When sharpening a knife with a Norton sharpening stone, it is important to select the appropriate grit size. This decision depends on the type of knife you are sharpening and the level of sharpness you desire.
Norton sharpening stones come in various grit sizes, ranging from coarse to fine. Coarse grit stones, usually denoted by lower numbers such as 100 or 220, are ideal for repairing chips or nicks in the blade and for initial shaping. They remove material quickly but leave behind pronounced scratches.
Medium grit stones, with numbers like 400 or 600, are versatile and widely used for general sharpening purposes. They are effective in removing the scratches left by coarse stones and for establishing a sharp edge.
Fine grit stones, typically with numbers above 1000, produce a polished and refined edge. They are perfect for achieving a razor-sharp finish and are often used for maintaining and refining blades that are already relatively sharp.
It is crucial to match the grit size with the intended use of the knife. For heavy-duty blades or those with significant damage, starting with a coarse grit stone is recommended. As you progress through the sharpening process, transitioning to medium and then fine grit stones will help you achieve a sharper and more refined edge.
Remember that the choice of grit size ultimately depends on the individual’s preferences and the specific requirements of the knife. Experimenting with different grit sizes will allow you to find the perfect balance between removing material efficiently and obtaining the desired level of sharpness.
Considering the stone material
When it comes to sharpening knives, the material of the sharpening stone plays a crucial role in determining the effectiveness of the sharpening process. Norton sharpening stones are known for their high-quality materials, which offer excellent performance and durability.
There are different types of Norton sharpening stones available, each made from a specific material. Here are some common materials used in Norton sharpening stones:
1. Aluminum Oxide Stones
Aluminum oxide stones are versatile and are suitable for sharpening a wide range of knives, including kitchen knives, hunting knives, and woodworking tools. These stones are known for their ability to remove metal quickly, making them an ideal choice for restoring dull or damaged blades.
2. Silicon Carbide Stones
Silicon carbide stones are known for their aggressive cutting action, which makes them ideal for fast material removal. They are commonly used for reshaping or repairing damaged edges. These stones are also suitable for sharpening tough materials such as stainless steel.
Overall, both aluminum oxide and silicon carbide stones offer excellent performance and can help you achieve a sharp edge on your knife. The choice between these two materials depends on your specific sharpening needs.
Before using a Norton sharpening stone, it is essential to soak the stone in water. This helps to lubricate the surface and prevent the stone from clogging with debris. Soaking the stone for about 10 minutes before use is recommended.
Additionally, it is important to follow the proper sharpening technique when using a Norton sharpening stone. This includes maintaining a consistent angle, using a steady hand, and applying even pressure throughout the sharpening process. With the right technique and the appropriate Norton sharpening stone, you can achieve a razor-sharp edge on your knife.
In conclusion, the material of the sharpening stone is an important consideration when sharpening knives. Norton sharpening stones, whether made from aluminum oxide or silicon carbide, provide excellent performance and durability. By choosing the right stone and following proper sharpening techniques, you can ensure your knives are always sharp and ready for use.
Preparing the knife for sharpening
Before you begin sharpening your knife with a Norton sharpening stone, you need to properly prepare the knife. This involves cleaning it and ensuring it is in good condition.
The first step is to clean the knife thoroughly. Use warm soapy water and a sponge or cloth to remove any dirt, oil, or grime from the blade. Pay special attention to any grooves or crevices that may have accumulated debris.
Once the knife is clean, inspect it for any damage or dullness. Look for any chips, nicks, or uneven edges that may need to be fixed. If you notice any significant damage, it may be necessary to take the knife to a professional for repair.
Next, check the knife’s edge to determine its current sharpness. You can do this by gently running your finger along the blade’s edge. Be careful not to cut yourself. If the edge feels dull or rough, it is time to sharpen the knife.
Before you start using the Norton sharpening stone, it is important to ensure it is properly set up. Place the stone on a stable surface, such as a countertop or table. Make sure it is securely in place and will not move while you are sharpening.
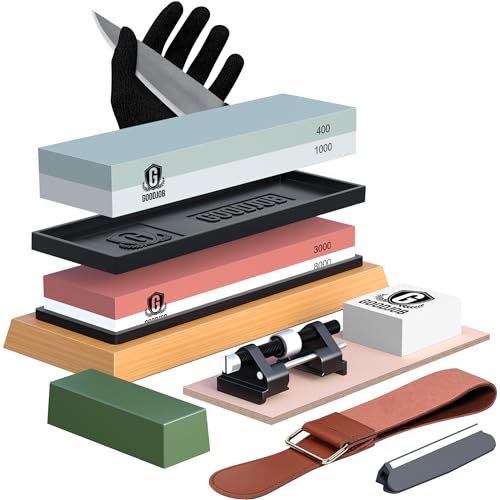
In addition to setting up the stone, you will also need to gather any additional tools you may need. This includes a honing guide to help you maintain the correct angle while sharpening, as well as lubricating oil to keep the stone clean and prevent it from clogging.
| Tools needed for preparing the knife: | |
|---|---|
| – Warm soapy water | – Sponge or cloth |
| – Inspection for damage | – Honing guide |
| – Checking the edge | – Lubricating oil |
By properly preparing your knife for sharpening, you set yourself up for success and ensure you achieve the best possible results with your Norton sharpening stone.
Cleaning the knife
Before sharpening your knife with a Norton sharpening stone, it is important to clean the knife to remove any dirt, debris, or oils that may be present. Cleaning the knife ensures a smooth and effective sharpening process.
To clean your knife:
- Start by wiping down the blade with a damp cloth or paper towel to remove any surface-level dirt or dust.
- For more stubborn stains or dried-on residue, you can use a mild soap or dish detergent and warm water. Gently scrub the blade using a soft brush or sponge.
- Rinse the knife thoroughly with clean water to remove any soap residue.
- Pat the knife dry with a clean towel or allow it to air dry completely.
- Inspect the knife to ensure it is clean and free of any debris.
It is important to note that if your knife has a wooden handle, you should avoid submerging it in water or exposing it to excessive moisture, as this can cause damage to the handle. Instead, you can use a damp cloth or wipe to clean the handle.
By properly cleaning your knife before sharpening, you ensure that the sharpening process is effective and that you achieve optimal results.
Inspecting the blade for damage
Before beginning the sharpening process, it is important to inspect the knife blade for any signs of damage. This step ensures that the blade is in good condition and safe to use. Here are some key factors to look out for:
- Chips or nicks: Examine the cutting edge of the blade for any chips or nicks. These can disrupt the sharpening process and may need to be repaired before proceeding.
- Rust or corrosion: Check for any signs of rust or corrosion on the blade. If present, it is necessary to remove them before sharpening. A rust eraser or mild abrasive can be used for this purpose.
- Bent or twisted blade: Ensure that the blade is straight and not bent or twisted. A misaligned blade may not provide optimal cutting performance and might need professional attention.
- Edge alignment: Inspect the bevels of the blade to ensure they are properly aligned. Misalignment can hinder the sharpening process, and proper adjustment may be required.
By inspecting the blade for damage, you can address any issues before starting the sharpening process. This ensures that you achieve the best possible results and maintain the longevity of your knife.
Sharpening the knife with the Norton sharpening stone
Sharpening a knife is an essential skill for any chef or home cook. Using a Norton sharpening stone can help restore the sharpness of a dull knife, providing a clean and efficient cutting edge. Here is a step-by-step guide on how to sharpen a knife using a Norton sharpening stone:
1. Choosing the right Norton sharpening stone
Before getting started, it is important to select the right Norton sharpening stone for your needs. Norton offers a variety of stones with different grits, ranging from coarse to fine. For initial sharpening and removing nicks, a coarse grit stone is recommended, while a fine grit stone is ideal for achieving a polished and sharp edge.
2. Preparing the Norton sharpening stone
Before using the Norton sharpening stone, it is important to ensure that it is properly soaked in water. To do this, submerge the stone in water for about 10-15 minutes until it is fully saturated. This will prevent the stone from drying out during the sharpening process and enhance its effectiveness.
3. Holding the knife at the correct angle
When sharpening the knife, it is crucial to maintain a consistent angle to achieve an even edge. Typically, a 20-degree angle is recommended for most kitchen knives. Hold the knife against the Norton sharpening stone with one hand, ensuring that the blade’s edge is in contact with the stone, while the other hand holds the handle for stability.
4. Moving the knife along the Norton sharpening stone
Gently slide the knife along the Norton sharpening stone, starting from the heel towards the tip in a sweeping motion. Apply light pressure and maintain a steady speed to ensure an even sharpening. Repeat this process several times, alternating sides, until you achieve the desired sharpness.
5. Checking the sharpness
After sharpening, it is crucial to check the sharpness of the knife. Carefully run your finger along the blade’s edge to feel for any imperfections or dull spots. If there are any, repeat the sharpening process until the knife is evenly sharp.
By following these steps, you can effectively sharpen your knife using a Norton sharpening stone. Remember to practice caution and take your time to ensure safety and optimal results. A sharp knife not only improves your cooking experience but also enhances the efficiency and precision of your cutting techniques.
Applying the correct angle
When using a Norton sharpening stone, it is crucial to apply the correct angle to achieve the desired sharpness. The angle at which you hold the knife against the stone will determine how sharp the edge becomes. It is essential to find the right balance between too shallow of an angle, which will not effectively sharpen the knife, and too steep of an angle, which can damage the blade.
Finding the correct angle
To find the correct angle, start by placing the knife flat against the stone with the edge touching the surface. Then, slowly tilt the knife until you feel a slight resistance. This resistance is an indicator that the edge is making contact with the stone. The angle at this point is the approximate angle you should maintain during the sharpening process.
It is worth noting that the ideal angle can vary depending on the type of knife and its intended use. As a general guideline, kitchen knives typically require a shallower angle of around 15 to 20 degrees, while pocket knives and hunting knives may benefit from a slightly steeper angle of 20 to 25 degrees.
Maintaining a consistent angle
Consistency is key when sharpening a knife, so it is important to maintain the chosen angle throughout the sharpening process. To achieve this, it can be helpful to use a sharpening guide or angle guide. These tools attach to the knife’s blade and provide a reference point, ensuring a consistent angle is maintained.
If you do not have a guide, you can practice maintaining the angle by paying attention to the position of your hand and the angle of the knife against the stone. Take your time and focus on maintaining a steady angle as you move the blade back and forth across the stone.
Remember, the correct angle is crucial to achieving a sharp and durable edge, so take the time to find and maintain it throughout the sharpening process.


