
A sheath knife is an essential tool for outdoor enthusiasts, hunters, and survivalists. It is important to keep your sheath knife sharp to ensure its effectiveness and efficiency. Dull knives can be dangerous and ineffective, making tasks like cutting rope, preparing food, and building shelters more difficult. Sharpening a sheath knife may seem daunting at first, but with the right technique and tools, it can be a straightforward process.
Step 1: Gather the necessary tools. You will need a sharpening stone or whetstone, honing oil, a towel or rag, and a stable surface to work on. It is important to use a proper sharpening stone that matches the type of steel used in your sheath knife. Different stones are designed for different types of steel, such as carbon steel or stainless steel. You can typically find this information in the knife’s product manual or by contacting the manufacturer.
Step 2: Prepare your sharpening stone. Place the stone on a stable surface, such as a table or countertop, and secure it with a non-slip mat or towel. Apply a few drops of honing oil to the stone, spreading it evenly across the surface. Honing oil helps to lubricate the stone and prevent excessive friction and heat buildup while sharpening.
Step 3: Hold the sheath knife correctly. Grip the handle firmly with your dominant hand, placing your index finger along the spine of the blade for better control. Rest the blade on the sharpening stone at a 20-degree angle, with the cutting edge facing away from you. This angle will vary depending on the manufacturer’s recommendations and the type of knife you are sharpening.
Step 4: Begin sharpening the blade. Using smooth and consistent strokes, glide the blade across the sharpening stone, moving from the base of the blade towards the tip. Maintain the 20-degree angle and apply gentle pressure. Repeat this motion on both sides of the blade for an even and balanced sharpening. It is important to maintain the same number of strokes on each side to ensure a symmetrical edge.
Step 5: Test the sharpness. After sharpening the blade, carefully wipe off any excess oil with a towel or rag. Test the sharpness by cutting through a piece of paper or slicing a tomato. If the blade cuts smoothly and effortlessly, your sheath knife is properly sharpened. If not, repeat the sharpening process until you achieve the desired sharpness.
Remember to always exercise caution when handling sharp objects, and follow the manufacturer’s guidelines for sharpening your specific sheath knife. Regularly maintaining the sharpness of your knife will ensure its longevity and optimal performance.
The importance of a sharp sheath knife
A sheath knife is an essential tool for outdoor enthusiasts, hunters, and survivalists. Having a sharp sheath knife is crucial for a variety of reasons:
1. Safety
A sharp sheath knife is safer to use than a dull one. When a blade is sharp, it can effortlessly cut through materials, reducing the risk of accidents. Dull knives require more force to cut, which increases the chances of slipping and causing injuries. Keeping your sheath knife sharp ensures that you have better control over the blade, reducing the likelihood of accidents.
2. Efficiency
A sharp sheath knife allows for efficient and precise cutting. Whether you are preparing food, building a shelter, or carving wood, a sharp blade makes the task easier and faster. With a dull knife, you may struggle to make clean cuts, leading to wasted time and effort. A sharp sheath knife enables you to accomplish tasks more efficiently, saving valuable time in various outdoor situations.
Moreover, a sharp blade is more effective when it comes to processing game during hunting. It allows for clean cuts, reducing the risk of damaging the meat and ensuring a higher-quality harvest.
3. Versatility
A sharp sheath knife offers greater versatility in its applications. Whether you need to whittle wood, process food, or perform emergency tasks, a sharp blade provides you with more options. You can handle a wide range of tasks with a single tool, making it a versatile companion for outdoor adventures.
Furthermore, a sharp sheath knife can be a valuable asset in survival situations. It can help you gather firewood, build a shelter, and even defend yourself if necessary.
In conclusion, maintaining a sharp sheath knife is essential for safety, efficiency, and versatility in outdoor activities. Regularly sharpening your knife ensures that it remains a reliable tool that can help you accomplish various tasks in the wilderness.
Choosing the right tools
When it comes to sharpening a sheath knife, having the right tools is essential for achieving the best results. Here are some important tools to consider:
Sharpening stones
Sharpening stones are the most common tool used for sharpening sheath knives. They come in different grits, with coarser grits being used for reprofiling a dull or damaged blade, and finer grits for honing and polishing the edge. It is advisable to have at least two or three stones with different grits to cover all your sharpening needs.
Honing guide
A honing guide is a tool that helps you maintain a consistent angle while sharpening your knife. It holds the blade securely and ensures that you maintain a steady hand, resulting in a more precise and even edge. Using a honing guide can be especially beneficial for beginners who are still learning how to sharpen knives.
Stropping tools
Stropping tools are used for the final step of sharpening a sheath knife. They are typically made of leather or fabric, and are used to refine and polish the edge, resulting in a razor-sharp finish. Stropping tools can be used with or without compound, depending on personal preference and the level of sharpness desired.
Safety equipment
When sharpening a sheath knife, it is important to prioritize safety. Always wear protective gloves and eye protection to prevent any accidents or injuries. Additionally, using a sharpening stone holder or a non-slip mat can help ensure stability and prevent the stone from moving during the sharpening process.
By choosing the right tools and taking the necessary safety precautions, you can ensure that your sheath knife is sharpened to perfection and ready for any task.
Selecting the appropriate sharpening stone
When it comes to sharpening a sheath knife, selecting the right sharpening stone is crucial for achieving a sharp and precise edge. There are several types of sharpening stones available in the market, each with its own unique characteristics and advantages. Here are some factors to consider when selecting the appropriate sharpening stone:
- Material: Sharpening stones can be made of various materials such as natural stones, synthetic stones, or diamond stones. Natural stones like Arkansas and water stones are known for their excellent sharpening qualities. Synthetic stones are often more consistent and durable. Diamond stones, on the other hand, are very effective for quickly sharpening and repairing blades.
- Grit: The grit level of a sharpening stone determines its coarseness or fineness. Low grit stones, such as 200-400 grit, are suitable for repairing damaged or very dull blades. Medium grit stones, ranging from 800-1000 grit, are ideal for regular sharpening. High grit stones, like 3000-8000 grit, are used for fine sharpening and polishing.
- Size: The size of the sharpening stone will depend on the size of your knife and personal preference. Smaller stones are more portable and can be suitable for smaller knives, while larger stones offer more surface area for sharpening larger blades.
- Water or oil: Some sharpening stones require water or oil to be used as a lubricant while sharpening. Water stones are typically soaked in water before use, while oil stones need to be lubricated with oil. It’s important to follow the manufacturer’s instructions for the specific stone you select.
By considering these factors and taking your specific needs into account, you can choose the most suitable sharpening stone for your sheath knife. Remember to keep the stone clean and flat, and to follow the proper sharpening technique to achieve the best results.
Preparing the knife for sharpening
Before you begin sharpening your sheath knife, it is important to properly prepare the knife to ensure the best results. Follow these steps to prepare your knife:
Step 1: Clean the knife
Start by cleaning the blade of your sheath knife to remove any dirt, debris, or residue. Use a mild soap or detergent and warm water to gently wash the blade. Be sure to dry it thoroughly with a clean towel afterward.
Step 2: Inspect the blade
Take a close look at the blade of your knife to inspect for any damage or nicks. If you notice any chips or dents, you may need to address them before sharpening. Minor imperfections can be filed or sanded down using a fine-grit sandpaper or a small metal file. However, for major damage, it is best to consult a professional.
Step 3: Secure the knife
When sharpening your sheath knife, you want to ensure that it remains stable and secure. Place a rubber mat or a piece of non-slip material on your work surface to prevent the knife from sliding. You can also use a knife sharpening jig or clamp to securely hold the knife in place.
Step 4: Gather your sharpening tools
Before you start sharpening, gather all the necessary tools. This typically includes a sharpening stone or honing rod, honing oil, and a leather strop. Make sure your sharpening tools are clean and in good condition.
Step 5: Understanding the blade angle
Before proceeding, it is important to determine the appropriate angle for sharpening your sheath knife. This angle will depend on the type of knife and its intended use. A general rule of thumb is to maintain an angle of 20 to 30 degrees. You can use a guide or angle measuring tool to help you achieve the desired angle.
Step 6: Lubricate the sharpening stone
If you are using a sharpening stone, it is essential to lubricate it with honing oil or water before use. This will prevent the stone from clogging and improve the sharpening process.
By following these preparatory steps, you will be ready to sharpen your sheath knife effectively and achieve optimal results.
Cleaning and oiling the blade
After sharpening your sheath knife, it’s important to clean and oil the blade to maintain its condition and prevent rusting. Here are some steps to follow:
1. Cleaning the blade:
Use a soft cloth or paper towel to wipe away any metal shavings or debris from the blade. Be thorough and make sure to clean both the cutting edge and the spine of the knife.
2. Removing rust:
If you notice any rust spots on the blade, use a rust eraser or steel wool to gently remove the rust. Be careful not to scratch the blade while doing this.
3. Applying oil:
Apply a small amount of oil to a clean cloth or paper towel. Then, gently rub the oil onto the blade, covering both the cutting edge and the spine. Make sure to cover the entire surface of the blade with a thin layer of oil.
4. Wiping off excess oil:
Using a clean cloth, wipe off any excess oil from the blade. Leaving too much oil on the blade can attract dirt and dust, so it’s important to remove the excess.
5. Storing the knife:
Once you’ve cleaned and oiled the blade, make sure to store your sheath knife in a dry and secure place. Avoid storing it in a humid or damp environment, as this can cause the blade to rust.
By regularly cleaning and oiling your sheath knife, you can prolong its lifespan and ensure its optimum performance.
Sharpening Techniques
Sharpening a sheath knife is an essential skill for any outdoor enthusiast or survivalist. A sharp knife not only makes tasks easier but also safer, as a dull blade can slip and cause accidents. Here are some effective techniques to sharpen your sheath knife:
1. Using a whetstone
Whetstones are one of the most popular tools for sharpening knives. To use a whetstone, follow these steps:
- Secure the whetstone on a stable surface.
- Hold the knife at a 20-degree angle against the whetstone.
- Using gentle pressure, slide the blade across the stone in a sweeping motion, moving from the base to the tip.
- Repeat this process on the other side of the blade for an even sharpening.
- Continue alternating sides until you achieve the desired sharpness.
2. Using a sharpening rod
A sharpening rod, also known as a honing rod or steel, is an excellent tool for maintaining the edge of your sheath knife. To use a sharpening rod:
- Hold the rod upright in your non-dominant hand, with the tip resting on a stable surface.
- Hold the knife at a 20-degree angle against the rod.
- Starting at the base of the blade, move the knife in a sweeping motion along the length of the rod, from base to tip.
- Repeat this process on the other side of the blade to sharpen both edges evenly.
- Continue alternating sides until you achieve the desired sharpness.
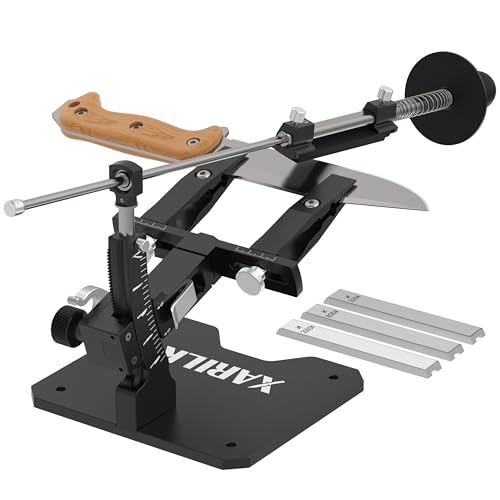
3. Using a sharpening system
If you prefer a more foolproof method, a sharpening system can provide consistent results. These systems usually consist of a guided sharpening stone or diamond plates. Follow the manufacturer’s instructions for your specific system to sharpen your sheath knife effectively.
Remember, practice makes perfect when it comes to sharpening a sheath knife. Take your time, be patient, and always prioritize safety by using protective gloves and keeping your fingers away from the blade. With the right technique and tools, you’ll have a razor-sharp sheath knife ready for any adventure.
Using the correct sharpening angle
When sharpening a sheath knife, it is crucial to use the correct sharpening angle. The angle at which the blade makes contact with the sharpening surface determines the sharpness and durability of the edge.
The most common sharpening angles for sheath knives range between 15 to 30 degrees. However, the optimal angle may vary depending on the type of knife and its intended use. It is essential to consult the manufacturer’s guidelines or research the specific recommendations for your knife.
To achieve the correct sharpening angle, you can use a sharpening guide or visually estimate the angle. A sharpening guide is a tool that attaches to the knife and helps maintain a consistent angle during sharpening. It is especially useful for beginners or those who are unsure about their ability to maintain a steady angle.
If you prefer to visually estimate the angle, keep in mind that a smaller angle, such as 15 degrees, will result in a sharper edge but may sacrifice durability. A larger angle, such as 30 degrees, will provide better durability but may not be as razor-sharp. Finding the balance between sharpness and durability depends on your preferences and the tasks you intend to perform with the knife.
Regardless of the method you choose, it is important to maintain a steady hand and apply consistent pressure while sharpening. Make sure to sharpen both sides of the blade equally to ensure an even edge.
In conclusion, using the correct sharpening angle is vital in maintaining the performance and longevity of your sheath knife. Whether you use a sharpening guide or visually estimate the angle, being mindful of the angle you are using will result in a well-sharpened and reliable blade.


