
Whittling is a timeless pastime that brings joy to many artisans and hobbyists. Whether you’re a beginner or an experienced whittler, keeping your knife sharp is essential for achieving clean and precise cuts. While a traditional leather strop is often used for sharpening whittling knives, it may not always be readily available.
Fortunately, there are alternative methods to sharpen your beloved whittling knife without the use of a leather strop. One approach is to utilize a sharpening stone or a sandpaper block. Both options allow you to remove the dull edges and restore the razor-sharpness of your knife blade.
Using a sharpening stone involves strategically gliding the knife blade along the coarse surface of the stone, maintaining a consistent angle throughout the process. This method offers control and precision, enabling you to adjust the blade’s sharpness to suit your specific needs. On the other hand, a sandpaper block can be used similarly, allowing you to gradually refine the blade’s edge by rubbing it against the abrasive surface.
It’s important to note that while these alternatives may not offer the same level of refinement as a leather strop, they are effective temporary solutions to keep your whittling knife sharp. Remember to always exercise caution when handling sharp objects and follow the manufacturer’s instructions for proper knife maintenance. With regular sharpening, your whittling knife will continue to serve as a reliable tool for your creative endeavors.
What is a whittling knife?
A whittling knife is a specialized carving tool that is designed for shaping and sculpting wood. It typically has a narrow, pointed blade with a sharp edge, allowing for precise and intricate carving. Whittling knives are commonly used by woodworkers, craftsmen, and hobbyists to create detailed designs and sculptures.
These knives are often made from high-quality steel, which ensures durability and long-lasting sharpness. The handle of a whittling knife is usually ergonomically designed to provide comfort and control during use.
Whittling knives can be used for a variety of purposes, such as carving intricate designs on wooden objects, creating wooden figurines, shaping furniture details, and even for outdoor activities like camping and bushcrafting.
Using a whittling knife requires skill and practice to achieve desired results. It is important to be patient and focused while working with this tool, as the blade is extremely sharp and can cause injury if not handled properly. Safety precautions, such as wearing protective gloves and using a cutting mat or workbench, are recommended when using a whittling knife.
Overall, a whittling knife is an essential tool for anyone interested in wood carving and woodworking. Its versatility and precision make it a valuable asset for creating beautiful and intricate wooden pieces.
Importance of sharpening a whittling knife
A sharp whittling knife is essential for any woodcarving or woodworking project. Properly sharpening the blade not only improves the cutting efficiency but also helps to ensure safety during use.
Here are some reasons why sharpening a whittling knife is important:
| 1. Improved cutting performance: | Sharpening a whittling knife restores its sharp edge, allowing it to effortlessly cut through wood. A dull knife makes carving more difficult and requires more effort, resulting in less precision and finer details in the carving. |
| 2. Safety: | A sharp knife is safer to use compared to a dull one. When a knife is dull, there is a higher chance of it slipping or bouncing off the wood surface, leading to accidents and injuries. With a sharp blade, the knife will cut smoothly, reducing the risk of accidents. |
| 3. Efficiency: | Sharpening your knife regularly ensures that you can work efficiently and complete your projects in less time. A sharp blade allows for smooth and precise cuts, reducing the need for excessive force or multiple passes. |
| 4. Longevity: | Regular maintenance of your whittling knife, including sharpening, helps to extend its lifespan. With proper care, a well-sharpened knife will remain effective for a longer time, saving you money on constant replacements. |
| 5. Versatility: | When your whittling knife is sharp, it is capable of tackling various carving tasks and cutting different types of wood. A dull knife limits your ability to work with different materials and achieve desired results. |
By understanding the importance of sharpening your whittling knife, you can ensure the best possible cutting experience and create masterful woodcarvings with ease and precision.
Method 1: Using sharpening stones
If you don’t have a leather strop, you can still sharpen your whittling knife effectively using sharpening stones. Follow these steps to achieve a sharp edge:
Step 1: Prepare the sharpening stones
Start by selecting the appropriate sharpening stones for your whittling knife. You’ll typically need two grit levels – a coarse stone for initial sharpening and a finer stone for polishing the edge. Soak the stones in water for 10-15 minutes to ensure they are properly lubricated before use.
Step 2: Set the angle of the blade
Hold the blade of your whittling knife against the sharpening stone at a consistent angle. Most whittling knives have a bevel of around 20-25 degrees. You can use a sharpening guide to help maintain the proper angle throughout the process.
Step 3: Start with the coarse stone
Begin by placing the blade against the coarse sharpening stone. Using light pressure, move the blade back and forth along the stone in a controlled manner. Make sure to sharpen both sides of the blade evenly by applying the same number of strokes to each side.
Step 4: Progress to the finer stone
After you’ve achieved a desired level of sharpness with the coarse stone, switch to the finer sharpening stone. Follow the same process of moving the blade back and forth, applying even pressure on both sides. This finer stone will help refine the edge and remove any remaining roughness from the previous step.
Step 5: Test the sharpness
Once you’ve finished sharpening with the finer stone, carefully wipe the blade clean. Run your finger along the edge to ensure it feels smooth and sharp. If you feel any burrs or rough spots, repeat the sharpening process using the finer stone until the blade is sufficiently sharp.
Remember, practice and patience are key when sharpening a whittling knife without a leather strop. It may take a few tries to achieve the desired sharpness, but with time, you’ll be able to maintain a sharp edge for your whittling adventures.
Choosing the right sharpening stone
When it comes to sharpening a whittling knife without a leather strop, choosing the right sharpening stone is essential. There are a few different types of sharpening stones available, each with its own characteristics and benefits. Understanding these differences can help you make an informed decision and achieve the best results.
1. Natural stones
Natural sharpening stones, such as Arkansas stones, are commonly used for sharpening whittling knives. These stones are known for their excellent sharpening capabilities and exceptional durability.
Arkansas stones come in different grades or grits, ranging from soft to hard. Softer stones are suitable for initial sharpening or repairing damaged blades, while harder stones are ideal for honing and achieving a finer edge.
One advantage of natural stones is that they tend to provide a smoother and more polished finish compared to other types of sharpening stones. However, they can be more expensive and require more maintenance.
2. Synthetic stones
Synthetic sharpening stones are an affordable alternative to natural stones. Made from materials like aluminum oxide or silicon carbide, synthetic stones come in various grits to suit different sharpening needs.
One benefit of synthetic stones is that they are typically more consistent in terms of grit size and performance. They also require less maintenance compared to natural stones, making them a popular choice among beginners or those looking for convenience.
Synthetic sharpening stones can provide excellent results when sharpening whittling knives, but they may not provide the same level of smoothness and polished finish as natural stones.
It’s important to note that the type of sharpening stone you choose ultimately depends on your personal preferences and the specific needs of your whittling knife. Experimenting with different stones and techniques can help you find the best combination for achieving the desired sharpness and edge on your knife.
In addition to choosing the right sharpening stone, it’s crucial to practice proper sharpening techniques and maintain a consistent angle while sharpening. This will ensure optimal results and prolong the life of your whittling knife.
Step-by-step guide to sharpening a whittling knife with a sharpening stone
Sharpening a whittling knife with a sharpening stone is a traditional and effective method that can help you achieve a sharp and precise edge. Here is a step-by-step guide to help you sharpen your knife:
1. Gather your materials
Before you begin sharpening your whittling knife, make sure you have all the necessary materials. You will need a sharpening stone, water or honing oil, a towel, and your whittling knife.
2. Prepare the sharpening stone
If you are using a water stone, soak it in water for about 10-15 minutes before starting. If you are using an oil stone, apply a few drops of honing oil to the stone and spread it evenly.
3. Find the correct angle
Hold the whittling knife at the correct angle against the sharpening stone. The angle will depend on the type of knife and your personal preference. A general guideline is to hold the knife at a 20-degree angle.
4. Start sharpening
With the knife held securely, move it back and forth across the sharpening stone. Apply gentle pressure and make sure to cover the entire length of the blade. Continue this motion for about 10-12 strokes on each side of the knife.
5. Check for burrs
After a few strokes, check the edge of the blade for burrs. A burr is a thin metal strip that forms along the edge when sharpening. To check for burrs, run your finger carefully along the blade’s edge. If you feel a rough or raised area, it means there is a burr present.
6. Remove the burrs
To remove the burrs, gently stroke the knife’s edge along the sharpening stone using lighter pressure. Make sure to keep the angle consistent. Repeat this process until you no longer feel any burrs.
7. Test the sharpness
Once you have removed the burrs, it’s time to test the sharpness of your whittling knife. Carefully run your thumb along the blade’s edge, applying light pressure. If the knife cuts smoothly without any resistance, it is adequately sharpened. Otherwise, repeat the sharpening process.
Sharpening a whittling knife with a sharpening stone requires patience and practice. With time, you will become more proficient in achieving a sharp and precise edge for your whittling projects.
Method 2: Using honing guide
If you don’t have a leather strop available, you can still achieve a sharp edge on your whittling knife by using a honing guide. A honing guide is a tool that helps you maintain a consistent angle while sharpening your knife, ensuring that you get an even and precise edge.
Here are the steps to sharpen your whittling knife using a honing guide:
Step 1: Prepare Your Honing Guide
Start by ensuring that your honing guide is set to the correct angle for your whittling knife. The angle will depend on the bevel of your knife, so make sure to refer to the manufacturer’s instructions or use a protractor to measure the angle.
Step 2: Secure Your Whittling Knife
Secure your whittling knife in the honing guide. Make sure it is tightly held and positioned at the correct angle. This will prevent any accidental movements or slips during the sharpening process.
Step 3: Begin Honing
Using your honing guide, start moving your knife along the sharpening stone. Apply light pressure and move the knife in a smooth and consistent motion. Make sure to cover the entire length of the blade, from the base to the tip.
Step 4: Check the Edge
After a few passes, check the edge of your knife to see if it has achieved the desired sharpness. You can do this by gently running your finger along the edge to feel for any burrs or rough spots. If the edge is still dull, continue honing until you achieve the desired sharpness.
Using a honing guide can be an effective alternative to a leather strop for sharpening your whittling knife. It allows you to maintain a consistent angle and ensures an even and precise edge. Remember to always follow the manufacturer’s instructions and take caution while handling sharp objects.
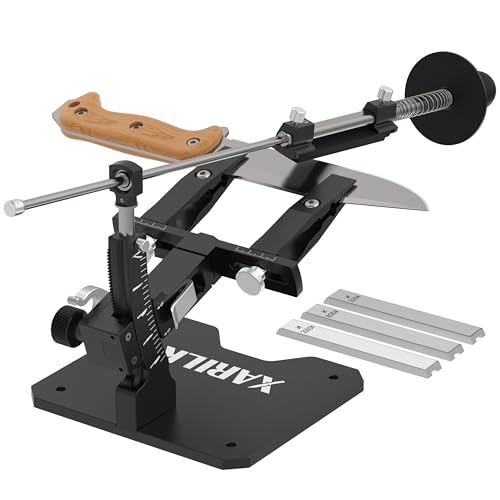
What is a honing guide?
A honing guide is a tool that helps maintain the proper angle while sharpening a whittling knife. It is a device that holds the knife securely in place and guides the blade along the sharpening stone. This ensures consistent and precise sharpening, helping to achieve a razor-sharp edge.
The honing guide typically consists of two main components: a clamp to secure the knife and an adjustable guide to set the sharpening angle. The clamp holds the knife firmly in position, preventing it from moving while in use. The adjustable guide allows you to set the desired sharpening angle, ensuring that each stroke on the sharpening stone is consistent and accurate.
Using a honing guide is especially useful for beginners or those who are not experienced in sharpening knives. It eliminates the guesswork involved in maintaining the correct angle and helps prevent mistakes that can lead to uneven sharpening or damage to the blade.
When using a honing guide, it is important to follow the manufacturer’s instructions and choose the appropriate angle for your specific knife. Different knives may require different angles for optimal sharpening. By using a honing guide, you can ensure that you are consistently sharpening your whittling knife to the correct angle, resulting in a sharp and effective tool for your woodworking projects.


