


Carving meat can be a satisfying and rewarding experience, but it can also be frustrating if you’re working with a dull knife. A sharp carving knife is essential for achieving clean, precise cuts that showcase the beauty of the food you’re preparing. Whether you’re an experienced chef or a home cook looking to up your culinary game, learning how to properly sharpen your carving knife is a skill worth mastering. In this article, we’ll explore some effective techniques to bring your carving knife back to its optimal sharpness.
Why is sharpening important?
When you’re carving meat, a sharp knife makes all the difference. A dull knife not only makes the carving process more difficult but also increases the risk of accidents. A sharp knife, on the other hand, allows you to make precise, controlled cuts, resulting in beautifully carved pieces of meat that are a pleasure to eat and present. By keeping your carving knife sharp, you’ll not only improve your carving skills but also extend the life of your knife, saving you money in the long run.

In this article, we will discuss two popular methods for sharpening a carving knife: using a honing rod and using whetstones. Each technique has its own advantages and the method you choose will depend on your personal preference and the condition of your knife. Let’s get started!
Essential Steps
In order to sharpen your carving knife effectively, follow these essential steps:
- Clean your knife: Wipe down the blade with a damp cloth to remove any dirt or debris.
- Select the right sharpening tool: Choose a sharpening stone or honing rod that is suitable for your knife. Consider the type of steel and the blade angle of your knife when making your selection.
- Prepare the sharpening surface: Place a damp towel underneath the sharpening stone to prevent it from sliding during use.
- Hold the knife correctly: Grip the handle firmly with one hand, and place the blade against the sharpening stone at a 20-degree angle.
- Sharpen the blade: Maintain a consistent angle, and move the blade back and forth across the sharpening stone in a sweeping motion. Use light pressure and repeat this process several times on each side of the blade.
- Test the sharpness: Carefully run your finger along the blade to test for sharpness. Be cautious to avoid any accidents.
- Hone the blade: If necessary, use a honing rod to further refine the cutting edge of the blade. Hold the rod upright and run the blade along the rod at a 20-degree angle.
- Clean and dry the knife: Once you are satisfied with the sharpness, thoroughly clean and dry the knife to remove any metal particles or debris.
- Store the knife properly: Keep your sharpened knife in a safe and secure location to protect the blade and prevent any accidents.
By following these essential steps, you can ensure that your carving knife remains sharp and ready for use, allowing you to create precise and clean cuts every time. Remember to exercise caution when handling sharp objects and always prioritize safety.
Choosing the Right Stone
When it comes to sharpening your carving knife, choosing the right stone is crucial. There are different types of stones available, each with its own characteristics and benefits. Here are a few factors to consider when selecting a sharpening stone:
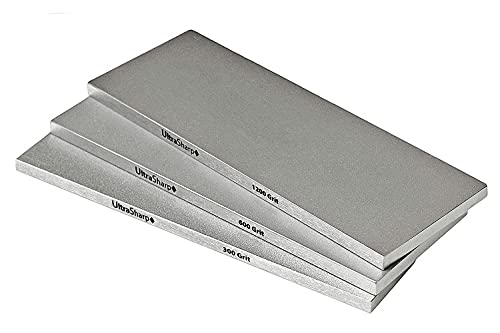
Grit Size: The grit size of the stone determines the level of abrasiveness. Coarser stones with lower grit numbers, such as 200 or 300, are ideal for fixing chips or reprofiling the edge of a dull knife. Finer stones with higher grit numbers, such as 1000 or 3000, are best for refining and polishing the edge.
Stone Material: Sharpening stones are typically made of either natural or synthetic materials. Natural stones, such as oil stones or water stones, offer a traditional feel and tend to be softer, making them ideal for sharpening softer steel knives. Synthetic stones, like diamond stones or ceramic stones, are more durable and work well with harder steel knives.
Size and Shape: Consider the size and shape of the stone based on your specific needs. Larger stones are suitable for sharpening longer blades, while smaller stones are more portable and convenient for smaller knives. Additionally, some stones come in a rectangular shape, while others are round or oval.
Water or Oil: Certain stones require water or oil as a lubricant during the sharpening process. Water stones are soaked in water before use and provide a faster cutting action. Oil stones, on the other hand, need to be oiled before each use and offer a slower but finer sharpening process.
Budget: Lastly, consider your budget when choosing a sharpening stone. Prices can vary depending on the type, size, and brand of the stone. While it’s tempting to opt for the cheapest stone, investing in a high-quality stone will ensure better results and a longer lifespan for your carving knife.
By considering these factors and choosing the right stone, you’ll be able to keep your carving knife sharp and ready for all your carving projects. Remember to regularly clean and maintain your stone to ensure optimal performance and longevity.
Preparing the Knife for Sharpening
Before you sharpen your carving knife, it’s important to prepare it properly to ensure the best results. Follow these steps to get your knife ready:
- Clean the knife: Start by washing your knife with warm water and mild dish soap. Remove any dirt, grime, or food particles that may be stuck to the blade.
- Dry the knife: After cleaning, use a clean towel to dry the knife thoroughly. Make sure there is no water left on the blade as this can interfere with the sharpening process.
- Inspect the knife: Take a close look at the blade and handle to check for any signs of damage or wear. Look for nicks, chips, or bent edges that may need to be repaired before sharpening.
- Repair any damage: If you find any damage on the knife, such as nicks or chips, use a honing stone or file to carefully remove them. Be gentle and take your time to avoid further damaging the blade.
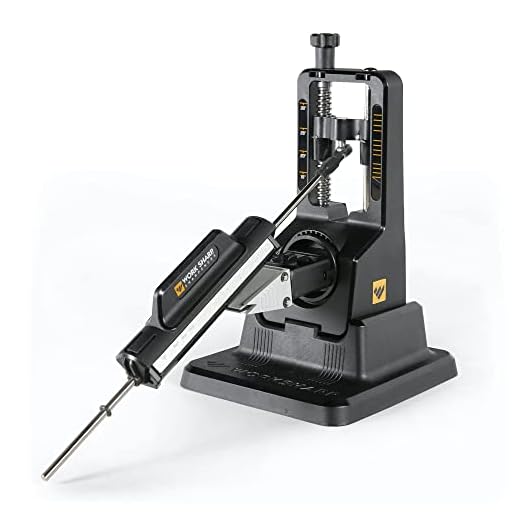
- Choose a sharpening method: There are several ways to sharpen a carving knife, including using a sharpening stone, honing rod, or electric sharpener. Decide which method you prefer and gather the necessary tools.
By properly preparing your carving knife before sharpening, you can ensure that the sharpening process goes smoothly and that you achieve a sharp, efficient blade for your carving needs.
Sharpening Techniques
Sharpening your carving knife is an essential skill for any home cook or professional chef. A sharp knife not only makes carving tasks easier and more efficient but also helps to ensure precision and safety in the kitchen. Here are some techniques to help you sharpen your carving knife effectively:
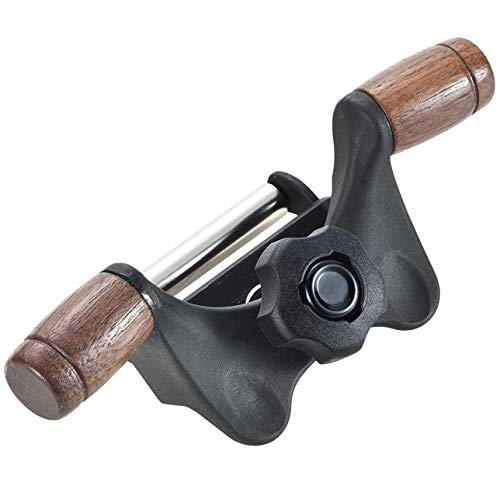
1. Honing
Honing is a technique used to maintain the sharpness of your knife between sharpenings. It involves using a honing rod or steel to straighten the edge of the blade. Hold the honing rod vertically with its tip resting on a stable surface. Position the blade against the rod at a 20-degree angle, then move the blade across the rod with gentle pressure, starting from the base to the tip. Repeat this process on both sides of the blade several times to achieve a sharp edge.
2. Whetstone Sharpening
Whetstone sharpening is a traditional method widely used for sharpening knives. Start by soaking the whetstone in water for about 10 minutes. Place the stone on a stable surface, then hold the knife at a 20-degree angle against the stone. Apply light pressure and move the blade across the stone in a sweeping motion, starting from the base to the tip. Repeat this process several times on both sides of the blade. Remember to keep the stone wet while sharpening to prevent overheating and damage to the blade.
3. Sharpening Tools
In addition to honing rods and whetstones, there are various sharpening tools available on the market. Electric sharpeners, for example, offer convenience and speed but may not provide the same level of control as manual techniques. Other options include sharpening stones with different grit levels, which allow you to adjust the sharpness of your blade based on your needs. Experiment with different tools to find the one that suits you best.
Remember, a sharp carving knife is not only a pleasure to work with but also promotes kitchen safety. Regularly sharpening your knife will ensure that you achieve clean and precise cuts, making your cooking experience more enjoyable.
Using a Whetstone
Sharpening your carving knife with a whetstone is a traditional and effective method. Here’s a step-by-step guide to help you get your carving knife back to its razor-sharp edge:
Step 1: Prepare the Whetstone
Before you start sharpening, soak your whetstone in water for about 10 minutes. This will ensure that it’s properly moist and ready for use.
Step 2: Find the Correct Angle
Hold your knife at a 15 to 20-degree angle against the whetstone. It’s important to maintain a consistent angle throughout the sharpening process.
Step 3: Begin Sharpening
Start by placing the cutting edge of the knife against the whetstone and move it back and forth in a smooth sweeping motion. Apply gentle and even pressure while maintaining the correct angle.
Step 4: Alternate Sides
After a few strokes on one side, switch to the other side of the blade. This will ensure that both sides of the knife are evenly sharpened. Remember to maintain the same angle and apply consistent pressure.
Step 5: Test the Sharpness
After sharpening both sides of the blade, carefully wipe away any metal shavings or residue. Test the sharpness of your knife by gently cutting through a piece of paper. If it slices through effortlessly, you have successfully sharpened your knife.
Remember to clean and dry your knife thoroughly after sharpening to prevent any corrosion. Regularly sharpening your carving knife will ensure that it stays in optimal condition for all your carving needs.
Applying the Correct Angle
When sharpening your carving knife, it is important to apply the correct angle to achieve the best results. The angle at which you hold the knife against the sharpening surface will determine how sharp and precise the final edge will be.
For most carving knives, a 20-degree angle is recommended for sharpening. This angle provides a good balance between sharpness and durability. To achieve this angle, start by holding the knife perpendicular to the sharpening surface, with the edge of the blade facing downwards.
Then, gradually tilt the knife until the bevel of the blade is at a 20-degree angle. This can be done by visually estimating the angle or by using a sharpening guide. A sharpening guide is a useful tool that attaches to the knife and helps maintain a consistent angle throughout the sharpening process.
Once you have achieved the correct angle, apply consistent pressure and move the knife along the sharpening surface in a smooth motion. Start at the base of the blade and work your way towards the tip, making sure to cover the entire length of the edge.
It’s important to note that different carving knives may require different sharpening angles, so it’s always a good idea to consult the manufacturer’s recommendations or do some research beforehand. Additionally, it’s a good practice to frequently check the edge of the knife during the sharpening process to ensure that you’re on the right track.
By applying the correct angle when sharpening your carving knife, you can ensure that it remains sharp and ready for all your carving needs.
Honing and Polishing
Once you have sharpened your carving knife using a sharpening stone or honing rod, the next step is honing and polishing. Honing helps to refine the edge of the blade, making it even sharper and more precise. Polishing adds a final touch, creating a mirror-like finish and reducing friction when cutting.
To hone your knife, you will need a leather strop or a honing guide with a stropping compound. Lay the strop or guide on a flat surface and hold the knife at a 20-degree angle. Gently swipe the blade along the strop or guide, starting from the base and moving towards the tip. Repeat this motion several times, alternating sides, to ensure an even honing.
When honing, it is important to maintain a consistent angle and apply light pressure. The goal is to remove any burrs or imperfections left from the sharpening process and align the blade’s edge for optimal performance. Remember to always follow the manufacturer’s instructions for your specific carving knife.
After honing, you can further enhance the sharpness and appearance of your knife by polishing. Apply a small amount of metal polish or a polishing compound to a soft cloth or buffing wheel. Gently rub the cloth or wheel along the blade, using light pressure. This will help to remove any remaining scratches or dullness, leaving a smooth and polished surface.
Polishing is not only beneficial for aesthetics but also for functionality. A polished blade reduces friction against the food you are carving, allowing for cleaner and more precise cuts. Additionally, it helps to prevent rust and corrosion, prolonging the lifespan of your knife.
Regular honing and polishing are essential for keeping your carving knife in optimal condition. By investing a little time and effort into maintaining your knife, you can ensure that it remains sharp and ready for all your culinary adventures.