A gas powered post hole digger is a versatile tool that can greatly simplify the process of digging holes for fence posts, sign posts, and other structures. Whether you are a professional contractor or a DIY enthusiast, knowing how to properly use a gas powered post hole digger can save you time and effort on your projects.
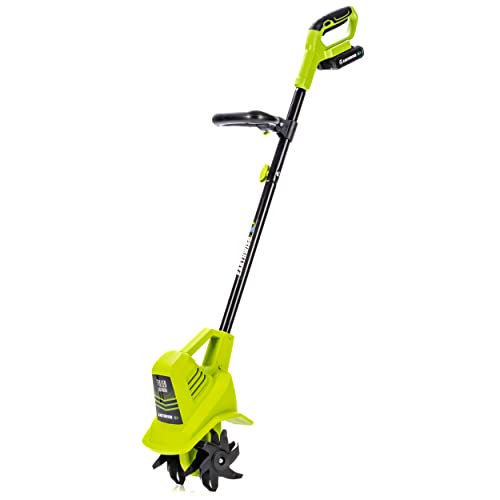
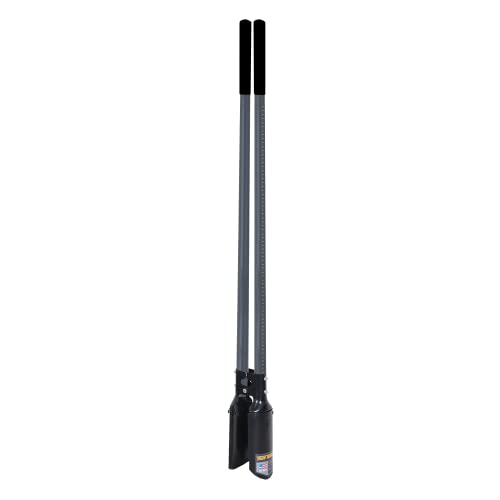
Before you begin using a gas powered post hole digger, it is important to familiarize yourself with the machine and its components. The main components of a gas powered post hole digger are the engine, the auger, and the handles. The engine is typically located on top of the digger and powers the auger, which is the rotating blade that does the digging. The handles are used to guide and control the digger.
When using a gas powered post hole digger, it is crucial to prioritize safety. Always wear protective gear, such as safety goggles, gloves, and sturdy shoes. Make sure the area where you will be digging is clear of any obstacles, such as rocks or roots, that could potentially damage the digger or cause accidents.
Once you have ensured safety, you can start using the gas powered post hole digger. Position the auger above the desired location for the hole and start the engine. Hold the handles firmly and gradually lower the auger into the ground. The blades of the auger will begin rotating and dig into the soil. Apply gentle pressure to guide the digger as it digs deeper into the ground.
Preparing for Digging
Before you start using a gas powered post hole digger, it is important to properly prepare for the digging process. Taking the time to prepare will ensure that your digging experience goes smoothly and efficiently. Follow these steps to adequately prepare:
1. Locate your work area: Determine the exact location where you need to dig your post holes. Mark the spots clearly with stakes or spray paint to avoid any confusion once you begin digging.
2. Check for underground utilities: Contact your local utility companies to ensure that there are no underground utilities or pipelines in the area where you plan to dig. This will help prevent any unexpected accidents or damage to essential infrastructure.
3. Clear the area: Remove any debris, rocks, or other obstacles from the work area. This will make the digging process easier and prevent any potential damage to the post hole digger.
4. Wear appropriate safety gear: Before starting any digging, make sure to wear the necessary safety gear, including gloves, protective eyewear, and sturdy boots. This will help protect you from any potential injuries during the digging process.
5. Mix fuel and oil: If your gas powered post hole digger requires a mixture of fuel and oil, follow the manufacturer’s instructions to prepare the correct fuel mixture. Improper fuel mixture can damage the digger and affect its performance.
6. Inspect the equipment: Before using the post hole digger, inspect it for any damage or loose parts. Ensure that the blades are sharp and that all nuts and bolts are tightened. Any defects or malfunctions should be addressed before starting the digging process.
Taking these preparatory steps will help ensure a safe and efficient digging process when using a gas powered post hole digger.
Tools and materials needed
Before you begin using a gas powered post hole digger, it is important to gather all the necessary tools and materials. Here are some items you will need:
1. Gas Powered Post Hole Digger:
A gas powered post hole digger is the main tool you will need for this task. Make sure the digger is in good working condition and has sufficient fuel.
2. Safety Gear:
It is essential to wear appropriate safety gear to protect yourself during the digging process. Some essential safety gear includes:
- Safety goggles or glasses to protect your eyes from dust and debris.
- Ear protection such as earplugs or earmuffs to reduce noise levels.
- Gloves to provide a better grip and protect your hands.
- Sturdy boots with good traction to prevent slipping.
- Protective clothing to shield your body from dirt and scratches.
3. Fuel:
Ensure that you have the appropriate fuel for your gas powered post hole digger. Most gas powered diggers use a mixture of gasoline and 2-cycle oil. Check the manufacturer’s instructions for the correct fuel ratio.
4. Extra Fuel and Oil Mixture:
It is always a good idea to have some extra fuel and oil mixture on hand in case you need to refill during the digging process.
5. Measuring Tape and Marking Flags:
Use a measuring tape to mark the desired hole depth and a set of marking flags to indicate the hole locations.
6. Shovel:
A shovel can be useful for removing any loose dirt or rocks from the hole after digging.
7. Water Source:
Keeping a water source nearby can be helpful for wetting the soil and making it easier to dig.
By gathering all these tools and materials before starting, you will be well-prepared to use a gas powered post hole digger effectively and safely.
Choosing the right location
Before using a gas-powered post hole digger, it’s important to carefully choose the right location for your project. This will ensure that you achieve the desired results and avoid any potential hazards.
Here are some factors to consider when choosing the location:
| Soil Type | Check the soil type in the area where you plan to dig the post holes. The digger will work best in soil that is not too rocky or compacted. Avoid areas with heavy clay or hard, rocky soil. |
| Obstacles | Look for any underground or above-ground obstacles that could interfere with the digging process. This includes rocks, tree roots, utility lines, or any other obstructions that may be present. |
| Access | Consider the accessibility of the location. Ensure that you have enough space to maneuver the digger and that there are no obstacles blocking the path. Also, ensure that there is enough clearance above the ground for the equipment to operate safely. |
| Utilities | Before digging, contact the relevant utility companies to identify the location of any underground cables or pipes. This will help you avoid damaging them during the digging process. |
| Terrain | Consider the terrain of the location. Avoid areas with steep slopes or uneven ground, as this can make it difficult to operate the equipment safely. Choose a flat and stable area for optimal results. |
By carefully assessing these factors, you can choose the right location for using a gas-powered post hole digger and ensure a successful digging project.
Operating the Post Hole Digger
Using a gas powered post hole digger can make quick work of digging holes for posts, whether you’re installing a fence, building a deck, or planting trees. Here are some steps to take when operating a gas powered post hole digger:
1. Prepare the digger
Before starting the post hole digger, ensure that the engine has enough fuel and oil mixture. Follow the manufacturer’s instructions for the specific fuel and oil requirements. Check the spark plug to ensure it is securely connected and in good condition. Adjust the choke and throttle to their starting positions.
2. Position the digger
Place the post hole digger in the desired location for digging the hole. Ensure that the area is free from any obstructions or hazards, such as rocks or underground cables. Position the digger so that it is stable and will not tip over during operation.
3. Start the engine
Follow the manufacturer’s instructions for starting the engine. This may involve priming the engine, pulling the starter cord, or engaging the electric starter if available. Once the engine is running, allow it to warm up for a few minutes before beginning to dig.
4. Begin digging
With the engine running and warmed up, hold the handles of the digger firmly and engage the throttle to increase the speed of the auger. Slowly lower the auger into the ground and allow its rotating action to begin digging the hole. Apply downward pressure as needed to keep the digger digging into the ground.
As the hole gets deeper, you may need to periodically lift the digger out of the hole to remove the soil and debris. Be careful not to twist or strain your back during this process.
5. Complete the hole
Continue digging until you reach the desired depth for your post. Once the hole is complete, slowly lift the digger out of the hole and turn off the engine. Use a shovel or other tool to remove any remaining loose soil from the hole.
Always remember to follow all safety precautions and guidelines provided by the manufacturer when operating a gas powered post hole digger. This includes wearing appropriate safety gear, such as gloves and eye protection, and being aware of your surroundings.
By following these steps, you can effectively and safely operate a gas powered post hole digger to quickly and efficiently dig holes for your various projects.
Familiarize yourself with the controls
Before using a gas powered post hole digger, it is essential to familiarize yourself with the controls. This will ensure that you operate the machine safely and efficiently.
Throttle: The throttle is located on the handle of the post hole digger. It is used to control the speed of the engine. Before starting the machine, make sure the throttle is in the off position.
Choke: The choke is usually located next to the throttle. It is used to provide extra fuel to the engine when starting. Before starting the digger, move the choke to the “start” or “choke” position.
Start/Stop Switch: The start/stop switch is used to turn the engine on and off. Make sure the switch is in the “stop” position before attempting to start the machine.
Recoil Starter: The recoil starter is used to start the engine. To start the digger, firmly grip the recoil starter handle and pull it quickly in a steady motion. Repeat as necessary until the engine starts.
Throttle Trigger: The throttle trigger is located on the handle and is used to control the speed of the engine. Squeeze the trigger to increase the engine speed and release it to decrease the speed.
It is vital to read the manufacturer’s instructions before operating the gas-powered post hole digger. They may provide specific information about the controls and any additional safety features.

Starting the machine
Before starting the gas powered post hole digger, it is important to follow a few steps to ensure safe and proper operation:
- Check fuel level: Make sure the machine has enough gas in the tank to operate. Refuel if necessary.
- Inspect the digger: Look for any signs of damage or wear on the machine. Ensure that all parts are in proper working condition.
- Prime the engine: Locate the priming bulb on the machine and press it several times to prime the engine. This helps to ensure that fuel is properly flowing through the system.
- Set the choke: Depending on the temperature and starting conditions, adjust the choke to the appropriate setting. A fully closed choke is typically used for cold starts, while a partially closed choke is used for warmer starts.
- Engage the throttle: Set the throttle control to the appropriate speed for starting, usually indicated by a rabbit symbol for high speed or a tortoise symbol for low speed.
- Pull the starter cord: Grasp the starter cord firmly and give it a quick and smooth pull. This should start the engine. Repeat if necessary.
- Warm up the engine: Allow the engine to run for a few minutes to warm up. This helps to ensure smooth operation.
Always refer to the specific manufacturer’s instructions for your gas powered post hole digger for more detailed information on starting procedures.