


If you’re a woodworking enthusiast, you’ve probably heard of box joints. They are a strong and visually appealing way to join two pieces of wood together, often used in making boxes and drawers. While box joints can be cut by hand with a chisel and saw, using a table saw is a faster and more precise method. In this article, we’ll walk you through the step-by-step process of cutting box joints on a table saw.
Step 1: Prepare Your Table Saw
Before you begin, make sure your table saw is properly set up for cutting box joints. This includes installing a dado blade set or a box joint blade set, depending on the size of the joint you want to cut. Adjust the blade height to match the thickness of the wood you’ll be using, ensuring a snug fit for your joints.
Tip: It’s always a good idea to wear protective goggles and a dust mask when operating a table saw.
Step 2: Mark your Workpieces
Next, mark the location of your box joints on both workpieces. Use a marking gauge or a measuring tape to ensure consistent spacing between each joint. Mark the width of the joint as well, as this will help you align the pieces accurately during the cutting process.
Note: For a more decorative look, you can alternate the width of the joints between the two pieces.

Step 3: Set up the Table Saw
Now it’s time to set up the table saw for making the cuts. Adjust the fence to the desired width of your joints, aligning it with the marked lines on your workpieces. You may need to make test cuts on scrap pieces of wood to fine-tune the width and ensure a snug fit.
Pro Tip: To minimize tearout, use a sacrificial piece of wood behind your workpieces when making the cuts.
Step 4: Make the Cuts
Finally, it’s time to make the cuts. Position the workpiece against the fence, making sure to keep your hands and fingers clear of the blade. Use a push stick or push block to guide the workpiece through the cut, ensuring a smooth and safe operation. Repeat the process for each joint until all cuts are complete.
Remember: Practice makes perfect, so don’t be discouraged if your first attempts at cutting box joints aren’t flawless. With time and experience, you’ll be able to create beautifully crafted joints that will enhance the quality of your woodworking projects.
By following these steps and taking the necessary safety precautions, you’ll be able to cut box joints on a table saw like a pro. Whether you’re a seasoned woodworker or just starting out, mastering this technique will open up a world of possibilities for your future projects.
A Step-by-Step Guide to Cutting Box Joints on a Table Saw
Box joints are a popular form of joinery that create strong, interlocking connections between pieces of wood. They are commonly used in the construction of drawers, cabinets, and other types of boxes. Cutting box joints on a table saw can be a bit intimidating for beginners, but with the right techniques and tools, it is a skill that can be mastered.
Step 1: Prepare the Table Saw
Before you begin cutting box joints, it’s important to ensure that your table saw is properly set up. Make sure the blade is sharp and securely mounted, the fence is square to the blade, and the saw is properly aligned.
Step 2: Choose the Right Blade
The type of blade you use will depend on the thickness of the wood you’re working with. For most box joint applications, a standard flat-top ripping blade with a high tooth count will work well.
Step 3: Set the Blade Height
The height of the blade should be set to match the thickness of the wood you’re using. Adjust the blade height so that it extends about halfway through the thickness of the wood.
Step 4: Set the Fence
Position the fence so that it is flush with the front edge of the saw blade. This will ensure that the joint is cut at the correct location.
Step 5: Make the First Cut
Begin by making the first cut on one of the workpieces. Hold the piece firmly against the fence and slowly push it through the blade. Be sure to keep your hands clear of the blade at all times.
Step 6: Make the Second Cut
Once the first cut is complete, use the piece you just cut to set up the second cut. Place the newly cut piece against the fence and slide it towards the blade until the desired width of the joint is achieved.
Step 7: Repeat the Process
Continue alternating between cutting the first and second pieces until you have completed the desired number of box joints.
Step 8: Test the Fit
Once all the box joints are cut, test the fit of the pieces by assembling them together. The joints should fit snugly and interlock securely.
By following these step-by-step instructions and practicing your technique, you will be able to cut clean and precise box joints on a table saw. Remember to always prioritize safety and take your time to ensure accurate results.
Choosing the Right Materials
When cutting box joints on a table saw, it’s important to choose the right materials to ensure a clean and accurate result. The materials you choose will heavily impact the strength and durability of the joints, so it’s crucial to make the right selection.
Here are some factors to consider when choosing materials for box joints:
| Material | Pros | Cons |
|---|---|---|
| Hardwood | – Provides a strong joint | – More expensive than softwood |
| Softwood | – Economical option | – Not as strong as hardwood |
| Plywood | – Can be more affordable than solid wood | – Not as strong as hardwood |
| MDF (Medium-Density Fiberboard) | – Smooth and even surface for joints | – Not as strong as hardwood |
| Melamine | – Resistant to moisture and stains | – Can be more expensive |
Based on your project requirements and budget, you can choose the material that best suits your needs. It’s important to consider the strength, cost, and intended use of the joints when making your selection.
Remember to carefully measure and plan your cuts before starting, as accuracy is crucial when cutting box joints. With the right materials and proper technique, you can achieve clean and precise box joints using your table saw.
Preparing Your Table Saw
Before you begin cutting box joints on your table saw, it’s important to properly prepare the saw for the task. Here are some steps to follow:
1. Check the Blade
Start by inspecting the blade on your table saw. Make sure it is sharp and in good condition. A dull or damaged blade can result in poor quality cuts and increase the risk of accidents. If necessary, replace the blade with a new one.
2. Set the Blade Height
Next, adjust the height of the blade to the desired cutting depth for your box joints. Ideally, the blade should be set to the same height as the thickness of the material you will be using. Use the height adjustment knob or lever to make the necessary adjustments. Double-check the height to ensure accuracy and safety.
3. Install a Dado Stack (Optional)
If you prefer to use a dado stack for cutting box joints, now is the time to install it. A dado stack consists of multiple blades stacked together, allowing you to make wider cuts in one pass. Follow the manufacturer’s instructions for installing and aligning the dado stack properly.
Keep in mind that using a dado stack requires caution and expertise. Make sure you are familiar with the necessary safety procedures and have the appropriate blade guards and accessories in place.
4. Adjust the Fence and Miter Gauge
Ensure that the fence and miter gauge on your table saw are properly adjusted. The fence should be parallel to the blade and securely locked in place. The miter gauge should slide smoothly and lock securely at various angles.
Take the time to align the fence and miter gauge accurately, as any misalignment can result in inaccurate cuts and compromise your box joint joints.
With these essential preparations complete, your table saw is now ready for cutting box joints. Remember to always prioritize safety and follow proper procedures when using power tools.
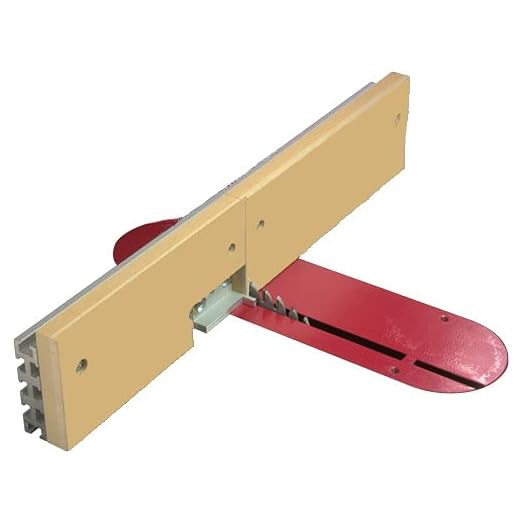
Setting Up the Box Joint Jig
Before you can start cutting box joints on a table saw, you will need to set up a box joint jig. A box joint jig is a specialized apparatus that helps guide the wood through the table saw and ensures precise and accurate cuts.
Step 1: Gather the Materials
To set up the box joint jig, you will need the following materials:
- Plywood or medium-density fiberboard (MDF)
- A table saw with a dado blade
- A ruler or measuring tape
- A drill and screws
- A miter gauge
Step 2: Measure and Cut the Jig Base
Using the plywood or MDF, measure and cut a rectangular piece to serve as the base of your jig. The size of the base will depend on the size of the box joints you want to make. Generally, a base of 12 inches by 24 inches works well for most projects.
Step 3: Attach the Miter Gauge
Attach the miter gauge to the jig base using the drill and screws. Make sure it is securely fastened and perpendicular to the base.
Step 4: Set the Dado Blade
Set up the table saw with a dado blade. The width of the dado blade should match the width of the box joints you want to create. Refer to the manufacturer’s instructions for proper installation.
Step 5: Position the Jig
Position the jig on the table saw, with the miter gauge against the table’s fence. Make sure the jig is parallel to the blade and centered on the table.
Step 6: Test and Adjust
Before making any cuts on your workpiece, it’s essential to test the setup and make any necessary adjustments. Use scrap wood to perform a test cut and check the fit of the joints. If needed, adjust the position of the jig or the depth of the blade until you achieve the desired results.
Once you have set up the box joint jig, you are ready to start cutting box joints on your table saw. Remember to always follow proper safety precautions and use push sticks or featherboards to keep your hands away from the blade.
Cutting the First Set of Box Joints
Box joints are a strong and visually appealing way to join two pieces of wood together. By using a table saw and a dado blade or a box joint jig, you can easily create perfectly square and tight-fitting box joints.
Step 1: Set up the Table Saw
First, ensure that your table saw is properly set up and adjusted. Make sure the blade is perpendicular to the table and set at the desired height. Additionally, ensure that the fence is parallel to the blade.
Step 2: Measure and Mark
Measure the width of your workpiece and determine the desired spacing between each box joint. Mark the locations of the joints on both pieces of wood using a pencil and a square.
Pro Tip: Make sure to mark the waste sections that will be removed between each joint to avoid any confusion during the cutting process.
Step 3: Adjust the Dado Blade or Box Joint Jig
If using a dado blade, adjust the width of the blade to match the width of your desired joint. If using a box joint jig, adjust and secure it according to the manufacturer’s instructions.
Step 4: Make the Cuts
Option 1: Using a Dado Blade:
With the blade height set, position the workpiece against the table saw fence. Start the saw and carefully push the workpiece through the blade, cutting the first slot. Remember to use a push stick to keep your hands safely away from the blade.
After the first cut, move the workpiece to the next marked location and repeat the process until all the slots for the first set of box joints are completed. Take your time and ensure accuracy with each cut.
Option 2: Using a Box Joint Jig:
Follow the manufacturer’s instructions for using the box joint jig. Typically, you will position the workpiece against the jig’s guide and make the cuts by moving the sled back and forth.
Pro Tip: To ensure consistent and precise cuts, use a clamp to securely hold the workpiece against the jig.
Step 5: Test the Fit
Once all the cuts for the first set of box joints are completed, test the fit by inserting the corresponding piece into the slots. The joints should fit snugly without any gaps. If needed, make slight adjustments to the blade or jig to achieve a perfect fit.
Congratulations! You have successfully cut the first set of box joints on your table saw. Repeat the process for the remaining sets of joints, ensuring the same precision and attention to detail.
Adjusting the Jig for the Second Set of Box Joints
After successfully cutting the first set of box joints using your table saw jig, you will need to make some adjustments to your jig in order to cut the second set of box joints. These adjustments ensure that the second set of joints align properly with the first set, creating a tight and seamless joint.
Start by carefully examining your jig and identifying any adjustments that need to be made. One common adjustment is to shift the position of the workpiece relative to the table saw blade. This can be done by loosening the screws or clamps that hold the workpiece in place and sliding it slightly in the desired direction. Make sure to double-check the alignment by placing the previously cut joints against the newly adjusted jig.
Additionally, you may need to adjust the height of the table saw blade. This is especially important if your first set of box joints did not perfectly fit together. By slightly raising or lowering the blade, you can ensure that the second set of joints fits snugly together. Take your time with this adjustment, as small changes can make a big difference in the final result.
Once you have made the necessary adjustments to your jig, it’s time to cut the second set of box joints. Be sure to follow the same steps and safety precautions as before, paying close attention to the placement of your fingers and hands. With the adjusted jig, you should be able to achieve a perfect fit between the first and second sets of box joints.
Remember, practice makes perfect when it comes to cutting box joints on a table saw. Don’t be discouraged if your first attempts are not perfect – with time and experience, you will become more proficient and produce high-quality box joints.
Finishing and Assembling the Box
Once you have cut all of the necessary box joints on your table saw, it is time to move on to finishing and assembling the box. Follow these steps to complete your project:
1. Sand the box joints and all other surfaces of the box to ensure a smooth finish. Start with a coarse-grit sandpaper and gradually move to finer grits for a polished look.
2. Apply a wood finish of your choice to enhance the appearance and protect the wood. You can use a brush or a cloth to apply the finish evenly. Allow the finish to dry completely according to the manufacturer’s instructions.
3. Once the finish is dry, test-fit the box joints to ensure a snug and accurate fit. Make any necessary adjustments by sanding or trimming the joints if needed.
4. Apply wood glue to the box joints and carefully assemble the box. Use clamps to hold the pieces together as the glue dries. Wipe away any excess glue with a damp cloth.
5. Allow the glue to fully cure before removing the clamps. This usually takes several hours or overnight, depending on the type of glue used.
6. Once the glue is fully cured, remove the clamps and inspect the box for any imperfections. Touch up any areas with sandpaper or additional finish as needed.
7. Your box is now ready to be used or displayed! You can apply additional decorative elements or hardware if desired, such as hinges or handles.
Remember to always prioritize safety while working with power tools and sharp blades. Wear appropriate protective gear and follow all safety guidelines provided by the manufacturer.
Congratulations on completing your box joint project! With practice and patience, you can create beautiful and functional boxes using this technique.


