
Table saws are a valuable tool for any woodworker or DIY enthusiast, but they can also be dangerous if not used correctly. One important safety feature that should never be overlooked is the blade guard. The blade guard is a protective covering that helps prevent accidents and injuries by shielding the user from contact with the spinning blade. However, many people find these guards to be cumbersome and obstructive, and are unsure of how to properly use them. In this article, we will provide you with a step-by-step guide on how to use a table saw blade guard effectively and safely.
The first step in using a table saw blade guard is to make sure it is properly installed and adjusted. Start by checking that the guard is securely attached to the saw and that it moves freely up and down the blade. Next, adjust the guard so that it sits just above the height of the workpiece you will be cutting. This way, the guard will provide maximum protection while still allowing you to see the blade and make precise cuts. Remember to also adjust the riving knife, which is a part of the blade guard that helps prevent kickback by keeping the workpiece from binding against the blade during a cut.
Once the blade guard is installed and adjusted, it’s important to always keep it in place while operating the table saw. Even though it may be tempting to remove the guard for convenience or to get a clearer view of the blade, this is extremely dangerous and should never be done. The blade guard is there for your safety, and removing it increases the risk of accidents and injuries. If you find that the guard is obstructing your view or hindering your work, stop the saw and adjust the guard or your position instead of removing it.
Finally, it is crucial to adopt safe operating techniques when using a table saw blade guard. Always use push sticks or push blocks to guide the workpiece through the cut, keeping your hands a safe distance away from the blade. Avoid wearing loose-fitting clothing or jewelry that could get caught in the blade. And never rush or force the workpiece through the cut – let the blade do the work at its own pace. By following these guidelines and using the blade guard properly, you can ensure both your safety and the success of your woodworking projects.
What is a table saw blade guard?
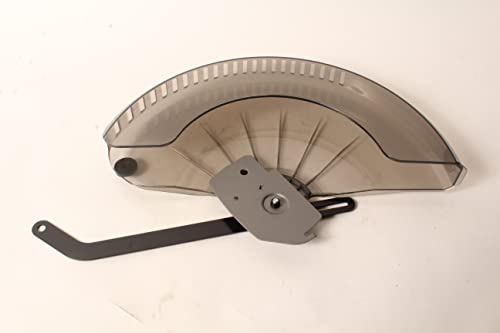
A table saw blade guard is a safety device that is designed to protect the operator from coming into contact with the spinning blade of a table saw. It is a sturdy piece of equipment that is typically made from transparent plastic, allowing the operator to see the blade and the material being cut.
The main function of a table saw blade guard is to prevent accidental contact with the blade, which can cause serious injury. The guard is attached to the table saw and covers the blade, creating a barrier between the operator and the blade. It helps to prevent the operator’s hands or fingers from accidentally touching the blade during operation.
The blade guard also serves as a shield, protecting the operator from any debris or wood chips that may be thrown up by the spinning blade. It helps to keep the work area clear and clean, reducing the risk of accidents caused by flying debris.
Some table saw blade guards also come with additional features, such as dust collection ports. These ports allow the operator to attach a dust collection system to the guard, helping to keep the work area free of sawdust and improving visibility.
It is important to note that using a table saw blade guard is not only a matter of safety, but it is also recommended by most manufacturers. The guard should be properly installed and adjusted according to the manufacturer’s instructions before operating the table saw.
Benefits of using a table saw blade guard:
1. Safety: The blade guard provides a physical barrier between the operator and the blade, reducing the risk of accidents and injury.
2. Dust collection: Some blade guards come with dust collection ports, helping to keep the work area clean and improving visibility.
Tips for using a table saw blade guard:
1. Proper installation: Follow the manufacturer’s instructions to ensure that the blade guard is properly installed and adjusted for optimal safety.
2. Regular maintenance: Keep the blade guard clean and free of any debris to ensure that it functions properly.
3. Use in conjunction with other safety measures: While the blade guard is an important safety device, it should be used in conjunction with other safety measures, such as using push sticks or featherboards to keep hands away from the blade.
Step 1: Properly Installing the Blade Guard
Before using a table saw, it is important to ensure that the blade guard is properly installed. The blade guard is a safety feature that helps to protect you from potential accidents and injuries.
To install the blade guard, follow these steps:
- Disconnect the power: Before starting any work on the table saw, make sure to disconnect the power cord from the power source. This will help prevent accidental activation of the saw during installation.
- Adjust the blade height: Lower the saw blade to its lowest position. This will create more clearance for the blade guard installation.
- Position the blade guard: Place the blade guard over the saw blade, making sure that it aligns with the blade properly. The guard should cover the entire blade and move freely up and down as you adjust the blade height.
- Secure the blade guard: Depending on the model of your table saw, there may be different methods for securing the blade guard in place. This could involve tightening screws, inserting pins, or using other mechanisms provided by the manufacturer. Refer to the user manual for specific instructions on securing the blade guard.
Note: It is important to always use the blade guard when operating a table saw. Removing or bypassing the blade guard can significantly increase the risk of accidents and injuries.
Choosing the right blade guard
When it comes to using a table saw, safety should always be a top priority. One of the essential safety features of a table saw is the blade guard. The blade guard acts as a barrier between the user and the spinning blade, preventing accidents and injuries. However, not all blade guards are created equal. It is important to choose the right blade guard for your specific needs.
There are several factors to consider when selecting a blade guard. First and foremost, make sure the blade guard is compatible with your table saw model. Different table saws have different mounting systems, so it is important to choose a blade guard that is designed to fit your specific saw.
Another important consideration is the visibility provided by the blade guard. You want a blade guard that allows you to see the workpiece clearly while still providing adequate protection. Look for a blade guard with a transparent shield that offers a clear line of sight to the blade and the workpiece.
The ease of installation and removal is also an important factor to consider. A good blade guard should be easy to install and remove, allowing you to quickly switch between different cutting tasks. Look for a blade guard that can be easily attached and detached without the need for additional tools.
The durability of the blade guard is another crucial factor. It should be made of high-quality materials that can withstand the rigors of regular use. Look for a blade guard that is made of sturdy materials such as polycarbonate or Plexiglas.
Lastly, consider any additional features or accessories that may come with the blade guard. Some blade guards have built-in dust collection systems, which can help keep your work area clean and minimize airborne particles. Others may have anti-kickback features or riving knives that further enhance safety.
| Factors to Consider | Features |
|---|---|
| Compatibility | Compatible with your table saw model |
| Visibility | Transparent shield for clear line of sight |
| Installation and Removal | Easy to attach and detach without additional tools |
| Durability | Made of high-quality materials |
| Additional Features | Built-in dust collection, anti-kickback, riving knives |
By considering these factors and choosing the right blade guard for your table saw, you can ensure a safer and more efficient woodworking experience.
Installing the blade guard
When working with a table saw, it is important to prioritize safety. One of the key safety features of a table saw is the blade guard. The blade guard helps protect your hands and fingers from accidentally coming into contact with the spinning blade, reducing the risk of serious injury. Here’s a step-by-step guide on how to properly install the blade guard on your table saw.
Step 1: Gather the necessary tools
Before you begin installing the blade guard, make sure you have all the necessary tools on hand. You will typically need a screwdriver, an adjustable wrench, and the blade guard assembly that came with your table saw.
Step 2: Remove the existing blade guard (if applicable)
If your table saw already has a blade guard installed, you will need to remove it before installing the new one. Use a screwdriver or the appropriate tool to remove any screws or fasteners that are holding the old blade guard in place. Once removed, set the old blade guard aside.
Step 3: Prepare the new blade guard
Inspect the new blade guard assembly to ensure it is in good condition and free from any defects. Make sure all the components are present and that there are no loose or damaged parts. If any parts are missing or damaged, contact the manufacturer to obtain replacement parts.
Step 4: Attach the new blade guard assembly
Once you have verified the condition of the new blade guard assembly, it is time to attach it to your table saw. Position the assembly over the blade, ensuring that it covers the blade completely and aligns with the mounting holes or brackets on the saw. Use the screws or fasteners provided with the assembly to secure it in place, making sure it is firmly and securely attached.
Step 5: Adjust the blade guard (if necessary)
After installing the blade guard, you may need to make some adjustments to ensure it is properly aligned with the blade. Check that the guard moves freely up and down as the blade is raised and lowered. Make any necessary adjustments to the guard’s position or the mounting brackets to achieve the desired position without impeding the movement of the blade.
Step 6: Test the blade guard
Once you have installed and adjusted the blade guard, it is important to test it before using the table saw. Ensure that the guard moves smoothly and doesn’t interfere with the cutting process. If any issues arise, recheck the installation and make the necessary adjustments before using the table saw.
By following these steps, you can correctly install the blade guard on your table saw, ensuring that you have taken an important step towards ensuring your safety while using the machine.
Step 2: Adjusting the Blade Guard
Once you have installed the blade guard on your table saw, the next step is to adjust it properly to ensure optimal safety and functionality.
Here are the steps to adjust the blade guard:
- Begin by loosening the bolts or screws that hold the guard in place. Use a suitable wrench or screwdriver to do this.
- Next, position the guard so that it hovers just above the surface of the table saw, ensuring there is enough clearance for your material to pass through.
- Align the guard with the blade, making sure it is parallel to the cutting edge. You can use a straight edge or ruler as a reference.
- Tighten the bolts or screws to secure the guard in its adjusted position. Ensure that it is stable and does not wobble.
- Test the guard by turning on the table saw and running a scrap piece of material through the blade. Check if the guard moves smoothly and remains in position throughout the cut.
- If necessary, make further adjustments to ensure that the guard provides adequate protection while allowing you to see the blade and cut line clearly.
- Remember to always follow the manufacturer’s instructions for your specific table saw model when adjusting the blade guard.
By properly adjusting the blade guard, you can minimize the risk of accidents and injuries while using a table saw.
Setting the correct height
Setting the correct height of the blade guard is crucial for safety and precision when using a table saw. The blade guard should be adjusted so that it is just above the height of the material being cut.
Step 1: Adjusting the blade height
Before setting the height of the blade guard, you need to adjust the height of the saw blade itself. Turn off the table saw and unplug it from the power source. Use the blade height adjustment wheel or lever to raise or lower the blade to the desired height. The height should be set according to the thickness of the material you are going to cut.
Step 2: Installing the blade guard
Once the blade height is set, you can now install the blade guard. Align the blade guard with the mounting bracket on the table saw. Make sure it is securely attached and properly aligned.
If your table saw has multiple blade guard options, choose the one that best suits the type of cut you will be making.
Step 3: Adjusting the guard height
With the blade guard installed, you can now adjust the height. Loosen the height adjustment knob or screw on the guard to release the blade guard from its fixed position. Gently lower or raise the guard until it is just above the height of the material being cut.
Make sure the guard does not touch the material, as this can cause kickback or interfere with the cut. It should create a protective barrier between you and the blade.
Once the guard is at the correct height, tighten the adjustment knob or screw to secure the guard in place.
| Caution: | Always double-check that the blade guard is properly aligned and secured before turning on the table saw. Failure to do so can result in serious injury. |
|---|
By following these steps and setting the correct height for your table saw blade guard, you can ensure a safer and more precise woodworking experience.
Aligning the blade guard with the saw blade
Properly aligning the blade guard with the saw blade is crucial for safe and accurate operation. Follow these steps to ensure correct alignment:
- Start by turning off the table saw and unplugging it from the power source to prevent any accidental start-ups.
- Remove any debris or sawdust that may have built up around the blade guard or the saw blade.
- Locate the adjustment screws or knobs on the blade guard assembly. These are usually located on the front or back of the guard and allow you to adjust its position.
- Loosen the adjustment screws or knobs to unlock the blade guard and enable movement.
- Gently lower the blade guard until it is close to the top of the saw blade.
- Align the blade guard with the saw blade by ensuring that the guard is parallel to the blade and the splitter (if equipped) is aligned with the saw kerf.
- Use a square or a piece of scrap wood to verify that the blade guard is perfectly aligned with the saw blade.
- Tighten the adjustment screws or knobs to secure the blade guard in its proper position.
Remember to always double-check the alignment before using the table saw to guarantee your safety and the accuracy of your cuts.


