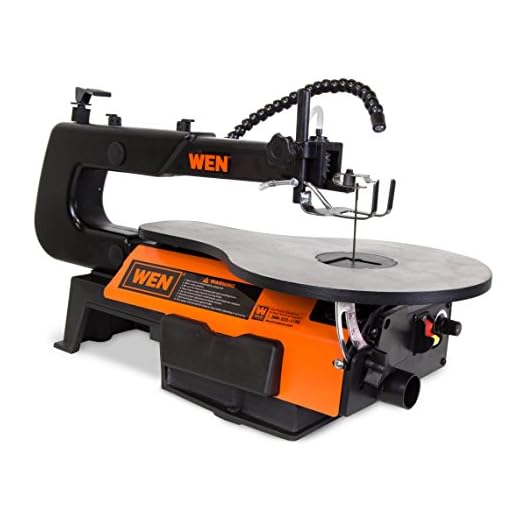

An electric fret saw is a versatile power tool that can be used for a variety of woodworking projects. Whether you’re a beginner or a seasoned woodworker, learning how to use this tool can greatly expand your creative possibilities.
With its sharp, narrow blade and adjustable speed, an electric fret saw allows you to make intricate and precise cuts in a wide range of materials, including wood, plastic, and metal. Its compact size and lightweight design make it easy to maneuver, even in tight spaces.
Using an electric fret saw requires some practice and care to ensure safe and accurate cutting. Before you start, it’s important to familiarize yourself with the tool’s components and understand the basic techniques involved.
This article will guide you through the process of using an electric fret saw effectively and efficiently, from preparing your workpiece to finishing your cuts. Whether you’re working on a small craft project or a larger DIY project, mastering the electric fret saw will open up new possibilities for your woodworking skills.
Benefits of Using an Electric Fret Saw
An electric fret saw is a versatile tool that offers several benefits to woodworkers and hobbyists alike. This powerful tool has become increasingly popular in recent years due to its convenience and efficiency. Here are some of the key benefits of using an electric fret saw:
Precision Cutting
An electric fret saw allows for precise and accurate cutting. The thin blade of the saw enables woodworkers to make intricate cuts and create detailed designs with ease. This level of precision is particularly useful when working on small and delicate projects, such as creating intricate patterns or making curved cuts.
Efficiency
Compared to hand saws, an electric fret saw is much faster and more efficient. The electric motor allows for speedy cutting, significantly reducing the time and effort required to complete a project. This is especially beneficial when working on larger projects or when there are multiple cuts to be made.
Versatility
An electric fret saw is a versatile tool that can be used for a wide range of woodworking tasks. It can cut various materials, including wood, plastic, and metal, making it suitable for different projects. Whether you are creating intricate wooden designs, cutting out templates, or making custom shapes, an electric fret saw can handle it all.
Ease of Use
Using an electric fret saw is relatively easy and straightforward. The saw’s design and features make it comfortable to hold and control. Additionally, many models come with adjustable speed settings, allowing users to customize the cutting speed according to the material being worked on. This helps prevent damage or splintering of the material, resulting in cleaner and more precise cuts.
In conclusion, an electric fret saw offers numerous benefits to woodworkers and hobbyists. Its precision cutting capabilities, efficiency, versatility, and ease of use make it an indispensable tool in any workshop or DIY project. Whether you are a novice or an experienced woodworker, investing in an electric fret saw can greatly enhance your woodworking experience.
Step-by-Step Guide for Using an Electric Fret Saw
Step 1: Prepare the work area
Ensure that you have a clean, well-lit work area to operate the electric fret saw. Remove any clutter or obstacles that may get in your way.
Step 2: Familiarize yourself with the saw
Take a moment to familiarize yourself with the various parts of the electric fret saw. Locate the power switch, speed control, blade tension knob, and other essential components.
Step 3: Choose the right blade
Select the appropriate blade for your project. Consider the material you’ll be cutting and the desired result. Consult the manufacturer’s manual for guidance if needed.
Step 4: Install the blade
With the saw turned off and unplugged, carefully follow the manufacturer’s instructions to install the blade securely. Take note of the blade’s orientation and ensure that it is properly tensioned.
Step 5: Plug in and power on
Plug in the electric fret saw and turn it on using the power switch. Gradually increase the speed to a comfortable level for your project.
Step 6: Position the workpiece
Position the workpiece on the saw’s table or work surface, ensuring that it is secured firmly. Consider using clamps or a vice to hold the material in place if necessary.
Step 7: Start cutting
With the saw and workpiece properly positioned, gently guide the blade into the material, following your marked lines or pattern. Move the workpiece steadily and maintain a consistent speed and pressure.
Step 8: Make necessary adjustments
Throughout the cutting process, periodically check the blade tension and adjust it if needed. This helps to ensure clean and accurate cuts. Take breaks as necessary to prevent overheating of the saw.
Step 9: Finish the cut
Once you have completed the cut, turn off the saw and unplug it from the power source. Carefully remove the workpiece from the saw, and inspect the cut for any rough edges or imperfections.
Step 10: Clean up
Clean up your work area by removing any wood dust or debris. Store the electric fret saw and accessories in a safe place, away from children and pets.
Note: Always refer to the manufacturer’s instructions and wear appropriate safety gear, such as goggles and gloves, when using an electric fret saw. Practice caution and work at a comfortable pace to prevent accidents.
Tips and Tricks for Getting the Most Out of Your Electric Fret Saw
Using an electric fret saw can greatly enhance your woodworking projects, but it’s important to know how to use it properly to get the best results. Here are some tips and tricks to help you make the most of your electric fret saw:
Choose the Right Blade
Choosing the right blade is crucial for achieving precise cuts with your electric fret saw. Different blades have different tooth patterns and sizes, which determine the type of material they are best suited for cutting. Make sure to select a blade that is appropriate for the material you are working with, whether it’s wood, plastic, or metal.
Secure Your Workpiece
Before making any cuts, it’s important to secure your workpiece properly. Use clamps or a vise to hold the material in place, ensuring it won’t move or slip while you’re working. This will help you maintain control and prevent any accidents.
Start Slowly
When starting a cut, it’s best to begin slowly and gradually increase the speed as you get more comfortable. This allows you to maintain control and precision throughout the cut. Rushing into high speeds can lead to mistakes or the blade getting stuck.
Wear Protective Gear
Using an electric fret saw involves potential risks, so it’s crucial to wear the appropriate protective gear. Safety glasses, gloves, and ear protection should be worn at all times to protect your eyes, hands, and ears from any potential hazards.
Practice Makes Perfect
As with any new tool, practice is key to mastering the electric fret saw. Take the time to experiment with different cutting techniques and materials, and don’t be discouraged if your first few attempts are not perfect. With time and practice, you’ll be able to achieve precise and beautiful cuts with ease.
By following these tips and tricks, you’ll be able to maximize the potential of your electric fret saw and create impressive woodworking projects. Remember to always prioritize safety and take your time to ensure accurate and clean cuts. Happy sawing!