
Creating a wooden shovel can be a simple and rewarding DIY project for those looking to add a personal touch to their gardening or woodworking tools. With just a few basic materials and tools, you can craft a functional and durable wooden shovel that will serve you well in various outdoor tasks.
To begin, you will need a sturdy piece of wood that is suitable for carving and shaping. Common choices include hardwoods like oak, ash, or maple, as they are known for their strength and durability. It’s important to select a piece that is free from knots or other imperfections that could weaken the shovel.
Next, determine the desired shape and size of your wooden shovel. You can use an existing shovel as a template or create your own design. Consider the intended use of the shovel and ensure that the handle is long enough for a comfortable grip while the blade is wide enough to effectively move soil or other materials.
With the design in mind, use a saw to cut the wood into the desired shape of the shovel. Be sure to use safety precautions, such as wearing protective goggles, gloves, and securing the wood firmly in place before making any cuts. Once the basic shape is achieved, you can use a chisel, carving knife, or sandpaper to refine and smooth the edges.
After carving the shovel, it’s important to apply a protective finish to the wood to enhance its lifespan and prevent damage from moisture or other weather conditions. Linseed oil or wood sealant can be applied with a brush or cloth, ensuring thorough coverage on all surfaces. Allow the finish to dry completely before using the wooden shovel.
What is a wooden shovel?
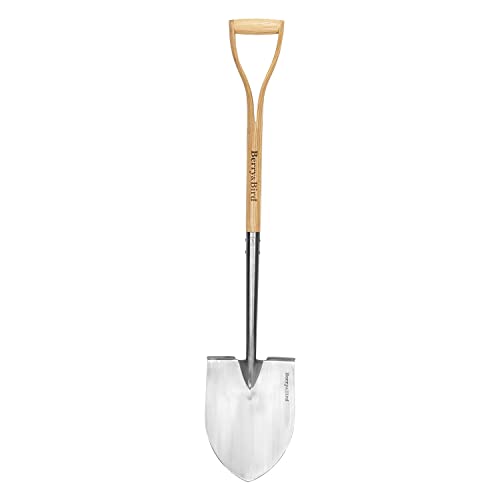
A wooden shovel is a tool made from wood that is used for digging and moving soil or other materials. It consists of a flat rectangular blade attached to a long handle. Wooden shovels have been used for centuries and are still commonly used in many parts of the world today.
Wooden shovels are typically made from strong and durable types of wood, such as oak or ash, to withstand the pressure and force applied during digging. The blade of the shovel is usually carved or shaped to form a flat surface that can easily penetrate the ground.
Wooden shovels are often preferred for certain tasks due to their durability, affordability, and eco-friendly nature. They are commonly used in gardening, landscaping, and construction projects. However, they may not be suitable for heavy-duty tasks or rocky terrains, as the wooden handle may break or splinter under excessive pressure.
Overall, wooden shovels offer a traditional and natural alternative to metal or plastic shovels. They have a rustic charm and can be easily repaired or replaced if damaged. Whether used for gardening or other purposes, a wooden shovel is a versatile tool that has stood the test of time.
The Benefits of a Wooden Shovel
A wooden shovel is a traditional tool that has been used for centuries to aid in various tasks. While there might be more modern materials available, a wooden shovel still offers several advantages.
Durability
One of the main benefits of a wooden shovel is its durability. When properly maintained, a wooden shovel can withstand heavy use and last for many years. The natural strength of wood allows the shovel to handle tough soil, rocks, and other debris without breaking or bending. This durability makes wooden shovels a reliable choice for gardening, landscaping, and construction projects.
Lightweight
Compared to shovels made from metal or other heavy materials, wooden shovels are relatively lightweight. This makes them easier to handle and maneuver, especially for extended periods of time. The lighter weight of a wooden shovel reduces fatigue and strain on the user’s body, making it a practical option for individuals of all ages and physical abilities.
Sustainability
Using a wooden shovel is an eco-friendly choice. Wood is a renewable resource, and when responsibly sourced, it can be harvested without causing significant harm to the environment. Unlike shovels made from non-renewable materials, a wooden shovel has a smaller carbon footprint and contributes less to pollution and waste.
In conclusion, a wooden shovel offers durability, lightweight handling, and sustainability. Whether you are gardening or working on a construction site, a wooden shovel can be a reliable and environmentally-friendly tool to assist you in your tasks.
Step 1: Gather the necessary materials
Before you can start making a wooden shovel, you will need to gather the following materials:
1. Wood
Choose a strong and durable wood for your shovel. Hardwoods like oak, ash, or maple are ideal for this project.
2. Handsaw
A handsaw will be necessary for cutting the wood into the desired shape and size for your shovel.
3. Sandpaper
You will need sandpaper to smooth the surface of the wood and remove any rough edges.
4. Drill
A drill will be needed to create holes for attaching the handle to the shovel head.
5. Hammer
A hammer will be necessary for driving nails or screws into the wooden shovel.
6. Nails/Screws
Depending on your preference, you can use either nails or screws to attach the handle to the shovel head.
7. Measuring tape
A measuring tape will be helpful for ensuring accurate measurements while cutting the wood.
8. Pencil or marker
A pencil or marker will be needed for marking measurements and guidelines on the wood.
Once you have gathered all of the necessary materials, you can proceed to the next step of making your wooden shovel.
Choosing the Right Type of Wood
When it comes to making a wooden shovel, choosing the right type of wood can greatly impact the longevity and effectiveness of the tool. Different types of wood have different strengths, durability, and resistance to moisture and decay. Here are a few factors to consider when selecting wood for your wooden shovel:
1. Hardness
One important characteristic to consider is the hardness of the wood. A harder wood will resist wear and damage better than a softer wood. It is recommended to choose a wood species that is at least moderately hard, such as oak or maple, for the blade and handle of the shovel.
2. Moisture Resistance
Since shovels are often used outdoors and may come into contact with moisture, it is important to choose a wood species that has good moisture resistance. Woods like teak, cedar, or redwood are known for their natural resistance to moisture and decay, making them ideal choices for a wooden shovel.
It is also crucial to properly treat and seal the wooden shovel to enhance its moisture resistance and prolong its lifespan. Applying a coat of waterproof sealant or oil can help protect the wood from moisture damage.
3. Availability
Consider the availability of the wood species you are considering. It is preferable to choose a wood that is readily available in your area, as this can make the process of acquiring the necessary materials for your wooden shovel easier and more cost-effective.
To help with the selection process, here is a comparison table highlighting some popular wood species and their characteristics:
| Wood Species | Hardness | Moisture Resistance |
|---|---|---|
| Oak | Moderate to Hard | Fair |
| Maple | Hard | Fair |
| Teak | Hard | Good |
| Cedar | Soft to Moderate | Excellent |
| Redwood | Soft to Moderate | Excellent |
Ultimately, the choice of wood for your wooden shovel will depend on your specific needs, preferences, and availability. It is important to consider all these factors in order to select a wood species that will provide durability, moisture resistance, and longevity to your wooden shovel.
Step 2: Prepare the wood for shaping
Before you can start shaping your wooden shovel, it’s important to prepare the wood properly. Here are the steps you need to follow:
1. Choose the right type of wood
When selecting wood for your shovel, it’s essential to choose a suitable type of wood that is both strong and durable. Good options for a wooden shovel include hardwoods like oak, ash, or hickory.
2. Gather the necessary tools
Make sure you have all the tools you need to prepare the wood for shaping. The tools you will need include a saw, a chisel, a plane, sandpaper, and a measuring tape.
3. Cut the wood to size
Using a saw, cut the selected wood into the desired dimensions for your shovel. Make sure you measure and mark the wood accurately before making any cuts to ensure the shovel’s proper size.
4. Remove any rough edges
Using a chisel, carefully remove any rough or uneven edges from the wood. This will help to create a smoother finish and reduce the risk of splintering when shaping the shovel.
5. Plane the wood
Use a plane to smooth out the surfaces of the wood, removing any bumps or imperfections. Take your time and work carefully to create an even and consistent surface.
6. Sand the wood
Finish preparing the wood for shaping by sanding it thoroughly. Start with a coarse-grit sandpaper to remove any remaining rough areas, then switch to a finer-grit sandpaper for a smoother finish.
Once you have completed these steps, your wood will be ready for shaping into a functional and sturdy wooden shovel.
Measuring and cutting the wood
Before you start making a wooden shovel, it’s essential to measure and cut the wood accurately. This step ensures that your shovel will have the correct size and shape.
Gather the materials
Start by gathering all the necessary materials for making a wooden shovel. You will need a piece of sturdy wood, preferably hardwood, measuring tape, a pencil or marker, and a saw for cutting the wood.
Measure and mark the wood
Using a measuring tape, measure the desired length and width for your wooden shovel. Typically, a shovel blade is around 10-12 inches wide and 12-14 inches long. Mark these measurements on the wood using a pencil or marker.
Next, measure and mark the handle portion of the shovel. The handle should be around 3-4 feet long. Mark the desired length on the wood, ensuring it is straight and centered.
Cut the wood
Once you have marked the measurements on the wood, it’s time to cut it. Use a saw to carefully cut along the marked lines. Make sure to follow the lines precisely to ensure accurate dimensions.
When cutting the handle portion, make sure to maintain a straight and even cut. A wavy or uneven handle can make using the wooden shovel uncomfortable and inefficient.
After cutting the wood, you can further refine the edges and shape using sandpaper or a wood file. Smooth out any rough edges to make the shovel more comfortable to use and prevent splinters.
Now that you have successfully measured and cut the wood, you are ready to proceed to the next steps in making your wooden shovel.
Sanding the wood for a smoother finish
Once you have cut the shape of the shovel out of a wooden plank and have the basic structure of the shovel, it is important to sand the wood to achieve a smoother finish.
First, make sure to wear protective gear such as safety goggles and a dust mask to protect yourself from the tiny wood particles that will be released during the sanding process.
Start by using coarse grit sandpaper to remove any rough edges or splinters from the wood. Gently run the sandpaper along the edges and any other rough areas until they are smooth. Remember to sand in the direction of the wood grain for the best results.
After the initial rough sanding, switch to a finer grit sandpaper to smooth out the surface of the wood further. Repeat the sanding process, making sure to sand the entire surface of the shovel evenly. This will help to eliminate any remaining imperfections and create a more polished look.
During the sanding process, it is important to frequently check the smoothness of the wood by running your hand over the surface. This will help you identify any areas that still need additional sanding. Pay special attention to the edges and corners, as these tend to be areas where roughness can be overlooked.
Once you are satisfied with the smoothness of the wood, use a damp cloth to wipe away any dust or debris from the sanding. This will help ensure a clean surface for applying a protective finish or paint if desired.
Remember, sanding the wood is an essential step in creating a wooden shovel with a smooth and professional-looking finish. Take your time and pay attention to detail, and you will be rewarded with a beautiful and functional tool.


