Wooden shovel handles are not only sturdy and reliable, but also have a rustic and natural appeal. Making your own wooden shovel handle can be a rewarding and enjoyable woodworking project. Whether you need to replace a broken handle or simply want to customize your shovel, this step-by-step guide will walk you through the process of creating a durable and ergonomic wooden shovel handle.
Step 1: Selecting the Wood
The first step in making a wooden shovel handle is to select the right type of wood. Look for a strong and durable hardwood, such as ash, hickory, or oak. These types of wood are known for their resilience and ability to withstand heavy use. Avoid softer woods, as they may not have the necessary strength to handle the weight and stress of digging.
Tip: If possible, choose wood that has been seasoned or kiln-dried to reduce the risk of warping or cracking.
Step 2: Cutting and Shaping the Handle
Once you have selected the wood, use a saw to cut a length that is slightly longer than your desired handle length. It’s always better to have extra length that can be trimmed later. Next, mark the center of the handle and use a drawknife or a lathe to shape the handle. Begin by removing any rough edges, and then gradually taper the handle towards one end, creating a comfortable grip.
Tip: Experiment with different handle shapes and sizes to find the one that feels the most comfortable in your hands.
Step-by-step guide to crafting your own wooden shovel handle
Materials needed:
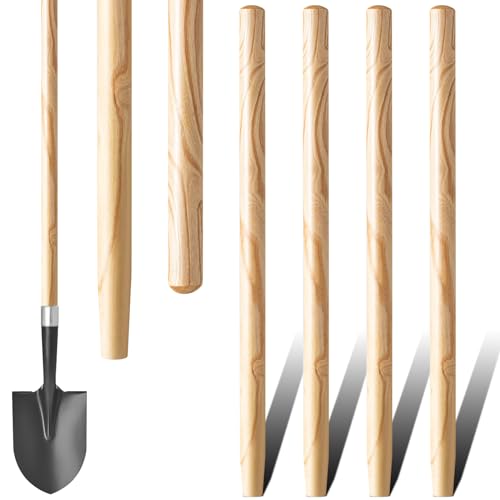
- One piece of hardwood, approximately 36 inches long and 2 inches in diameter
- Tape measure
- Pencil
- Saw
- Sandpaper
- Wood stain or varnish
- Paintbrush
Step 1: Measuring and marking
Using a tape measure, measure and mark a length of 36 inches on the hardwood.
Step 2: Cutting the wood
Use a saw to cut the hardwood along the marked line. Take your time and make sure the cut is straight.
Step 3: Sanding
Once the wood is cut, use sandpaper to smooth out any rough edges or surfaces. Be sure to sand all sides evenly for a polished finish.
Step 4: Finishing
If desired, apply wood stain or varnish to the handle for added protection and a professional look. Use a paintbrush to evenly coat the entire surface of the handle. Allow it to dry completely before moving on to the next step.
Step 5: Attaching the handle
To attach the handle to the shovel, simply slide it into the shovel’s socket until it fits securely. Depending on the design of your shovel, you may need to fasten it with screws or nails to ensure a tight fit.
Step 6: Testing the handle
Before using the shovel, give the handle a few test swings to ensure it is secure and comfortable to grip. Make any necessary adjustments before putting it to use.
Step 7: Maintenance
Regularly inspect the handle for any signs of wear or damage. If needed, sand and refinish the handle to keep it in optimal condition.
Follow these steps, and you’ll have a sturdy and reliable wooden shovel handle that you made yourself. Enjoy your newfound woodworking skills!
Choosing the right wood for your shovel handle
When it comes to choosing the right wood for your shovel handle, there are a few key factors to consider. The wood you select will determine the durability, strength, and overall performance of your shovel. Here are some popular wood options to consider:
| Wood Type | Pros | Cons |
|---|---|---|
| Hickory | Durable and shock-resistant | Can be quite heavy |
| Ash | Offers flexibility and strength | May require additional protection |
| Oak | Strong and durable | Can be heavy and hard to work with |
| Maple | Resistant to splintering | Not as strong as hickory or ash |
Factors to consider when choosing wood
Before making a final decision, consider the following factors:
- Strength: Ensure the wood has sufficient strength to withstand the pressure and weight applied during digging.
- Durability: Look for a wood species that is resistant to cracking, splitting, and moisture damage.
- Weight: Consider the weight of the wood, as a heavy handle can cause fatigue during prolonged use.
- Availability: Choose a wood species that is readily available in your area to ensure accessibility and affordability.
- Workability: Select a wood that is easy to shape and carve into the desired handle design.
Additional considerations
It’s important to note that the design and construction of the handle, including its shape and size, can also affect its performance. Be sure to carefully consider these aspects in conjunction with your choice of wood for optimal results.
By taking the time to choose the right wood for your shovel handle, you can ensure a reliable and long-lasting tool that makes light work of your digging tasks.
Preparing the wood for crafting
Before you can start crafting your wooden shovel handle, it’s essential to properly prepare the wood. This process will ensure that the handle is durable and long-lasting.
1. Selecting the wood
Choose a type of wood that is strong and resistant to wear and tear. Popular options for shovel handles include ash, hickory, and oak. These types of wood have excellent strength and can withstand the pressure and force applied when using a shovel.
2. Cutting the wood
Begin by cutting a section of the wood to the desired length for your handle. Use a saw or any other suitable cutting tool. Ensure that the length is appropriate for your shovel head and comfortable for your grip.
Note: If the wood is still green, it’s best to let it dry for some time before proceeding with the next steps. Green wood may shrink or split as it dries, which can affect the integrity of the handle.
3. Removing the bark
With a sharp knife or chisel, carefully peel off the bark from the wood. This step helps to prevent the presence of pests or insects that may damage the handle in the future. Ensure that the wood is clean and free from any debris or dirt.
4. Shaping the handle
Using a drawknife or a carving knife, start shaping the wood to create a comfortable grip for your hand. Remove any rough edges or splinters, and smoothen the surface of the handle. Pay attention to the ergonomics and make sure the handle fits your hand well.
Optional: You can also add additional design elements or personal touches to the handle during this step, such as carving patterns or initials.
By following these steps, you will have a well-prepared piece of wood that is ready for the next stage of crafting your wooden shovel handle.
Shaping and carving the shovel handle
Once you have selected a suitable piece of wood for your shovel handle, it is time to shape and carve it to your desired specifications. Follow these steps to create a comfortable and sturdy handle:
- Measure and mark the desired length of your handle using a tape measure and a pencil. Make sure to account for any additional length needed for mounting the handle onto the shovel blade.
- Use a saw to cut the handle to the desired length. Make sure to cut the wood at a slight angle to create a comfortable grip.
- With a pencil or chalk, mark the centerline of the handle along its length. This will serve as a guide for creating symmetrical shapes.
- Using a drawknife or a spokeshave, start removing excess material from the handle. Work slowly and carefully, following the natural curves of the wood and checking for symmetry as you go.
- Continue shaping the handle until it reaches your desired thickness and profile. Smooth out any rough spots or edges using sandpaper or a file.
- If desired, add decorative carvings or patterns to the handle using carving tools. This is purely optional but can add a personal touch to your finished product.
- Once you are satisfied with the shape and finish of the handle, apply a protective finish such as varnish or linseed oil to seal the wood and enhance its durability.
Remember to take breaks and step back to assess your progress throughout the shaping and carving process. The key is to work slowly and carefully, ensuring that the handle fits comfortably in your hand and provides ample strength for the task at hand.
Finishing touches for a durable handle
Once you have shaped and smoothed the wooden handle for your shovel, it’s important to add some finishing touches to ensure its durability. Follow these steps to complete your handle:
| Step 1: | Apply a coat of wood sealer to the entire handle. This will protect the wood from moisture and prevent it from cracking or warping over time. |
| Step 2: | Once the sealer has dried, sand the handle lightly with fine-grit sandpaper to remove any rough spots or unevenness. Be careful not to sand too much, as this can damage the sealer. |
| Step 3: | Next, apply a layer of wood stain or paint to give the handle a finished look. Choose a stain or paint that is specifically designed for outdoor use and can withstand the elements. |
| Step 4: | Allow the stain or paint to dry completely. Depending on the product, this may take a few hours or overnight. Follow the manufacturer’s instructions for best results. |
| Step 5: | Finally, apply a coat of varnish or polyurethane to protect the finish and provide additional durability. This will help prevent scratches, stains, and fading. |
By following these steps, you can ensure that your wooden shovel handle is not only functional but also long-lasting. Don’t forget to allow adequate drying time between each step to achieve the best results.