Repouring a sieve bed is an essential process that ensures its proper functioning and longevity. Sieve beds are commonly used in various industrial applications, including gas separation, air compression, and water treatment. Over time, due to wear and tear, the sieve material may degrade, leading to reduced efficiency and performance. A repouring procedure involves removing the old sieve material and replacing it with fresh material, effectively rejuvenating the sieve bed.
The first step in repouring a sieve bed is to thoroughly clean the existing bed. Any debris, sediment, or contaminants should be removed to create a clean surface for the new sieve material. This can be achieved through a combination of techniques such as vacuuming, blowing compressed air, and using specialized cleaning solutions. It is crucial to ensure that the sieve bed is free from any foreign particles that can compromise its functionality.
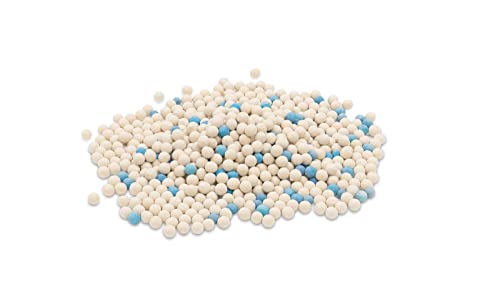
Once the bed is clean, the next step is to prepare the fresh sieve material. Different types of sieve materials are available, including molecular sieves and activated carbon. The choice of material depends on the specific application and desired performance. The new sieve material should be carefully selected and prepared according to the manufacturer’s instructions or industry standards. It is essential to handle the sieve material with care to avoid any damage or contamination.
Steps to Repour a Sieve Bed
If you need to repour a sieve bed, follow these steps:
1. Preparation:
Before starting the repouring process, make sure you have all the necessary tools and materials. This may include a new sieve material, a mixing container, a trowel, a level, and any other equipment needed for the specific type of sieve bed you are working with.
2. Removal of Old Material:
The first step is to remove the old sieve material from the bed. Carefully scrape off the old material using a trowel or any suitable tool. Make sure you remove all the old material until you reach the substrate or the base of the sieve bed.
3. Cleaning and Leveling:
Thoroughly clean the substrate or base of the sieve bed. Use a brush or a cloth to remove any loose particles, dirt, or debris. Once the bed is clean, use a level to ensure it is perfectly flat and even.
4. Mixing New Material:
Prepare the new sieve material by following the manufacturer’s instructions. Depending on the type of material, you may need to mix it with water or any other additive. Use a mixing container to ensure the material is well mixed and has a consistent texture.
5. Repouring the Bed:
Take the mixed sieve material and carefully pour it onto the cleaned and leveled bed. Start from one end and gradually work your way to the other end, making sure the material is evenly distributed. Use a trowel to smooth out the surface and eliminate any air pockets or uneven areas.
6. Curing and Drying:
Allow the repoured sieve bed to cure and dry according to the manufacturer’s instructions. This may involve a certain period of time for the material to harden and set properly. Avoid disturbing or using the sieve bed until it is fully cured.
Following these steps will help you successfully repour a sieve bed and ensure its optimal functionality and performance.
Preparing the Sieve Bed
Before repouring a sieve bed, it is important to properly prepare the surface to ensure the best results. Here are the steps to follow:
Clean the Sieve Bed
Start by cleaning the sieve bed thoroughly. Remove any debris, leftover material, or dust from the surface. A clean surface is essential for a successful repouring process.
Inspect for Damage
Next, carefully inspect the sieve bed for any signs of damage or wear. Look for cracks, chips, or any other imperfections that may affect the performance of the sieve bed. If you notice any damage, it is important to repair or replace the affected parts before proceeding.
Tip: Regular inspections and maintenance can help to identify and address any issues before they become more serious.
Prepare the Mixture
Once the sieve bed is clean and free of damage, it is time to prepare the repouring mixture. Follow the instructions provided by the manufacturer for the specific type of sieve bed material being used. Ensure that the mixture is properly mixed and free of clumps or air bubbles.
Note: Different types of sieve beds may require different mixtures or additives, so it is important to consult the manufacturer’s guidelines.
By following these steps, you can ensure that the sieve bed is properly prepared for repouring. This will help to optimize the performance and longevity of the sieve bed, ensuring accurate and efficient sieving processes.
Removing the Old Material
Before repouring a sieve bed, it is necessary to remove the old material. This ensures that the new material is able to function properly and efficiently. The process of removing the old material involves the following steps:
| Step | Description |
| 1 | Turn off the sieve bed and disconnect it from any power sources. |
| 2 | Carefully remove the top cover of the sieve bed, exposing the old material. |
| 3 | Use a specialized tool or vacuum cleaner to carefully remove the old material from the sieve bed. Take caution not to damage any components or structures within the bed. |
| 4 | Inspect the sieve bed thoroughly to ensure that all old material has been removed. |
| 5 | Clean the sieve bed using a gentle cleaning agent and a soft cloth. This will help remove any residue or particles that may be left behind. |
| 6 | Allow the sieve bed to fully dry before proceeding with the repouring process. |
By following these steps, you can effectively remove the old material from the sieve bed and ensure that it is clean and ready for the repouring process.
Cleaning the Sieve Bed
The sieve bed is an essential component of a filtration system, and regular cleaning is necessary to maintain its efficiency. Over time, the sieve bed can become clogged with debris, sediments, and impurities, which can hinder the filtration process. Cleaning the sieve bed is a relatively straightforward process that can be done using the following steps:
1. Turn off the Filtration System
Before beginning the cleaning process, it is important to turn off the filtration system and ensure that there is no water flow through the sieve bed.
2. Remove the Sieve Bed Cover
Using the appropriate tools, carefully remove the sieve bed cover. Be cautious not to damage any components or disturb the filter media.
3. Rinse the Sieve Bed
Using a gentle stream of water, thoroughly rinse the sieve bed to remove loose debris and sediment. Be careful not to use excessive water pressure, as it may damage the sieve bed or displace the media.
4. Soak the Sieve Bed in Cleaning Solution
Prepare a cleaning solution according to the manufacturer’s instructions or use a mild detergent. Submerge the sieve bed in the cleaning solution and allow it to soak for the recommended time, typically around 30 minutes.
5. Scrub the Sieve Bed
Using a soft bristle brush or sponge, carefully scrub the sieve bed to remove any stubborn debris or impurities. Pay special attention to the areas around the sieve bed walls and bottom, as they tend to accumulate more contaminants.
6. Rinse Thoroughly
After scrubbing, thoroughly rinse the sieve bed with clean water to remove any remaining cleaning solution or loosened debris. Ensure that all traces of the cleaning solution are removed to prevent contamination of the filtration system.
7. Inspect and Reassemble
Inspect the sieve bed for any signs of damage or wear, such as cracks or tears in the bed material. If any damage is found, consider replacing the sieve bed before reassembling. Once the sieve bed is clean and in good condition, carefully reassemble it, ensuring proper alignment and sealing.
Regular maintenance and cleaning of the sieve bed will help ensure optimal filtration performance and extend the lifespan of the filtration system. Following these steps and adhering to the manufacturer’s guidelines will help keep your sieve bed in excellent condition.
Mixing the New Material
Once you have removed the old material from the sieve bed, the next step is to mix and prepare the new material. Here is a step-by-step guide on how to successfully repour a sieve bed:
1. Gather the materials:
Before starting the mixing process, ensure that you have all the necessary materials. This includes the new sieve material, a bucket or container for mixing, a measuring cup or scale, and any additives or binders that may be required.
2. Measure the quantity:
Accurately measure the correct quantity of new sieve material based on the bed size and specifications. This is important to ensure that the bed is properly filled and functions optimally.
3. Mix the materials:
In the mixing container, combine the measured quantity of sieve material with any additives or binders as instructed. Use a stirring implement, such as a shovel or mixing paddle, to thoroughly blend the materials together. Continue mixing until you achieve a consistent and homogenous mixture.
4. Check the moisture content:
It is important to check the moisture content of the mixed materials before pouring them into the sieve bed. The moisture content should be within the recommended range specified by the manufacturer or engineering guidelines. Adjust the moisture content if necessary by adding water or drying the mixture slightly.
5. Pour the mixture:
Carefully pour the mixed material into the sieve bed. Start from one end and work your way to the other to ensure even distribution. Avoid overflowing or underfilling the bed, as this can lead to poor performance and uneven spreading of the material during sieving.
6. Level and compact:
Using a leveling tool or implement, distribute the material evenly across the bed and compact it to ensure uniformity. The level and compaction should be consistent throughout to achieve optimal sieving results.
Note: It is important to follow any specific instructions or guidelines provided by the manufacturer or consulting engineer when repouring a sieve bed. This will ensure that the process is completed correctly and the bed functions efficiently.
Pouring the New Material
Once the old material has been removed from the sieve bed, it is time to pour the new material. This process requires careful attention to detail and precision to ensure an effective and efficient sieve bed.
First, you will need to gather the necessary materials for the pour. This includes the new material, such as zeolite or activated carbon, as well as any tools or equipment required for the job. Make sure to use high-quality materials to ensure the best results.
Next, prepare the sieve bed for the pour. This may involve cleaning and drying the sieve bed to remove any remaining residue or moisture. It is important to have a clean and dry surface to ensure proper adhesion of the new material.
Once the sieve bed is prepared, carefully pour the new material into the bed. Start by pouring the material in one corner and slowly move across the bed, ensuring an even distribution. Use a level or straight edge to ensure that the material is evenly spread and at the desired level.
After pouring the new material, gently tap the sieve bed to remove any air bubbles or voids. This will help to ensure maximum contact between the material and the gas or liquid passing through the bed. Take your time during this step to ensure a thorough and effective pour.
Finally, allow the new material to cure or dry according to the manufacturer’s instructions. This may involve a specific curing time or temperature. It is important to follow these instructions to ensure that the new material properly sets and becomes fully functional.
In conclusion, pouring the new material into a sieve bed requires careful preparation and attention to detail. By following these steps, you can ensure a successful and efficient pour that will provide optimal performance for your sieve bed.
Curing the Sieve Bed
When it comes to repouring a sieve bed, one important step is the curing process. Curing is essential to ensure the longevity and effectiveness of the repoured sieve bed.
Here are the steps to properly cure a sieve bed:
- Moisture control: Before curing the repoured sieve bed, it is crucial to ensure proper moisture control. Make sure the bed is neither too wet nor too dry. Maintaining the right moisture content will help in achieving an optimal curing process.
- Temperature regulation: It is important to control the temperature during the curing process. Keep the temperature within the recommended range to facilitate proper curing. Extremes of temperature can have a negative impact on the strength and durability of the sieve bed.
- Covering: Cover the repoured sieve bed with a plastic sheet to prevent moisture loss. This will help create a favorable environment for curing and ensure consistent moisture content throughout the bed.
- Curing time: The curing time for a repoured sieve bed may vary depending on the type of material used and specific instructions provided by the manufacturer. Follow the recommended curing time to allow the bed to achieve its full strength and stability.
- Monitoring: Regularly monitor the curing process to ensure optimal conditions are maintained. This includes checking the moisture content and temperature at regular intervals to make any necessary adjustments.
- Final inspection: Once the curing process is complete, perform a final inspection to ensure the repoured sieve bed meets the required standards. Look for any signs of cracks, inconsistencies, or other defects that may impair its functionality.
Following these steps for curing the repoured sieve bed will help ensure its longevity and performance. It is important to carefully adhere to the recommended guidelines provided by the manufacturer to achieve the best results.