
Homemade gin is a delightful drink to have on hand for special occasions or simply to savor on a quiet evening. But before it can be enjoyed, it is important to properly sieve the gin to achieve a smooth and refined taste. Sieving homemade gin involves removing any impurities or sediment that may have developed during the distillation process. With the right tools and a little patience, you can easily sieve your gin at home and enhance its flavor.
Step 1: Gather your equipment
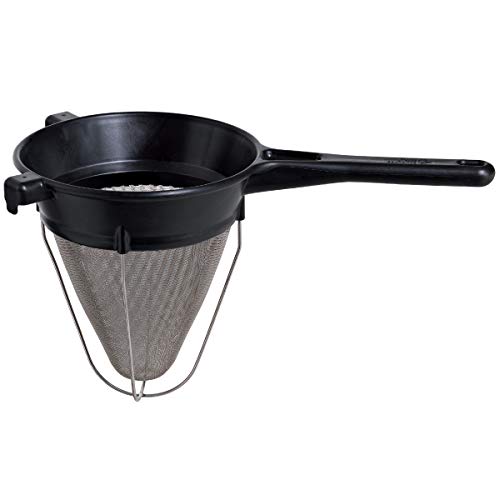
Before you begin the sieving process, make sure you have all the necessary equipment on hand. You will need a fine-mesh strainer or cheesecloth, a funnel, and a clean glass bottle or jar to store the sieved gin. It is also a good idea to have a measuring cup or small pitcher to make the transfer from the distillation vessel easier.
Step 2: Prepare the strainer or cheesecloth
If you are using a fine-mesh strainer, ensure that it is clean and free of any debris. If you are using cheesecloth, cut it into a square or rectangle that is large enough to cover the opening of the funnel. Rinse the cheesecloth with cold water to remove any loose particles or odors, then wring it out to remove excess moisture.
Step 3: Set up your workstation
Find a clean and spacious area to work in. It is best to place a clean towel or cloth underneath your equipment to catch any spills or drips. This will make cleanup easier later on.
Step 4: Strain the gin
Carefully pour the homemade gin through the strainer or cheesecloth-lined funnel into the glass bottle or jar. Allow the liquid to flow through slowly to ensure that all impurities are captured by the strainer or cheesecloth. It may be necessary to pause periodically to clean and rinse the strainer or cheesecloth if it becomes clogged.
Step 5: Store and enjoy
Once the gin has been sieved, seal the bottle or jar tightly to preserve its flavor. Store it in a cool, dark place to prevent any changes or degradation in taste. Your homemade gin is now ready to be enjoyed either on its own or in your favorite gin-based cocktail.
Remember, the sieving process is an essential step in ensuring that your homemade gin is of the highest quality. Take your time and be thorough to achieve a smooth and refined taste that you can be proud to serve to your guests or enjoy yourself.
Tips for Sieving Homemade Gin
When making homemade gin, it is essential to sieve the final product to achieve a clear and smooth texture. Here are some helpful tips to ensure that your gin is perfectly filtered:
1. Choose the Right Sieve
Selecting the right sieve is crucial for achieving excellent results. Use a fine-meshed sieve or a coffee filter to remove particulates and impurities. Avoid using sieves with large holes as they may not effectively filter out all unwanted elements.
2. Double Sieving
For a more refined end product, consider double sieving your homemade gin. After passing it through the first sieve, strain the gin again using a fresh sieve or a new coffee filter. This extra step helps remove any remaining impurities and enhances the overall clarity of the final product.
Remember to wash the sieve or coffee filter thoroughly between each straining to prevent any residue from contaminating the gin.
3. Use Gravity
Instead of forcing the gin through the sieve, let gravity do the work. Place the sieve or coffee filter on top of a clean container and allow the gin to strain naturally. Avoid pressing or squeezing the filter, as this can introduce unwanted flavors or cloudiness into the gin.
Be patient during the sieving process, as it may take some time for the gin to pass through and fully filter.
By following these tips, you can ensure that your homemade gin is beautifully sieved, resulting in a delicious and visually appealing beverage that is ready to be enjoyed.
Choosing the Right Materials
When it comes to sieving homemade gin, it is important to choose the right materials that will help you achieve the desired clarity and taste.
1. Sieve: Start by selecting a fine mesh sieve or cheesecloth, as these options will effectively remove impurities and botanical particles from your gin. Make sure the sieve is clean and free of any residue before use.
2. Funnel: A funnel can be a handy tool to transfer the gin from one container to another through the sieve. Look for a funnel that fits securely on top of your sieve to avoid any spillage.
3. Glass Container: To further refine your gin, consider transferring it into a glass container after the initial sieve. Glass containers are non-reactive and won’t alter the taste of your homemade gin.
4. Cheesecloth or Coffee Filter: If you desire an even smoother and clearer gin, you can pass it through a second filtration using a cheesecloth or a coffee filter. This step will help remove any remaining fine particles or impurities.
5. Clean Water: If you plan on diluting your gin, make sure to use clean and filtered water. The quality of water can impact the overall taste of your final product.
By choosing the right materials, you can ensure that your homemade gin is free of impurities and has a smooth and refined taste.
Preparing the Gin Mixture
Before you can start sieving your homemade gin, you need to prepare the gin mixture. This involves mixing together the key ingredients and allowing them to infuse.
Here are the steps to prepare the gin mixture:
- Gather your ingredients, including juniper berries, botanicals of your choice, and a neutral spirit such as vodka. Make sure the berries and botanicals are fresh and of high quality.
- Crush the juniper berries slightly using a mortar and pestle to release their flavor. You can also use the back of a spoon if you don’t have a mortar and pestle.
- Add the crushed juniper berries and botanicals to a clean glass jar or container with an airtight lid.
- Pour the neutral spirit over the berries and botanicals, making sure they are completely submerged. The ratio of berries and botanicals to spirit can vary depending on your desired flavor intensity, but a good starting point is around 1 tablespoon of juniper berries and 1 teaspoon of botanicals for every 250ml of spirit.
- Seal the jar tightly and give it a gentle shake to mix the ingredients together.
- Place the jar in a cool, dark place, such as a pantry or cupboard. Allow the mixture to infuse for at least 24 hours, but for a more intense flavor, you can leave it for up to a week.
- After the desired infusion time, your gin mixture is ready to be sieved. Proceed to the next steps to filter and clarify your homemade gin.
By preparing the gin mixture properly, you’ll ensure that your homemade gin has a rich and well-balanced flavor. Take your time and enjoy the process of creating your very own personalized gin.
Setting up the Sieving Equipment
When it comes to sieving homemade gin, having the right equipment is key. Here’s how to set up your sieving station:
-
Choose a suitable container: Select a container that is large enough to hold the liquid you want to sieve. Make sure it is clean and has a lid or cover to prevent any contaminants from entering.
-
Prepare the filters: Place a fine-meshed sieve or cheesecloth over a funnel or another container with a spout. Make sure the sieve or cheesecloth is large enough to cover the opening completely.
-
Layer the filters: For extra filtration, you can add multiple layers of filters. Place a paper coffee filter or additional cheesecloth on top of the initial sieve, ensuring that it covers the entire surface evenly.
-
Secure the filters: Use rubber bands or clips to secure the filters in place. This will prevent them from falling out or slipping during the sieving process. Make sure the filters are secured tightly to avoid any leakage.
-
Set up the funnel: If you are using a funnel, place it securely on top of the container or another appropriate vessel. The spout of the funnel should fit snugly into the opening of the container to avoid any spills or drips.
-
Position the sieving equipment: Find a stable surface to set up your sieving station. It is important to have a steady base to prevent any accidents or spills while pouring the gin through the filters.
Once you have set up your sieving equipment, you are ready to start the process of sieving your homemade gin. Follow the instructions carefully and be patient as the liquid passes through the filters, ensuring a smooth and refined final product.
The Sieving Process
Once you have steeped your botanicals in alcohol and allowed it to infuse for a desired period of time, it is time to sieve the homemade gin to remove any solid particles and impurities. The sieving process helps to achieve a smooth and clear final product.
Start by preparing a clean container or bottle to collect the sieved gin. Place a funnel lined with a cheesecloth or a coffee filter over the opening of the container.
Next, carefully pour the infused gin into the funnel. The cheesecloth or coffee filter will help catch any botanical remnants, such as herbs or spices, preventing them from transferring into the final product.
Allow the gin to slowly pass through the cheesecloth or coffee filter, ensuring that you do not overcrowd the funnel. If needed, you can use a spoon to gently stir and assist the filtration process, but be careful not to force the liquid through.
Once all the gin has passed through the cheesecloth or coffee filter, remove the filter and discard the trapped solids. You can then transfer the filtered gin into a clean bottle or container for storage or consumption.
Remember, proper sieving is crucial to achieve a professional-looking and great-tasting homemade gin. So take your time and ensure that the gin passes through the filtering material slowly and thoroughly. Cheers!
Final Steps and Storage
Once you are satisfied with the flavor and aroma of your homemade gin, it’s time to proceed with the final steps and storage process.
1. Using a funnel, carefully pour the gin from the infusion jar into a clean and sterilized bottle. Make sure to leave a small amount of headspace at the top to allow for expansion.
2. To achieve a crystal-clear appearance, you can use a coffee filter or a cheesecloth to strain the gin one final time before transferring it into the bottle.
3. Seal the bottle tightly with a cork or a screw-on cap to prevent any air from entering. Oxygen can degrade the quality of the gin over time.
4. Store the bottle in a cool, dark place. An ideal storage spot is a cellar or a cupboard away from direct sunlight and fluctuations in temperature.
5. It is recommended to let the gin age for at least a week before enjoying it. This resting period allows the flavors to blend together and mellow out.
6. Once opened, consume the gin within a reasonable timeframe to enjoy it at its best. Unlike commercially produced gins, homemade gin may not have as long of a shelf life.
By following these final steps and proper storage practices, you will be able to savor your homemade gin for months to come.


