If you’re a painter, you know how crucial it is to have smooth, lump-free paint for your artwork. One effective way to achieve this is by sieving your paint.
Sieving paint may seem like a simple task, but it can make a significant difference in the overall quality of your work. When paint is sieved, any impurities or lumps are removed, resulting in a smooth and consistent texture.
So, how can you sieve paint with a sieve?
First, gather your materials: a fine-mesh sieve, a container for the sieved paint, and of course, the paint you wish to sieve.
Next, place the sieve over the container, ensuring that it is stable and won’t topple over. Pour a small amount of paint onto the sieve, making sure not to overload it. If you have a large quantity of paint, it may be best to work in batches.
Gently tap or shake the sieve to help the paint pass through the mesh. You may need to use a spoon or spatula to stir the paint and encourage it to move through the sieve.
As the paint filters through the sieve, you’ll notice any impurities, such as dried paint or debris, being left behind on the mesh.
Continue this process until all the paint has passed through the sieve, leaving you with a smooth, lump-free consistency. You may need to clean the sieve periodically, especially if it becomes clogged or if large particles accumulate on the mesh.
Once you’ve sieved your paint, it’s ready to be used in your artwork. The smooth texture will make it easier to apply and create the desired effect.
Remember, sieving your paint is a simple yet effective technique that can elevate the quality of your artwork. So, take the time to sieve your paint and enjoy the benefits of a smoother, more professional finish.
Why Sieve Paint?
When it comes to painting, sieve paint is a technique that can greatly benefit both professional painters and DIY enthusiasts. Sieving paint refers to the process of removing any impurities or solids that may have formed in the paint over time, resulting in a smoother and more consistent finish.
1. Improved Finish
One of the primary advantages of sieving paint is the improved finish it provides. By removing any lumps or particles that may have formed in the paint, you can achieve a smoother and more even application. This is particularly important when working on surfaces that require a flawless finish, such as walls or furniture.
2. Enhanced Flow and Spread
Another benefit of sieving paint is the enhanced flow and spread that it offers. When paint contains impurities or solids, it can result in uneven coverage and an inconsistent appearance. Sieving the paint helps to ensure that it has a consistent texture, allowing it to flow and spread more easily on the surface being painted.
Whether you are using a brush, roller, or spray gun, sieving the paint can help to prevent clogging and provide a more enjoyable painting experience.
3. Longer Paint Lifespan
Sieving paint can also extend the lifespan of your paint. By removing any particles or impurities that may cause deterioration over time, you can ensure that your paint remains in good condition for longer periods. This is especially important if you store your paint for future use.
By sieving unused paint before storing it, you can help to prevent any solidification or separation that may occur. This ensures that the paint remains usable and can be easily reactivated when needed.
In conclusion, sieving paint is a simple yet effective technique that can greatly benefit any painting project. By achieving a smoother finish, enhancing flow and spread, and extending the lifespan of your paint, sieving ensures that you achieve the best possible results. So, next time you prepare to paint, be sure to invest a little extra time in sieving your paint and enjoy the benefits it brings.
Benefits of Sieving Paint
Sieving paint before use offers several benefits that can enhance the overall painting experience and the quality of the finished artwork.
Improved Smoothness
One of the main benefits of sieving paint is that it helps to remove any clumps or particles that may be present in the paint. These impurities can negatively affect the smoothness of the paint application, creating an uneven surface texture in the final artwork. By removing these particles through sieving, the paint becomes smoother and easier to work with, allowing for better control and precision when applying it onto a surface.
Enhanced Color Consistency
Another advantage of sieving paint is that it helps to ensure color consistency throughout the painting process. Paint tubes may sometimes contain dried pigment or other impurities that could affect the color accuracy when directly applied onto a canvas or other surfaces. Sieving the paint removes these impurities, resulting in a more consistent color application. This is particularly important when working on a large artwork or when attempting to achieve precise color mixes for specific areas of a painting.
Additionally, sieving the paint can help to mix any separated or settled components, such as oil or water, that may occur over time. This ensures that the paint is well-blended and ready for use, providing a consistent color application from start to finish.
Extended Paint Lifespan
Sieving paint can also help to extend its lifespan. As paint ages, it may develop lumps or dry out, making it difficult to work with. By sieving the paint, any dried particles can be removed, making it easier to revive the paint by adding additional medium or water. This can save both time and money, as it allows artists to continue using their paint rather than needing to purchase new tubes.
In conclusion, sieving paint offers numerous benefits that can greatly enhance an artist’s painting experience. It improves smoothness, ensures color consistency, and extends paint lifespan. By taking the extra step of sieving paint, artists can achieve a higher quality of work and greater satisfaction with their final creations.
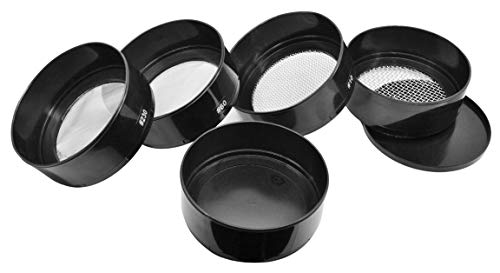
Types of Sieves
When it comes to sieving paint or any other material, there are several types of sieves that can be used to achieve the desired result. Each type of sieve is designed with a specific purpose in mind, and understanding the differences between them can help you choose the right one for your needs.
1. Mesh Sieves
Mesh sieves are the most common type of sieve used for painting purposes. They are made up of a mesh screen that is stretched tightly over a frame. The size of the mesh refers to the number of holes per inch, with a higher mesh number indicating smaller holes. Mesh sieves are ideal for removing large particles from the paint, such as dried chunks or dust.
2. Nylon Sieves
Nylon sieves are similar to mesh sieves but are made from a synthetic material instead of metal. They are often used for sieving paints that contain delicate pigments or additives that could be damaged by metal screens. Nylon sieves are also suitable for sieving fine powders or materials with fine particles.
| Sieve Type | Mesh Size | Common Uses |
|---|---|---|
| Mesh Sieves | Varies | Removing large particles from paint |
| Nylon Sieves | Varies | Sieving delicate pigments or fine powders |
It’s important to note that the mesh size of a sieve should be chosen based on the desired outcome. A smaller mesh size will result in a finer end product, while a larger mesh size will allow larger particles to pass through.
Ultimately, the type of sieve you choose will depend on the specific requirements of your painting project. Whether you opt for a mesh sieve or a nylon sieve, using a sieve will ensure that your paint is free from impurities and ready to use.
How to Choose the Right Sieve?
When it comes to sieving paint, choosing the right sieve is important to ensure optimal results. Here are some factors to consider when selecting a sieve for your paint filtering needs:
- Mesh Size: The mesh size of the sieve determines the size of particles that will be filtered out. You need to select a mesh size that is appropriate for the type of paint you are using. Finer paints may require a finer mesh size, while thicker paints may require a coarser mesh size.
- Durability: Look for a sieve made from durable materials such as stainless steel, which will ensure long-lasting performance. Avoid sieves made from flimsy materials that may break or lose their shape over time.
- Easy to Clean: Cleaning the sieve between uses can be a tedious task, so it is important to choose a sieve that is easy to clean. Look for a sieve with smooth surfaces and removable parts for easy cleaning and maintenance.
- Size: Consider the size of the sieve in relation to the amount of paint you need to filter. If you have a large volume of paint, a larger sieve will be more efficient. However, if you only need to filter small amounts of paint, a smaller sieve will suffice.
- Handle or Stand: Depending on your filtering setup, you may prefer a sieve with a handle or a sieve that can be placed on top of a container or stand. Consider your preferred method of filtering and choose a sieve that accommodates your needs.
By considering these factors and choosing the right sieve, you can ensure that your paint is properly filtered, free from impurities, and ready for use.
Step-by-Step Guide to Sieving Paint
Painting is a popular hobby and a great way to freshen up the look of your home. But sometimes, lumps and debris can spoil the finish of your paint job. That’s where sieving paint comes in handy. By removing any impurities, you can ensure a smooth and even application. Here is a step-by-step guide to help you effectively sieve your paint.
Step 1: Gather Your Materials
Before you begin, make sure you have all the necessary materials. You will need a fine-mesh sieve or strainer, a clean container, and a stir stick. It is important to use a sieve with a fine mesh to effectively remove any lumps or particles.
Step 2: Prep Your Paint
Open your paint can or container and give it a thorough stir using a stir stick. This will help to break up any clumps that may have formed. If the paint is extremely thick, you may want to add a small amount of water or paint thinner to thin it out slightly. Be sure to refer to the manufacturer’s instructions for guidance on dilution, if necessary.
Step 3: Position the Sieve
Place the mesh sieve or strainer over the clean container, ensuring that it is secure and stable. The container will catch any impurities that are sieved out of the paint.
Step 4: Sieve the Paint
Pour a small amount of paint into the sieve, taking care not to overfill it. Gently tap or shake the sieve to allow the paint to pass through the mesh. You may need to use the stir stick to help push the paint through the sieve if it is particularly thick or has a lot of lumps. Continue this process until all the paint has been sieved.
Step 5: Discard Debris
Once all the paint has been sieved, carefully remove the sieve from the container. Any debris or impurities will be left behind in the sieve. Dispose of these properly.
Step 6: Use the Sieved Paint
Your sieved paint is now ready to use! It should be free from lumps and debris, allowing for a smooth and even application. Use a clean paintbrush or roller to apply the paint to your desired surface.
Note: Sieving paint is particularly important when using older paint or leftover paint that may have been exposed to air for some time. This will help to ensure that any dried bits or foreign matter are removed before painting.
By following these steps, you can easily sieve your paint and achieve a professional finish. Happy painting!
Tips and Tricks
When it comes to sieving paint, there are some tips and tricks that can help make the process easier and more effective. Here are a few ideas to consider:
1. Use a Fine-Mesh Sieve
Choosing the right sieve is crucial for effectively removing impurities from your paint. Look for a sieve with a fine mesh that will catch even the smallest particles.
2. Tap or Shake the Sieve
If you notice that the paint is not passing through the sieve easily, try tapping or shaking the sieve gently. This can help loosen any clumps or debris that may be blocking the mesh.
3. Use a Stir Stick
If you have stubborn clumps of paint that are not passing through the sieve, try using a stir stick to break them up. Gently press the clumps against the mesh to encourage them to separate.
4. Clean the Sieve Regularly
After each use, be sure to clean the sieve thoroughly to remove any paint residue. This will help prevent clogs and ensure that the sieve continues to work effectively.
5. Use a Table to Catch the Paint
Placing a table or large plate underneath the sieve can help catch the paint as it passes through. This will prevent any spills and make clean-up easier.
| Tips | Benefits |
|---|---|
| Choose a fine-mesh sieve | Effective removal of impurities |
| Tap or shake the sieve | Loosens clumps and debris |
| Use a stir stick | Breaks up stubborn clumps |
| Clean the sieve regularly | Prevents clogs |
| Use a table to catch the paint | Prevents spills and makes clean-up easier |
By following these tips and tricks, you can ensure that your paint is well-sieved and free from impurities, resulting in a smoother painting experience.