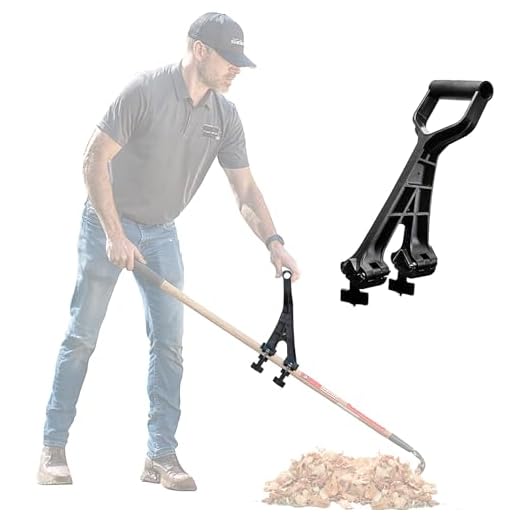


Attaching a handle to a spade is a simple process that can be done easily with just a few tools. Whether your old handle is worn out or you simply need to replace it, this guide will walk you through the steps to ensure a secure and sturdy attachment. By following these instructions, you’ll be able to get your spade back in working condition in no time.
Step 1: Removing the old handle
Before you can attach a new handle, you’ll need to remove the old one. Start by laying the spade flat on the ground or on a workbench. Use a wrench or pliers to remove any screws or bolts that may be securing the handle to the spade head. Once the fasteners are removed, carefully pull the old handle out of the spade head. If it’s stuck, you can use a rubber mallet to gently tap the handle to loosen it.
Step 2: Preparing the new handle

Select a new handle that is made of a durable material, such as wood or fiberglass, and is the appropriate size for your spade head. Measure the length of the spade head and mark the same length on your new handle. Use a saw to cut the new handle to the correct length. Smooth out any rough edges or splinters with sandpaper to ensure a comfortable grip.
Step 3: Attaching the new handle
Place the spade head on a sturdy surface with the hole for the handle facing up. Apply a small amount of wood glue or epoxy adhesive to the end of the new handle. Insert the glued end of the handle into the hole in the spade head, making sure it fits snugly. If necessary, you can use a rubber mallet to gently tap the handle into place. Wipe away any excess glue.
Step-by-step guide for attaching handle to spade
Attaching a handle to a spade is a simple process that can be completed in a few easy steps. Follow the instructions below to properly attach a handle to your spade:
Materials needed:
- A spade
- A handle
- Screws or bolts
- A screwdriver or wrench
Step 1: Prepare the spade
Before attaching the handle, make sure the spade is clean and free of any debris or dirt. This will ensure a secure and long-lasting attachment.
Step 2: Align the handle
Take the handle and align it with the hole on the spade where it will be attached. Make sure the handle fits snugly into the hole.
Step 3: Secure the handle
Using screws or bolts, attach the handle to the spade. Start by inserting the screws or bolts through the holes in the handle and into the corresponding holes in the spade. Use a screwdriver or wrench to tighten the screws or bolts until the handle is securely attached.
Step 4: Test the attachment
After securing the handle, give it a gentle tug to ensure it is firmly attached to the spade. If the handle feels loose, tighten the screws or bolts further.
Step 5: Finishing touches
Inspect the attachment to ensure it is secure and there are no loose parts. If everything looks good, you can clean the spade and handle with a damp cloth to remove any dirt or residue.
Following these simple steps will help you properly attach a handle to your spade, ensuring it is ready for use in your gardening or landscaping tasks.
Prepare your materials
Before attaching the handle to the spade, make sure you have all the necessary materials:
- A spade: Choose a sturdy spade that is suitable for your gardening needs. Ensure that the spade head is in good condition and free from any damage or rust.
- A handle: Select a handle made from durable materials such as wood or fiberglass. Make sure the handle is long enough for you to comfortably hold and work with.
- Screws or nails: Depending on the type of handle and spade head you have, you will need either screws or nails to attach the handle securely.
- A screwdriver or hammer: You will need a suitable tool to drive the screws or nails into place.
- Sandpaper: If the spade handle has any rough edges or imperfections, sandpaper can help smoothen them out for a more comfortable grip.
Once you have gathered all the necessary materials, you are ready to begin attaching the handle to the spade.
Remove old handle from spade
To attach a new handle to your spade, you will first need to remove the old handle. Follow these steps to complete this task:
Step 1: Assess the condition of the old handle
Before you begin, check the condition of the old handle. Look for any signs of damage, such as cracks or splinters. If the handle is severely damaged or worn out, it is recommended to replace it with a new handle.
Step 2: Secure the spade
To remove the old handle safely, you’ll need to secure the spade. This can be done by placing the spade head firmly on the ground or attaching it to a sturdy surface using clamps. Ensuring that the spade is securely held in place will make the removal process easier and safer.
Step 3: Remove the old handle
Using a hammer or mallet, firmly strike the top end of the old handle to detach it from the spade head. Gradually work your way around the circumference, delivering even blows until the handle becomes loose. Be careful not to damage the spade head during this process.
Once the handle is loosened, grasp it firmly near the spade head and pull it away from the spade. If the handle is resistant, you may need to wiggle it back and forth or apply lubricant to make the removal process easier.
Dispose of the old handle responsibly, following local waste disposal regulations.
With the old handle removed, you are now ready to attach a new handle to your spade.
Clean the spade head
Before attaching the handle to the spade, it’s important to clean the spade head properly. This will ensure that the handle attaches securely and that the spade is ready for use.
Here are the steps to clean the spade head:
1. Remove any dirt: Start by removing any dirt or debris from the spade head. Use a brush or a cloth to gently brush away any loose dirt. Pay special attention to the edges and corners of the spade head.
2. Wash with water: Once the loose dirt has been removed, wash the spade head with water. Use a hose or a bucket of water to rinse off any remaining dirt or grime. Make sure to thoroughly clean all sides of the spade head.
3. Dry the spade head: After washing, dry the spade head completely. Use a towel or leave it in the sun to air dry. Make sure there is no moisture left on the spade head before proceeding.
4. Inspect for rust: Take a close look at the spade head to check for any signs of rust. If you notice any rust spots, use sandpaper or a wire brush to gently remove the rust. This will help prevent further corrosion and ensure the longevity of the spade.
5. Apply rust-resistant coating: To prevent future rusting, consider applying a rust-resistant coating to the spade head. You can find specialized rust-resistant sprays or paints at your local hardware or gardening store. Follow the manufacturer’s instructions for application.
Note: It’s important to clean and maintain your spade head regularly to extend its lifespan and ensure optimal performance.
Measure and cut new handle
Before attaching a new handle to your spade, you need to measure and cut it to the appropriate length. Follow these steps to ensure a proper fit:
-
Measure the old handle
If you have an old handle that needs replacing, measure its length to use as a reference. Place one end of a tape measure or ruler at the base of the spade head and extend it along the handle until you reach the top. Note down the measurement.
-
Determine the size of the new handle
If you don’t have an old handle to measure, you can determine the size by considering the length of the spade blade, the type of spade, and personal preference. Most spades have handles that are around 24 to 48 inches long.
-
Cut the handle
Using a saw or other appropriate cutting tool, cut the new handle to the desired length. It is recommended to cut the handle slightly longer than the measurement to allow for adjustments and fine-tuning during the attachment process.
Once you have measured and cut the new handle, you can proceed with attaching it to your spade.
Attach the handle to the spade head
Attaching the handle to the spade head not only ensures a sturdy construction, but also allows for precise control when using the spade for various gardening tasks. Follow these steps to properly attach the handle:
- Place the spade head on a stable surface with the metal socket facing upward.
- Insert the wooden handle into the metal socket of the spade head.
- Ensure that the handle is aligned straight with the spade head.
- Using a rubber mallet or a wooden hammer, gently tap the top of the handle to firmly secure it into place.
- Apply pressure to make sure the handle is securely attached to the spade head.
Once the handle is attached, give it a test by holding onto the handle and applying slight pressure. If it feels secure and there are no wobbling or loose parts, your spade is ready to be used for your gardening needs.
Secure the handle in place
Once you have selected the appropriate handle for your spade, it’s time to secure it in place. This step is crucial to ensure the handle stays attached while using the spade.

Materials needed:
Before you begin, gather the following materials:
- A drill with a drill bit
- Wood screws
- Wood glue (optional)
- A screwdriver or wrench
Step-by-step instructions:
- Place the spade on a stable surface, with the blade facing downward.
- Insert the handle into the spade’s handle socket, making sure it fits snugly.
- If desired, apply wood glue to the handle/socket interface for added stability.
- Using the drill, create pilot holes through the handle and into the socket.
- Align the holes in the handle and socket before inserting the wood screws.
- Tighten the screws using a screwdriver or wrench, ensuring a secure connection between the handle and spade.
It is important to note that the wood screws should be long enough to securely fasten the handle to the spade without protruding through the other side. This will ensure a comfortable grip and prevent potential injuries.
Once the handle is securely attached, give it a firm tug to test its stability. If it feels loose, tighten the screws further or add more screws if necessary.
By following these steps, you can confidently attach a handle to your spade and ensure it remains securely in place, allowing you to complete your gardening tasks with ease.