


If you’ve ever owned a garden spade, you know how vital it is for digging up soil, planting flowers, and maintaining your outdoor space. It’s a dependable tool that can withstand the test of time, but occasionally, parts may need to be replaced or repaired. One such part is the rivet that holds the handle securely in place.
Removing a rivet from a garden spade may seem like a daunting task, but with the right tools and a little know-how, it can be a straightforward process. In this article, we will guide you through the steps necessary to remove a rivet from your garden spade, allowing you to replace or repair the handle as needed.
Step 1: Gather your tools
Before you begin, make sure you have the necessary tools on hand. You will need a drill with a bit slightly smaller than the rivet, a hammer, a punch or nail, and safety goggles. It is essential to wear safety goggles to protect your eyes from any flying debris while drilling.
Step 2: Secure the spade
Find a sturdy surface to secure the garden spade, such as a workbench or a solid piece of wood. Ensure that the spade is held firmly in place to prevent any accidents or injuries while removing the rivet.
Step 3: Drill a hole
Use the drill to create a hole through the center of the rivet. Start with a smaller drill bit, and gradually increase the size until you reach a diameter slightly larger than the rivet. Take your time and apply even pressure while drilling, being careful not to damage any surrounding parts of the spade.
Remember to periodically remove the drill bit to clear any debris from the hole.
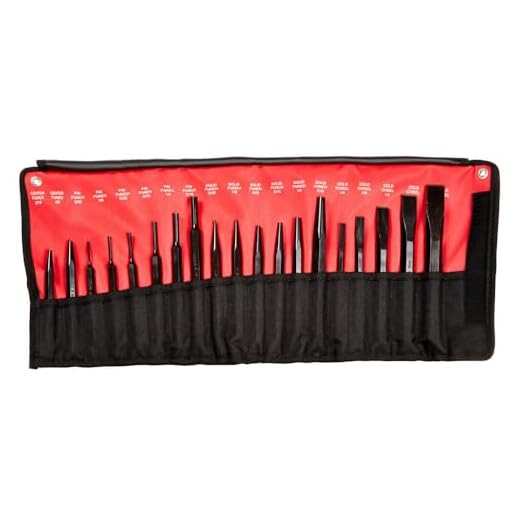
Essential Tools for Rivet Removal
When it comes to removing rivets from a garden spade, having the right tools can make the task much easier and efficient. Here are some essential tools that you will need:
1. Drill
A drill is one of the most important tools for removing rivets. It is used to create a hole in the center of the rivet, allowing you to then remove it with a punch or chisel. A cordless drill with variable speed settings is recommended for better control.
2. Punch or Chisel
Once you have drilled a hole in the rivet, you will need a punch or chisel to remove it from the spade. A punch can be used to drive the rivet out, while a chisel can be used to cut through the rivet shaft. Both tools require caution and precision to avoid damaging the spade.
3. Hammer or Mallet
A hammer or mallet is necessary to strike the punch or chisel, applying the necessary force to remove the rivet. A hammer with a rubber or plastic head can help protect the spade’s surface from being scratched or dented during the removal process.
It is important to note that safety goggles and gloves should be worn when removing rivets to protect your eyes and hands from flying debris.
With these essential tools in hand, you will be well-equipped to remove the rivets from your garden spade effectively and safely.
What You’ll Need to Remove a Rivet from a Garden Spade
Removing a rivet from a garden spade can be a simple task if you have the right tools. Here are the items you’ll need:
Rivet Removal Tool
A rivet removal tool is essential for removing the rivet from the garden spade. This tool usually consists of a handle and a sharp tip that can be used to drill a hole in the rivet, allowing for easy removal.
Drill
A drill with a small drill bit is necessary for creating a hole in the rivet. Make sure to choose a drill bit that is slightly smaller than the diameter of the rivet. This will avoid damaging the surrounding material.
Pliers
Pliers are useful for gripping and removing the rivet once a hole has been drilled. They allow for a firm grip to pry the rivet out of its hole.
Protective Equipment
It is important to wear protective equipment when working with tools. Safety glasses will protect your eyes from any flying debris, and gloves will prevent any injuries to your hands.
With these tools, you’ll be able to easily remove a rivet from your garden spade and make any necessary repairs or modifications.
Step-by-Step Guide to Remove Rivet from Garden Spade
When using a garden spade, it is common for the rivet connecting the handle to the head to become loose or worn out over time. If this happens, it is important to replace the rivet to ensure the tool remains safe and effective. Follow these steps to remove the rivet from your garden spade:
- Remove any dirt or debris around the rivet using a brush or cloth. This will make it easier to access and remove the rivet.
- Using a power drill, drill a small hole through the center of the rivet. Start with a small drill bit and gradually increase the size until the rivet head is completely removed. Be sure to wear protective eyewear while drilling.
- Once the rivet head is removed, use a hammer and punch to drive out the remaining rivet shaft from the handle.
- If the rivet is stubborn and difficult to remove, apply some penetrating oil to the area to help loosen it. Allow the oil to sit for a few minutes before attempting to remove the rivet again.
- Once the rivet is fully removed, clean the area with a brush or cloth to remove any debris or oil residue.
- If you are replacing the rivet, ensure that you have a suitable replacement. Measure the diameter of the old rivet to ensure the new one is the correct size. Rivets can be found at hardware stores or online.
- To install the new rivet, place it through the hole in the handle and spade head. Align the rivet so that the head is flush with the surface of the handle.
- Using a hammer, strike the rivet head firmly to secure it in place. Continue hammering until the rivet is tight and secure.
- Inspect the rivet to ensure it is properly installed and there is no movement or looseness. If necessary, give it a few extra taps with the hammer to ensure a tight fit.
By following these steps, you can easily remove and replace a loose or worn-out rivet on your garden spade. Remember to handle tools and equipment with care and always wear protective gear when necessary.
Step 1: Assess the Rivet and Spade Condition
Before attempting to remove a rivet from your garden spade, it is important to assess the condition of both the rivet and the spade. This will help you determine the best method for removal and avoid causing any further damage.
1.1 Check the Rivet
Inspect the rivet that needs to be removed. Look for any signs of damage, such as corrosion or bending. If the rivet is in poor condition, it may be more difficult to remove and may require additional tools or techniques.
1.2 Examine the Spade
Take a close look at your garden spade. Ensure there are no cracks, splits, or other signs of damage that could affect the removal process. It is important to have a sturdy and intact spade to avoid any mishaps during the rivet removal.
| Tip |
|---|
| Consider replacing the rivet and/or the spade if either is in poor condition. This will ensure optimal performance and longevity. |
Step 2: Secure the Garden Spade
Before you begin removing the rivet from your garden spade, it’s important to secure the spade to ensure stability and safety during the process. Follow these steps to secure the garden spade:
1. Find a stable work surface
Locate a flat and stable work surface, such as a workbench or a sturdy table. This will provide a secure base for your garden spade and prevent it from moving around while you work.
2. Place the garden spade on the work surface
Position the garden spade on the work surface, making sure that it is stable and won’t tip over or slip during the process. Orient the spade in a way that allows easy access to the rivet you are going to remove.
Take extra care if the spade has a sharp edge and keep it away from the edge of the work surface to avoid accidents.
Step 3: Drill Out the Rivet
Once you have gathered the necessary tools and safety equipment, it’s time to start removing the rivet from your garden spade. Follow these steps carefully to ensure a successful removal:
1. Choose the Right Drill Bit
Before drilling out the rivet, it’s important to use the right size drill bit. The size of the drill bit should be slightly smaller than the diameter of the rivet. This will allow you to drill through the center of the rivet without damaging the surrounding metal of the spade.
2. Secure the Garden Spade
It’s important to secure the garden spade properly before drilling out the rivet. This will help prevent any unnecessary movement or damage to the spade. You can use a vise or clamp to hold the spade securely in place.
3. Position the Drill Bit
Position the drill bit at the center of the rivet and apply gentle pressure. Make sure to hold the drill straight and steady to avoid any slippage or damage to the spade.
4. Start Drilling
Slowly start drilling into the rivet using a medium speed setting on your drill. Apply consistent pressure and continue drilling until you have completely removed the rivet.
5. Remove the Rivet
Once the rivet is drilled out, you can use pliers or a screwdriver to remove any remaining pieces. Gently pull or pry the rivet out of the spade until it is completely detached.
Now that you have successfully removed the rivet from your garden spade, you can proceed with any necessary repairs or replacements. Make sure to clean the area thoroughly before attaching a new rivet or fastener.