


![Elephantile Black & White Glass Linear Tile for Kitchen Backsplash Bahtroom Wall Mosaic Sheets [Set of 5]](https://m.media-amazon.com/images/I/61ME9-A1HpL._SS520_.jpg)

As a professional tile installer, I know how important it is to have the right tools for the job. When it comes to installing a backsplash, having the best trowel can make all the difference. A trowel is a tool that is used to spread adhesive onto the wall before applying the tiles. It creates those neat and even lines that give your backsplash a professional finish. But with so many options available on the market, how do you know which trowel is the best for your backsplash project?
One of the key factors to consider when choosing a trowel is the size and shape of the notches on the trowel blade. The notches help control the amount of adhesive that is applied to the wall, which is crucial for a successful installation. For backsplash projects, a trowel with square or U-shaped notches is generally recommended. Square notches provide more uniform coverage, while U-shaped notches allow for a bit more adhesive to be applied, which can be beneficial for certain types of tiles.
Another important factor to consider is the size of the trowel. The size refers to the width of the blade, and it can vary from small to large. The size of the trowel should be chosen based on the size of the tiles being installed. If you are working with small mosaic tiles, a smaller trowel with a narrow blade is usually the best choice. For larger tiles, a larger trowel with a wider blade is recommended. This ensures that the right amount of adhesive is applied to the tiles, allowing them to bond properly with the wall.
Choosing the Right Trowel for Your Backsplash Project
As someone who has tackled many home improvement projects, including installing backsplashes, I know firsthand the importance of choosing the right tools for the job. One of the key tools you’ll need for a successful backsplash installation is a trowel. With so many options available, it can be overwhelming to know which trowel is right for your specific project. In this guide, I’ll walk you through the factors to consider when selecting a trowel for your backsplash installation.
1. Consider the Size and Shape of the Tiles
When choosing a trowel for your backsplash project, it’s essential to consider the size and shape of the tiles you’ll be using. Larger tiles typically require a bigger and deeper trowel notch to ensure proper adhesive coverage and adhesion. Smaller tiles, on the other hand, may require a smaller trowel notch. By matching the trowel size to the tile size, you’ll improve the overall stability and aesthetics of your backsplash.
2. Evaluate the Type of Adhesive
Another crucial factor to consider is the type of adhesive you’ll be using for your backsplash project. Some adhesives require a specific trowel size and notch depth for optimal performance. For example, thinset mortar, a common adhesive used for backsplash installations, often requires a notch trowel with a 3/16-inch or 1/4-inch notch depth. Make sure to read the manufacturer’s instructions for the adhesive and select a trowel that matches the recommended notch size.
3. Assess Your Skill Level
Finally, it’s important to assess your skill level when choosing a trowel for your backsplash project. If you’re a beginner or unfamiliar with trowel techniques, it’s best to start with a smaller, more manageable trowel. This will allow for easier and more precise adhesive application. As you gain experience and confidence, you can graduate to larger trowels for faster installations. Remember, using a trowel that is too large or too small for your skill level can result in uneven adhesive coverage and a compromised backsplash installation.
By carefully considering the size and shape of your tiles, the type of adhesive being used, and your own skill level, you’ll be able to choose the right trowel for your backsplash project. Remember to always follow the manufacturer’s instructions for both the tiles and the adhesive to ensure a successful installation. With the right tools and techniques, you’ll be on your way to creating a beautiful backsplash that enhances the aesthetic appeal of your kitchen or bathroom.
My Top 5 Trowels for Backsplash Installation
As someone who has worked extensively with backsplash installations, I have come across various trowels that have proven to be excellent tools for the job. Here are my top 5 trowels for backsplash installation:
1. Notched Trowel with V-Notch
One of the most commonly used trowels for backsplash installation, this tool has a V-shaped notch that helps create consistent ridges of adhesive. The size of the V-notch determines the amount of adhesive applied, allowing for better control and preventing excess material from seeping through the tile joints.
2. Square-Notched Trowel
The square-notched trowel is another staple tool for backsplash installation. It features square-shaped notches in different sizes, such as 1/4 inch or 3/16 inch. This trowel is ideal for spreading thin-set mortar evenly on the back of the tiles, ensuring a secure bond between the tile and the substrate.
3. Margin Trowel
A margin trowel is a versatile tool that comes in handy during backsplash installations. With its flat and flexible blade, it can be used for various tasks such as spreading adhesive, removing excess material, or leveling mortar. Its small size makes it perfect for working in tight spaces.
4. Bucket Trowel
A bucket trowel is an essential tool for backsplash installations, especially when mixing mortar or adhesive. Its curved blade allows for easy scooping and spreading of material from a bucket. The strong and durable construction ensures that it can withstand frequent use.
5. Pointing Trowel
While not typically used for spreading adhesive or mortar, a pointing trowel is a useful tool for backsplash installations when it comes to grouting. Its narrow blade and pointed tip allow for precise application of grout in tight spaces, ensuring a neat and professional finish.
These are my top 5 trowels that I highly recommend for any backsplash installation project. With the right tools, you can achieve a professional and seamless result, making your backsplash the focal point of your kitchen or bathroom. Don’t forget to choose the appropriate size and notch for your specific tile and adhesive requirements.
Tips for Using a Trowel for Backsplash
Hello, I’m here to share some helpful tips for using a trowel when installing a backsplash. As an experienced installer, I have learned a few tricks of the trade that can make a big difference in the success of your project.
1. Choose the right size trowel: The size of the tile you are installing will determine the size of the trowel you should use. A larger tile will require a larger trowel with deeper notches, while a smaller tile will require a smaller trowel. It’s important to select the right size trowel to ensure proper adhesive coverage and a strong bond.
2. Pay attention to the notch shape: The shape of the notches on your trowel can also affect the adhesive coverage. A U-notch trowel is ideal for most backsplash installations, as it creates a consistent and even layer of adhesive. However, if you are using natural stone or uneven tiles, a V-notch trowel may be more suitable to ensure proper coverage.
3. Use the proper technique: When applying adhesive with a trowel, it’s important to use the proper technique. Hold the trowel at a 45-degree angle and apply even pressure as you spread the adhesive onto the wall. Be sure to work in small sections to prevent the adhesive from drying out before you can install the tiles.
4. Comb in one direction: To ensure proper adhesive coverage, comb the adhesive in one direction using the notches on your trowel. This will help to create uniform lines and prevent any air pockets or voids behind the tiles. Make sure to remove any excess adhesive from the trowel as you go.
5. Clean your trowel: After each use, it’s important to clean your trowel to remove any dried adhesive. This will help to prolong the life of your trowel and ensure smooth, consistent application. Use a stiff brush and warm soapy water to remove any excess adhesive, then dry the trowel thoroughly before storing.
By following these tips and using the right trowel for your backsplash installation, you can achieve professional-looking results and a strong, durable bond. Remember to take your time and pay attention to the details, and your backsplash will be a beautiful addition to your space.
Frequently Asked Questions About Backsplash Trowels
Here are some commonly asked questions about backsplash trowels:
1. What is a backsplash trowel?
A backsplash trowel is a specialized tool used for applying adhesive to the back of tiles and spreading it evenly on the wall. It features a flat, rectangular blade with notched edges that ensure proper adhesion of the tiles.
2. What type of backsplash trowel should I use?
The type of backsplash trowel you should use depends on various factors, such as the size and type of tiles, the adhesive being used, and the substrate. For smaller tiles or mosaics, a v-notch trowel with smaller notches may be suitable, while larger tiles may require a square or u-notch trowel with larger notches to ensure proper adhesive coverage.
3. Can I use any trowel for installing backsplash?
While it is possible to use a regular trowel for installing backsplash, it is recommended to use a trowel specifically designed for backsplash installation. These trowels have notched edges that help achieve proper adhesive coverage and ensure a strong bond between the tiles and the wall.
4. How do I clean a backsplash trowel?
You can clean a backsplash trowel by using warm soapy water and a scrub brush to remove any adhesive residue. Make sure to dry the trowel thoroughly after cleaning to prevent rusting. Additionally, it is a good idea to clean the trowel after each use to maintain its effectiveness and prolong its lifespan.
5. Can I use a backsplash trowel for other tile installations?
Yes, backsplash trowels can be used for other tile installations as well. However, it is important to consider the size and type of tiles, the adhesive being used, and the substrate to determine if a backsplash trowel is the most appropriate choice. In some cases, a different type of trowel may be more suitable for achieving proper adhesive coverage.
Summary
Choosing the right backsplash trowel is crucial for achieving a successful tile installation. Consider the size and type of tiles, the adhesive being used, and the substrate when selecting a trowel. Clean the trowel after each use to maintain its effectiveness, and remember that a backsplash trowel can also be used for other tile installations if appropriate.
10 Best Trowel For Backsplash
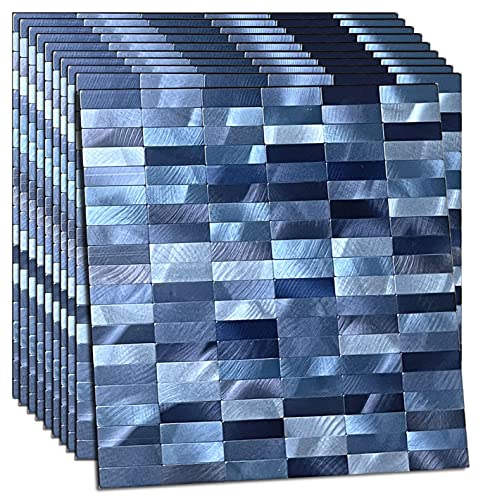
XUANINY 10-Sheet Peel and Stick Tile Backsplash Self- Adhesive Wall Tiles Aluminum Mosaic Sticker for Kitchen (Rectangle Blue Mix)
Features
| Part Number | XY21 |
| Model | XY21 |
| Color | Rectangle Blue Mix |
- Easy to Install:DIY self-adhesive metal backsplash, Just peel and stick (no need for extra glue), directly stick the tile on wall,save your time and money on labor.
- Each backsplash tile sheet has brushed aluminum matted surface and self-adhesive back sticker, no grout.Strong stickiness, will not fall off.
- The high-end metal texture backsplash is suitable for most indoor applications,(kitchen backsplash,livingroom walls, bedroom walls,laundry rooms metal wall tile , bathroom wall tile, accent walls & decorative purposes).
- Suitable for Flat Surface: This metal mosaic tile has a heat and moisture resistant surface suitable for sticking to a clean, flat surface free from dust and oil stains. Should not contact the flame directly or submerse in water.
- There are 10 sheets in a box covering 9.2 square feet. 1% extra wastage is recommended in every project.Light weight ,waterproof, oil proof, easy to clean.
XUANINY 10-Piece Peel and Stick Backsplash for Kitchen Aluminum 3D Wall Sticker Panel Self-Adhesive Metal Mosaic Tile (11.41"x11.41" Silver)
Features
| Color | Silver |
| Size | 12.7x12.5x2 inches |
- 1. Used for decoration of most indoor applications,(kitchen backsplash, living room walls, bedroom walls,laundry rooms metal wall tile , bathroom wall tile, accent walls & decorative purposes), making your rooms different for the space.
- 2. Easy to Install and DIY self-adhesive metal backsplash: Clean the wall first, making the wall no dust, water or oil. And Just peel and stick (no need for extra glue), directly stick the tile on wall, save your time and money on labor. With gaps, easy for cutting to meet the room decorating size.
- 3. Each backsplash tile sheet has brushed aluminum matted surface embellished with several mirror chips , has a strong metal texture and no color fading. Letting you in a different visual world.
- 4. Strong self-adhesive back sticker, no grout. Strong stickiness, will not fall off. Suitable for Flat Surface. This metal mosaic tile has a heat and moisture resistant surface suitable for sticking to a clean, flat surface free from dust and oil stains. But should not contact the flame directly or submerse in water.
- 5. There are 10 sheets in a box covering 9.05 square feet. 1% extra wastage is recommended in every project.Light weight ,waterproof, oil proof, easy to clean.
Diflart Mirror Glass Mosaic Tile Crystal Square Frosted Backsplash for Kitchen Bathroom Wall Pack of 6 Sheets
Features
| Color | Flat Square |
| Size | 6 sheets |
- 【Preminum Glass】Diflart mirror glass tiles are water-resistant, oil-proof and resistant to high temperatures, and usually do not change the color or shape
- 【Package】Sold by box, 6 sheets/box, Chip size: 3/5”x3/5”x4/25” (15x15x4mm), Sheet size:11.8”x11.8”x4/25”(300x300x4mm), 0.97 sq.ft / sheet,5.8 sq.ft/box; 18 rows and 18 columns, 324 pieces per sheet,total 1944 pieces
- 【Easy to Install】These mirror glass tiles are installed on a solid net and can be cut with only a pair of scissors, saving a lot of installation time
- 【Multiple Usage】Shining mirror glass tile suitable for wall of kitchen/bathroom/bar/fireplace deco etc, not for floor use
- 【Firm Package】The glass mosaic uses a firm package to protect them, and the plastic film covering the surface of the mosaic can avoid mirror abrasion. Damage crystal tiles caused during transportation can be replaced.
Elephantile Black & White Glass Linear Tile for Kitchen Backsplash Bahtroom Wall Mosaic Sheets [Set of 5]
Features
| Color | Black/White |
| Size | Set of 5 Sheets |
- Tile Sheet Size - Each sheet of the mosaic linear glass tile is around 12×12 inches, 6 mm thickness, weighted around 2.5 lbs. Whole box 5 wall tiles cover 5 sq.ft. This black and white silver interlocking subway tile is originally designed by Elephantile artist.
- Tile Material - Made of high-quality crystal glass. Glass tiles are waterproof, high temperature resistance and fire resistance, easy to clean and maintain.The mosaic tile is great for kitchen and bath wall backsplash.
- Easy to Install and Cut - The glass tile is mesh mounted. It can be easily cut by scissors following the grout lines. To cut the glass chips, a wet saw is needed. It is NOT peel and stick, needs Non-sanded grout for installation. After installation, it lasts lifetime, no falling off issues like peel and stick ones.
- Multipurpose - Glass crystal mosaic tile looks very stylish and gorgeous. The glass tile works great for all interior wall backsplash remolding. Mosaic glass tiles perfect for kitchen fireplace decor, bathroom kitchen backsplash, shower walls, art accent wall, wall borders.
- Excellent Service - All tiles from Elephantile are strictly inspected and carefully packed before shipment. We take full responsibility for our tile quality and any damage caused by shipping.
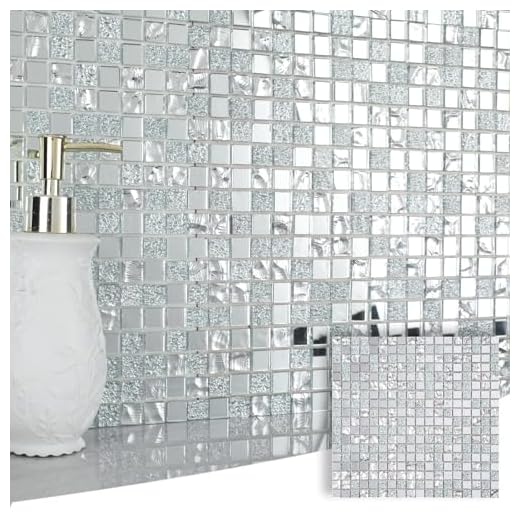
Adedeo Crystal Diamond Mosaic Tile Square Mirror Glass Mosaic Tile for Kitchen Backsplash Bathroom Wall (6 Sheets, Silver Square Flat Mirror)
Features
| Color | Silver Square Flat Mirror |
| Size | 12 x 12 Inch |
- Price for Box, 6 sheets/box, 6 sq.ft/box. Sheet Size: 11. x 11.8 x 0.16 Inch. Please consider cutting loss 3-5% in every DIY project
- High-quality glass materials combined with excellent cutting technology have created the exquisite and translucent mirror glass mosaic tile, shines like diamonds
- Each glass mosaic particle is connected by fiberglass mesh, is easy to cut and DIY
- Glass mosaic particles are pasted and arranged manually. Neatly organized particles stick strongly, to ensure no falling off in transportation
- With good features of glass mosaic tile, wet proof and heat proof. It’s suitable to use in wet areas, such as in kitchen, bathroom and shower cabin
FAQ:
What is the best trowel for backsplash installation?
The best trowel for backsplash installation is a square-notched trowel with a 1/4-inch notch size. This size is ideal for spreading thinset adhesive evenly on the back of the tiles, ensuring proper adhesion and a flat installation.
Can I use a v-notch trowel for backsplash installation?
While a v-notch trowel can be used for backsplash installation, it is not the recommended option. A square-notched trowel provides better coverage and an even spread of adhesive, resulting in a more secure and stable installation.
Are stainless steel trowels better than plastic ones for backsplash installation?
Both stainless steel and plastic trowels can be used for backsplash installation. Stainless steel trowels are more durable and can withstand heavy use, while plastic trowels are lighter and may be more comfortable to use for extended periods. Ultimately, the choice between the two comes down to personal preference and budget.
Can I use a notched trowel with larger notch sizes for backsplash installation?
Using a notched trowel with larger notch sizes for backsplash installation is not recommended. Larger notch sizes can lead to excessive adhesive build-up and may cause the tiles to sit unevenly or not adhere properly. Stick to the recommended 1/4-inch square-notched trowel for the best results.
Should I clean my trowel after every use?
Yes, it is recommended to clean your trowel after every use to prevent the adhesive from drying and hardening on the surface. Use warm water and a scrub brush to remove any excess adhesive and ensure that your trowel is ready for the next installation.
Conclusion
In conclusion, choosing the best trowel for a backsplash project is crucial for achieving professional and flawless results. The size, shape, and material of the trowel are all important factors to consider. A trowel with the right size notches will allow for proper adhesive coverage and prevent issues such as tile slippage or air pockets. High-quality stainless steel or carbon blade trowels are recommended for their durability and smooth application. Additionally, ergonomic handles can greatly enhance comfort and reduce fatigue during the installation process. By investing in the best trowel suited for your project, you can ensure a successful and long-lasting backsplash installation.


