


When it comes to installing patio tiles, choosing the right trowel is crucial. The trowel you use plays a significant role in ensuring a successful and long-lasting tile installation. A trowel is a tool with a flat blade used to apply and spread adhesive or mortar over a surface. In the case of patio tiles, the trowel determines the amount and depth of the adhesive or mortar that holds the tiles in place.
Not all trowels are created equal, and choosing the wrong one can result in tiles that don’t adhere properly or an uneven surface. The size and shape of the trowel not only affect the amount of adhesive or mortar applied but also the texture and pattern created on the tile’s back. Therefore, it’s important to understand which trowel is best suited for the type and size of patio tiles you are using.
Generally, for patio tiles, a notched trowel with a square or rectangular shape is recommended. This type of trowel creates uniform ridges and valleys in the adhesive or mortar, providing better adhesion and allowing for proper coverage. The size of the notches on the trowel will depend on the size of the tiles. Small or medium-sized patio tiles typically require a 1/4 inch notched trowel, while larger tiles may require a 3/8 inch notched trowel.
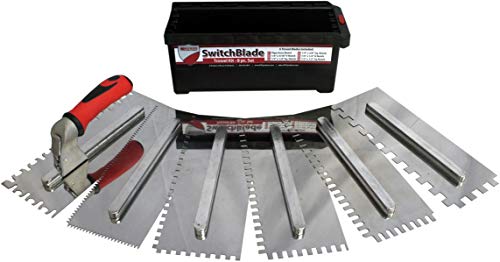
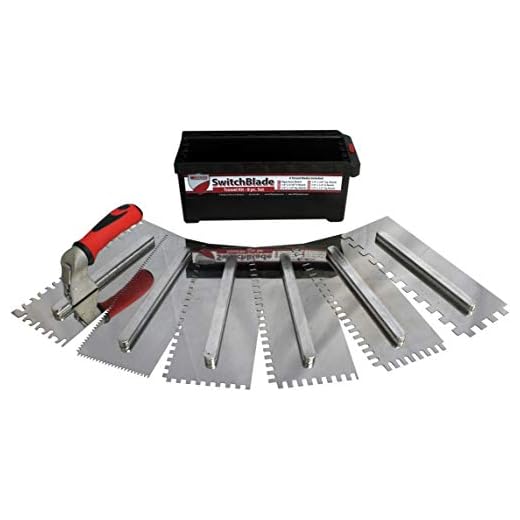
Types of trowels for patio tiles
When it comes to laying patio tiles, choosing the right trowel is crucial for achieving a professional finish. The type of trowel you use will depend on the size and type of tiles you are working with, as well as personal preference. Here are some common types of trowels used for patio tiles:
1. Square-notched trowel
A square-notched trowel is one of the most commonly used trowels for laying patio tiles. It has square-shaped notches on one or both sides, which help create an even layer of mortar or adhesive. The size of the notches should be selected based on the size of the tiles and the thickness of the mortar or adhesive being used.
2. U-notched trowel
A U-notched trowel is another popular choice for laying patio tiles. It has U-shaped notches on one or both sides, which are smaller and narrower compared to square-notched trowels. U-notched trowels are generally used when working with smaller tiles or when a thinner layer of mortar or adhesive is required.
It is important to note that the size of the notches can vary, so it is essential to choose the appropriate size for your specific project.
Table of recommended trowel sizes:
| Tile Size (inches) | Square-Notched Trowel Size (inches) | U-Notched Trowel Size (inches) |
|---|---|---|
| 12×12 | 1/4 x 1/4 x 1/4 | 1/8 x 1/8 x 1/8 |
| 16×16 | 1/4 x 1/4 x 3/8 | 1/8 x 1/8 x 1/8 |
| 18×18 | 1/4 x 1/4 x 1/2 | 1/8 x 1/8 x 3/16 |
Remember to check the manufacturer’s recommendations for trowel size based on the specific tiles and mortar or adhesive being used for your patio project.
In conclusion, selecting the right trowel for your patio tiles is crucial for achieving a successful installation. Square-notched and U-notched trowels are the most common options, with variations in notch size depending on the tile and adhesive being used. By choosing the appropriate trowel, you can ensure a professional and long-lasting patio tile installation.
Factors to consider when choosing a trowel for patio tiles
When it comes to setting patio tiles, choosing the right trowel is crucial for achieving a successful and durable installation. There are several factors to consider before making a decision:
1. Tile size:
The size of the patio tiles will determine the type and size of trowel you should use. For small tiles, such as mosaics or subway tiles, a small notched trowel will be sufficient. However, for larger tiles, such as 12×12 or 18×18 inches, a larger notched trowel is recommended to ensure proper coverage of adhesive.
2. Tile thickness:
Consider the thickness of your patio tiles when selecting a trowel. Thicker tiles require a deeper notch in the trowel to accommodate the adhesive. In contrast, thinner tiles can be set with a trowel with a smaller notch size.
3. Tile material:
The material of your patio tiles also plays a role in choosing a trowel. Different materials, such as ceramic, porcelain, or natural stone, have varying weight and rigidity. It is important to select a trowel that can handle the weight and rigidity of the specific tile material to ensure proper coverage of adhesive and avoid tile slippage.
4. Pattern and layout:
If you plan to install your patio tiles in a specific pattern or layout, it is crucial to select a trowel that can accommodate your design. For example, for tiles set in a herringbone pattern, a square-notched trowel may be more suitable to ensure the adhesive is evenly spread and the tiles are properly aligned.
5. Personal comfort and preference:
Lastly, consider your own comfort and preference when choosing a trowel. Some people may find certain trowel handle designs more ergonomic and easier to use. It is important to choose a trowel that feels comfortable in your hand and allows for easy and controlled application of adhesive.
By taking these factors into consideration, you can select a trowel that is best suited for your patio tile installation and ensure a successful and long-lasting result.
Benefits of using the right trowel for patio tiles
When it comes to installing patio tiles, using the right trowel can make a significant difference in the outcome of your project. A trowel is an essential tool for spreading and leveling mortar or adhesive on the surface of the patio, ensuring proper adhesion and a smooth finish. Here are some benefits of using the right trowel for patio tiles:
1. Accurate placement
Using the right trowel size ensures accurate and consistent placement of the mortar or adhesive. A trowel that is too small may not spread the material evenly, leading to uneven tile placement and potential issues with stability. On the other hand, a trowel that is too large can result in excessive mortar or adhesive being applied, which may cause it to squeeze out between the tiles.
By using the appropriate trowel size, you can ensure that the right amount of mortar or adhesive is applied, giving your patio tiles a secure and properly aligned placement.
2. Efficient coverage
The shape and design of the trowel can affect the coverage and efficiency of your tile installation process. A notched trowel, for example, creates ridges in the mortar or adhesive, allowing for better contact and improved bonding between the tiles and the surface. This helps prevent issues such as loose or shifting tiles over time.
Using a trowel with the appropriate notching size for your specific tile can optimize coverage, minimizing wasted material and saving you time during the installation process. It can also help ensure a stronger and longer-lasting patio floor.
Note: Remember to refer to the manufacturer’s recommendations for the appropriate trowel size and notching for your specific type and size of patio tiles.
3. Reduced effort
Using the right trowel can also make your patio tile installation process less physically demanding. A trowel that is too heavy or difficult to maneuver can strain your wrists, hands, and arms, making the job more fatiguing and time-consuming.
Opting for a trowel that is lightweight, ergonomic, and comfortable to hold can make a significant difference in reducing fatigue and improving your overall experience while working on your patio project.
To sum up, using the right trowel for patio tiles offers many benefits, including accurate placement, efficient coverage, and reduced effort. Investing in a quality trowel that suits your specific tile installation needs can help you achieve a professional-looking patio that will last for years to come.
Tips for using a trowel for patio tiles
Using the right trowel is essential for a successful patio tile installation. Here are some tips to help you use a trowel effectively:
- Choose the right trowel size: The size of the trowel notch should match the size of your patio tiles. Larger tiles typically require a larger notch size, while smaller tiles need a smaller notch size. Using the right size trowel ensures proper adhesive coverage and helps prevent tiles from loosening or cracking.
- Hold the trowel at a slight angle: When applying adhesive to the patio surface, hold the trowel at a slight angle (around 30 degrees). This angle helps create uniform ridges and ensures better adhesion between the tiles and substrate.
- Spread the adhesive evenly: Use the flat side of the trowel to spread the adhesive evenly across the patio surface. Apply enough adhesive to cover the area where the tile will be placed, but avoid excess application as it can lead to uneven tile installation.
- Create ridges with the notched side: Once the adhesive is spread, flip the trowel over and use the notched side to create ridges in the adhesive. This helps improve the bond between the tiles and adhesive, allowing for better support and reducing the risk of tiles shifting or popping up after installation.
- Work in small sections: To prevent the adhesive from drying out before you can install the tiles, work in small sections. Apply the adhesive to a manageable area, create ridges, and then immediately place the tiles. This ensures the adhesive remains fresh and sticky, facilitating a strong bond with the tiles.
- Avoid excessive force: While placing the patio tiles, avoid applying excessive force that may push the tiles too deeply into the adhesive bed. This can cause the adhesive to squeeze up between the tiles and create an uneven surface. Instead, gently press the tiles into the adhesive to achieve a uniform and level installation.
- Clean the trowel regularly: Adhesive residue can build up on the trowel over time and affect its performance. Clean the trowel regularly during the installation process to remove any dried adhesive and ensure smooth application. This will help you achieve consistent results with every tile.
Following these tips will help you use a trowel effectively for patio tile installation, ensuring a professional-quality finish and a long-lasting patio surface.
Common mistakes to avoid when using a trowel for patio tiles
Using a trowel for laying patio tiles can be a great way to achieve a professional finish. However, there are some common mistakes that people make when using a trowel, which can result in a less-than-perfect tiling job. By being aware of these mistakes and avoiding them, you can ensure that your patio tiles are laid properly and will last for years to come.
One of the most common mistakes is using the wrong size of trowel. It’s important to choose a trowel that is specifically designed for the type of tile you are using and the adhesive you are working with. Using a trowel that is too small can result in an uneven adhesive application, while using a trowel that is too large can leave excess adhesive and cause the tiles to be uneven.
Another mistake to avoid is applying too much pressure when using the trowel. While it may seem like applying more pressure will help the adhesive bond better, it can actually cause the tiles to be pushed out of alignment. Instead, apply a gentle and even pressure to ensure that the tiles are properly bonded to the surface.
Not cleaning the trowel between applications is another common mistake. Adhesive can build up on the trowel over time, which can affect how well the tiles adhere to the surface. Make sure to clean the trowel thoroughly between each application to avoid this issue.
Finally, not using the correct technique when using the trowel can result in a less-than-perfect finish. It’s important to use smooth and even strokes when applying the adhesive, and to hold the trowel at the correct angle to ensure proper coverage. Practice using the trowel before starting the tiling project to ensure that you are using the correct technique.
Avoiding these common mistakes when using a trowel for patio tiles can make a big difference in the quality of your tiling job. By choosing the right size trowel, applying the correct amount of pressure, cleaning the trowel between applications, and using the correct technique, you can achieve a professional finish that will last for years to come.


