


When it comes to DIY home improvement projects, having a caulking gun in your arsenal is essential. Whether you’re sealing cracks or applying a fresh bead of caulk, using a caulk gun allows for precise application and a neat finish. But if you’re new to using a caulk gun, you may be wondering how exactly you put caulk in it. Don’t worry, we’ve got you covered!
First, start by choosing the right caulk for your project. There are different types of caulk available, such as silicone or acrylic latex, each with their own specific uses. Once you have your caulk, remove the cap or seal from the tube, and insert the caulk tube into the caulk gun.
Next, locate the plunger rod at the back of the caulk gun. This is the part that will push the caulk out of the tube. Pull the rod back, creating space for the caulk to enter the gun. Now, take the tube of caulk and cut off the tip at a 45-degree angle using a sharp utility knife. The size of the opening will depend on the size of the bead you want to create.

Now, insert the cut tip of the caulk tube into the opening at the front of the caulk gun. Make sure it fits snugly and is securely in place. Once the tube is in position, release the plunger rod, allowing it to move forward and push the caulk towards the tip. You’re now ready to start caulking!
Preparing the Caulk Gun
Before you can use a caulk gun, you need to prepare it for application. Follow these steps to get your caulk gun ready:
|
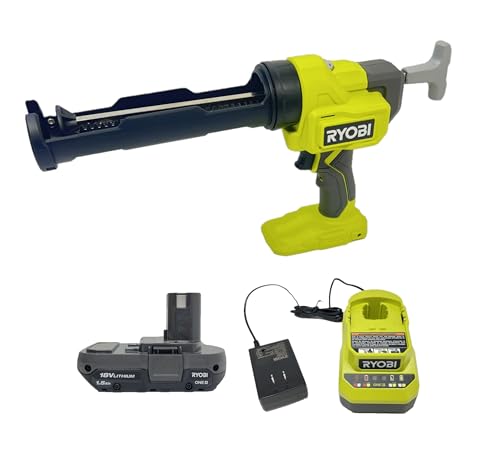
Step 1: Top Rated
RYOBI Cordless Caulk Gun Kit Includes battery and charger for convenience
Pushes up to 500 lbs. for effortless caulk application, featuring anti-drip technology for a mess-free experience.
|
Ensure that the caulk gun is clean and free from any old residue. Use a brush or a cloth to remove any dirt or debris. |
|
Step 2: |
Check the tip of the caulk gun to ensure that it is not clogged. If it is clogged, use a pin or a piece of wire to clear any obstructions. |
|
Step 3: |
Open the caulk gun by pulling the release trigger or pressing the release button, depending on the model. This will allow you to insert the caulk tube. |
|
Step 4: |
Remove the cap or seal from the caulk tube. Most caulk tubes come with a foil seal that needs to be punctured with a sharp object, such as a knife or a caulk gun poker. |
|
Step 5: |
Insert the caulk tube into the caulk gun, ensuring that the nozzle is facing outwards and the plunger rod aligns with the opening of the tube. |
|
Step 6: |
Secure the caulk tube in place by closing the caulk gun, making sure that it is tightly locked. |
Once you have prepared the caulk gun, it is ready to be used for applying caulk to various surfaces. Remember to always follow the manufacturer’s instructions for proper usage and safety precautions.
Choose the Right Caulk Gun
When it comes to caulking, having the right tools can make a big difference in the final result. One essential tool for the job is a caulk gun. These guns are specially designed to hold and dispense caulk or sealant smoothly and evenly.
Here are some factors to consider when choosing the right caulk gun:
- Type of caulk: Different types of caulk require different types of guns. For example, latex caulk requires a standard caulk gun, while heavier sealants like silicone or construction adhesives may need a heavy-duty gun.
- Size of caulk tube: Caulk guns come in different sizes to accommodate various caulk tube sizes. Make sure to choose a gun that matches the size of the caulk tube you plan to use.
- Trigger: Look for a caulk gun with a comfortable trigger that is easy to squeeze. This will make the caulking process easier and more ergonomic.
- Dripless feature: Some caulk guns are designed with a dripless feature that helps prevent excess caulk from oozing out when you release the trigger. This can minimize mess and waste.
- Price: Consider your budget when choosing a caulk gun. There are options available at various price points, so you can find one that suits your needs and wallet.
By considering these factors, you can choose the right caulk gun for your specific caulking project, ensuring that the application process is efficient and the results are professional. Remember to read the manufacturer’s instructions for your chosen caulk gun to ensure proper usage.
Load the Caulk Tube
Before you begin, ensure that you have the appropriate caulk tube for your caulking job. Most caulk guns can accommodate both standard 10 oz. and 5.5 oz. tubes, but it’s always best to double-check.
Once you have the correct tube, you can begin preparing it for insertion into the caulking gun. Start by removing the cap at the end of the tube. This cap typically has a long, thin nozzle attached to it, which is used for applying the caulk.
Next, take a sharp utility knife or a caulk tube cutter and cut off the tip of the nozzle at a 45-degree angle. This angled cut will allow for better control and precision when applying the caulk.
After cutting the nozzle, locate the plastic seal inside the cap. Use a long nail or a small, thin screwdriver to pierce the seal and create a small hole. This hole will serve as an entry point for the caulk to flow out of the tube when pressure is applied.
Finally, insert the caulk tube into the caulking gun. Open the gun’s cradle or release mechanism and place the tube inside, ensuring that it is seated properly and secure.
Once the tube is securely in place, close the cradle or release mechanism, and you’re ready to start using your caulk gun. Apply pressure to the gun’s trigger or plunger to start dispensing the caulk.
Note that if this is your first time using a caulking gun, it might be helpful to practice a few times on a disposable surface before tackling your actual project. This will give you a chance to get accustomed to the gun’s pressure and control, ensuring a smooth caulk application.
With the caulk tube loaded in your caulking gun, you’re now ready to tackle any caulking project that comes your way.
Applying Caulk with a Caulk Gun
Using a caulk gun is a simple and effective way to apply caulk to various surfaces. Here are the steps to follow:
1. Prepare the caulk gun: Make sure the plunger is pushed all the way to the back of the gun and the release lever is in the up position. This will allow you to load the caulk tube properly.
2. Prepare the caulk tube: Use a utility knife to cut off the narrow tip of the caulk tube at a 45-degree angle. Make sure to cut a small opening that matches the size of the joint or crack you will be filling.
3. Load the caulk tube: Insert the caulk tube into the gun with the nozzle facing forward. Push the caulk tube all the way into the gun until the puncture pin on the gun pierces the seal on the caulk tube.
4. Apply the caulk: Hold the caulk gun at a 45-degree angle to the surface you will be caulking. Squeeze the trigger of the gun to push the caulk out of the nozzle. Move the gun steadily along the joint or crack, applying an even bead of caulk as you go. Keep continuous pressure on the trigger to maintain a consistent flow of caulk.
5. Smooth out the caulk: After applying the caulk, use a caulk smoothing tool, like a caulk finishing tool or a wet finger, to smooth out the caulk and create a neat, smooth line. Wipe away any excess caulk with a damp cloth or sponge.
6. Allow the caulk to dry: Depending on the type of caulk you are using, it may take anywhere from a few hours to a few days for the caulk to fully dry and cure. Follow the manufacturer’s instructions for the recommended drying time.
Remember to always read and follow the instructions provided by the caulk manufacturer for best results. Properly applying caulk with a caulk gun can help create a durable and watertight seal.
Prepare the Surface
Before applying caulk with a caulk gun, it is important to prepare the surface properly. This will ensure that the caulk adheres well and provides an effective seal. Follow these steps to prepare the surface:
- Thoroughly clean the area where you will be applying caulk. Remove any dust, dirt, or debris using a soft brush or cloth.
- Use a cleaning solution or mild detergent to wash the surface. This will remove any grease or oil that may be present and help improve the adhesion of the caulk. Rinse the area completely and allow it to dry.
- If there are any cracks, holes, or gaps in the surface, fill them with an appropriate filler or putty. Smooth the filler with a putty knife and allow it to dry completely before proceeding.
- If the surface has any loose paint or old caulk, remove it using a scraper or caulk removal tool. This will ensure a clean and smooth surface for the new caulk to adhere to.
- Inspect the surface for any damage or deterioration. If necessary, repair or replace the damaged area before applying caulk.
- Lastly, make sure the surface is completely dry before applying caulk. Moisture can interfere with the adhesion and curing process of the caulk.
By properly preparing the surface, you will create a clean and secure foundation for the caulk to adhere to. This will help ensure a long-lasting and effective seal.
Cut the Tip of the Caulk Tube
After loading the caulk tube into the caulk gun, the next step is to cut the tip of the tube. This is an important step as it determines the amount and width of the caulk that will be dispensed. Follow the steps below to properly cut the tip of the caulk tube:
Step 1: Gather the necessary tools
Before starting, gather the necessary tools for cutting the caulk tube tip. You will need a utility knife or a pair of sharp scissors. Make sure the tools are clean and sharp to ensure a clean cut.
Step 2: Determine the desired bead size
Decide on the desired size of the caulk bead. The size will depend on the width of the gap you are sealing. For smaller gaps, a smaller bead size is appropriate, while larger gaps may require a wider bead. This will affect the size of the cut you make on the caulk tube.
Step 3: Mark the cut line
Using a pencil or marker, mark the desired cut line on the caulk tube. This will serve as a guide to ensure a straight and even cut.
Step 4: Cut the tip
Hold the caulk tube firmly in one hand and position the utility knife or scissors at the marked cut line. Apply gentle pressure and carefully cut the tip of the caulk tube in a straight line. Be cautious not to cut too much, as it may result in a larger bead than desired.

Step 5: Cut at an angle (optional)
If you prefer a specific angle for the caulk bead, you can cut the tip of the caulk tube at a slight angle. This will allow for easier application and better control over the bead.
Once the tip of the caulk tube is cut, you are ready to start using the caulk gun to dispense the caulk. Remember to always follow the manufacturer’s instructions for loading and using the caulk gun.
| Tools needed: | Utility knife or sharp scissors |
|---|---|
| Steps: | 4 |
| Time required: | A few minutes |


