


A router chisel is an essential tool for any woodworker, allowing you to create precise cuts and shapes in wood. Over time, the cutting edge of the chisel can become dull and ineffective, making it difficult to achieve clean and accurate cuts. Sharpening your router chisel is a simple process that can greatly improve the performance and lifespan of your tool.
Before you begin the sharpening process, it’s important to gather the necessary materials: a flat sharpening stone or honing guide, honing oil, a marker, and a rag. The sharpening stone should be fine-grit, between 1000 and 4000, to achieve a sharp edge without removing too much material.
Start by cleaning the chisel to remove any dirt or debris that may be present. Use a rag or brush to wipe away any loose particles, ensuring a clean surface for sharpening. Then, take your marker and carefully color the cutting edge of the chisel. This will help you determine if the entire edge is making contact with the sharpening stone.
About Router Chisel
A router chisel is a specialized cutting tool used in woodworking. It is a long, slender tool with a sharp blade at one end and a handle at the other. The blade of a router chisel is typically made of high-carbon steel or tungsten carbide, which allows it to cut through wood with ease.
Router chisels are commonly used to shape and carve wood, as well as to make precision cuts. They can be used with a hand router or a power router, depending on the desired application. The chisel blade is inserted into the router and secured in place using a collet or chuck.

One of the key advantages of using a router chisel is its versatility. It can be used to create intricate patterns and designs in wood, as well as to remove excess material or smooth rough edges. The sharp blade allows for precise control and accuracy, making it a popular choice among woodworkers.
However, like any cutting tool, a router chisel requires regular maintenance to keep it in optimal condition. This includes sharpening the blade and keeping it clean and free from debris. Proper care and maintenance of a router chisel will ensure its longevity and effectiveness.
Overall, a router chisel is an essential tool for any woodworker or DIY enthusiast. Its ability to shape, carve, and cut wood with precision makes it a valuable asset in any woodworking project.
Importance of Sharp Chisel
A sharp chisel is an essential tool for any woodworker. Whether you are a beginner or a seasoned professional, having a sharp chisel is crucial for achieving precise and clean cuts.
Here are a few reasons why maintaining a sharp chisel is important:
Accurate and Clean Cuts: A sharp chisel allows you to make accurate cuts with minimal effort. It helps in creating crisp, clean lines and edges on your woodwork, resulting in a professional-looking finish.
Efficiency: A dull chisel requires more force and effort to make cuts, which can slow down your progress. With a sharp chisel, you can work more efficiently as it effortlessly glides through the wood, saving you time and energy.
Safety: Working with a dull chisel can be dangerous. It is more likely to slip, leading to accidents and injuries. A sharp chisel, on the other hand, allows you to have better control over your tool, reducing the risk of accidents.
Longevity: Keeping your chisel sharp not only improves its performance but also extends its lifespan. Regular sharpening and proper maintenance help prevent the chisel’s blade from becoming excessively worn or damaged, ensuring that it lasts longer.
In conclusion, a sharp chisel is indispensable for achieving precise cuts, working efficiently, ensuring safety, and prolonging the lifespan of your chisel. Make sure to regularly sharpen and maintain your chisel to enjoy these benefits for your woodworking projects.
Tips for Sharpening Chisel
Sharpening a chisel is an important skill for anyone who works with wood. A sharp chisel not only ensures clean and precise cuts but also makes the task much easier and safer. Here are some tips to help you sharpen your chisel effectively:
1. Use the Right Tools
Before you begin sharpening your chisel, make sure you have the right tools. A sharpening stone or diamond plate is essential for removing the dull edge and restoring a sharp one. Additionally, you will need a honing guide to maintain the correct angle while sharpening and a strop to refine the edge.
2. Find the Correct Angle
Each chisel may have a slightly different angle, so it’s important to find the correct angle for your specific chisel. Start by examining the bevel on your chisel and use a protractor or honing guide to match that angle. Typically, chisels have a bevel angle between 25 and 30 degrees. Finding and maintaining the correct angle is crucial for achieving a sharp edge.
3. Start with Coarse Grit
If your chisel has a dull edge or nicks, start by sharpening it with a coarse grit stone or diamond plate. This will help remove any imperfections and establish the basic shape of the cutting edge. Use even and consistent strokes along the entire bevel, making sure to maintain the correct angle.
4. Progress to Finer Grits
After shaping the edge with a coarse grit, move on to finer grit stones or diamond plates. This will help refine the edge and remove any scratches left by the previous grit. Gradually work your way up to finer grits until you achieve the desired level of sharpness. Remember to maintain the correct angle and use consistent strokes.
5. Hone the Edge
Once you have achieved a sharp edge with the fine grit, it’s time to hone the chisel. Use a honing guide to maintain the correct angle and make smooth, light passes on a strop. This final step will polish the edge and remove any remaining burrs, resulting in a razor-sharp chisel.
6. Test the Edge
Before putting your freshly sharpened chisel to work, it’s essential to test the edge. Hold the chisel up to a light source and look for any remaining dull spots or imperfections. If necessary, repeat the sharpening process until you achieve a uniformly sharp edge.
By following these tips, you can ensure that your chisel is sharpened correctly and ready for use. Remember to take your time and be patient, as sharpening a chisel is a skill that improves with practice.
Use the Right Tools
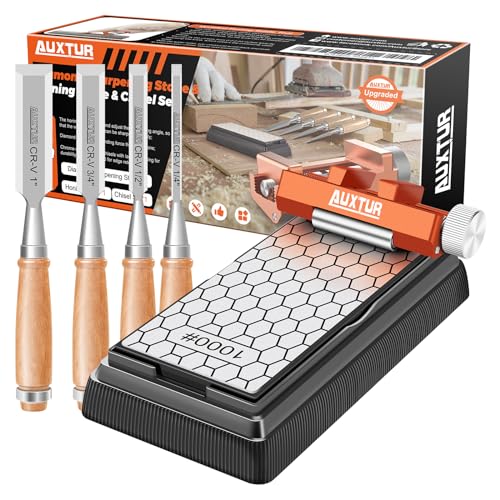
When sharpening a router chisel, using the right tools is crucial to achieve the best results. Here are the essential tools you will need:
| Tool | Description |
|---|---|
| Sharpening Stone | A sharpening stone is used to remove any nicks or burrs on the cutting edge of the chisel. It helps in shaping and refining the edge. |
| Honing Guide | A honing guide holds the chisel at the correct angle while sharpening. This ensures consistent and accurate sharpening results. |
| Marker | Using a marker allows you to easily track your progress when sharpening. By coloring the bevel edge, you can see which areas need more attention. |
| Stropping Compound | Stropping compound is applied to a leather strop to polish the chisel’s edge after sharpening. This step helps refine and maintain a sharp edge. |
| Leather Strop | A leather strop is used to make the final honing and polishing pass. It helps remove any remaining burrs and gives the chisel a razor-sharp edge. |
Having these tools ready and properly using them will ensure that your router chisel is sharpened effectively, resulting in clean and precise cuts in your woodworking projects.
Preparing for Sharpening
Before you start sharpening your router chisel, it’s important to properly prepare for the task. This will ensure that you achieve the best results and prolong the life of your chisel.
Step 1: Gather Tools and Materials
Firstly, gather all the necessary tools and materials. You will need a sharpening stone or diamond plate, honing guide, water or honing oil, a clean cloth or towel, and a flat surface to work on.
Step 2: Clean the Chisel
Before sharpening, make sure that the chisel is clean from any debris or dirt. Use a brush or compressed air to remove any dust particles from the blade and handle. This will help in achieving a better edge.
Step 3: Secure the Chisel
Once the chisel is clean, secure it firmly in a honing guide. This will ensure a consistent angle while sharpening. Follow the manufacturer’s instructions for setting up the guide and adjusting the angle for your chisel.
Step 4: Lubricate the Stone
If you are using a water stone, soak it in water for the recommended amount of time. If you are using a diamond plate, apply a small amount of honing oil on the surface. Lubricating the stone will help in achieving smoother and more effective sharpening.
Step 5: Start Sharpening
With your chisel secured and your stone or diamond plate ready, begin sharpening. Start by placing the chisel on the stone, making sure to maintain a consistent angle. Use even, light pressure and move the chisel in a back-and-forth motion across the stone. Repeat this process until you achieve a sharp edge.
Note: Be careful while sharpening and make sure to follow all the safety precautions. Always wear protective goggles and gloves to avoid any accidents.
Following these steps will help you properly prepare for sharpening your router chisel. This will result in a sharper and more efficient chisel, allowing you to achieve clean and precise cuts in your woodworking projects.
Sharpening Techniques
Properly sharpening your router chisel is essential for achieving clean and precise cuts. Here are some sharpening techniques to help you maintain a sharp edge on your router chisel:
1. Honing Guide
Using a honing guide is the first step in sharpening your router chisel. A honing guide will ensure that the chisel is held at the correct angle while sharpening. Place the chisel in the honing guide and tighten the screws to secure it in place.
2. Sharpening Stones
Sharpening stones are essential tools for sharpening your router chisel. Start with a coarse-grit stone (around 1000 grit) to remove any nicks or dents on the chisel edge. Move the chisel back and forth across the stone in a circular motion, applying light pressure. Repeat this process until the edge is smooth and free of imperfections.
Next, switch to a medium-grit stone (around 3000 grit) to refine the edge. Follow the same back and forth motion, applying light pressure. Continue sharpening until you have achieved a sharp and polished edge.
3. Stropping
After sharpening on the stones, stropping the chisel can help to further refine the edge and remove any burrs. Stropping involves rubbing the chisel against a leather strop, usually with a polishing compound applied to it. Hold the chisel at a slight angle and move it back and forth across the strop. This motion will polish the edge and remove any remaining imperfections.
Remember to always clean the chisel and remove any debris before sharpening to ensure the best results. Regularly inspect the chisel for any signs of wear and sharpen as needed to maintain its performance.
By following these sharpening techniques, you can keep your router chisel in optimal condition and achieve precise cuts in your woodworking projects.
Maintenance and Storage
Proper maintenance and storage of your router chisel are essential to ensure its longevity and optimal performance. Here are some tips to help you keep your router chisel in top condition:
Cleanliness: After each use, make sure to clean the router chisel thoroughly. Remove any wood shavings, dust, or debris that may have accumulated on the chisel. You can use a soft brush or compressed air to clean hard-to-reach areas.
Sharpening: Regularly sharpen your router chisel to maintain its cutting edge. Use a sharpening stone or honing guide to achieve the desired sharpness. Follow the manufacturer’s instructions for sharpening angles and techniques.
Lubrication: Apply a thin coat of lubricant or rust preventative oil on the metal parts of the router chisel to prevent rust and corrosion. Be sure to wipe off any excess oil before storing the chisel.
Storage: Store your router chisel in a clean and dry place. Use a protective case or sleeve to prevent the chisel from getting damaged or dull. Avoid storing the chisel with other tools or materials that may scratch or chip its cutting edge.
Inspection: Regularly inspect your router chisel for any signs of wear, damage, or looseness. Check the handle, blade, and connection points for any cracks, chips, or dents. If you notice any issues, repair or replace the chisel as needed to ensure safe and effective use.
Proper usage: Always use your router chisel for its intended purpose and avoid excessive force or improper techniques. This will help prevent unnecessary wear and tear on the chisel and ensure optimal performance.
By following these maintenance and storage tips, you can extend the lifespan of your router chisel and enjoy smooth and precise woodworking operations. Remember to always prioritize safety and consult the manufacturer’s instructions for specific care recommendations.
Cleaning the Chisel
Before sharpening the router chisel, it’s important to clean it properly first. A dirty chisel can affect the sharpening process and the overall quality of the blade. Follow these steps to ensure your chisel is clean:
Step 1: Remove any dirt or debris
Start by using a soft cloth or a brush to remove any dirt or debris that may have accumulated on the chisel. Make sure to clean both the blade and the handle.
Step 2: Use a cleaning solution
If there are any stubborn stains or marks on the chisel, you can use a cleaning solution specifically designed for metal tools. Apply the solution to a clean cloth and gently rub the affected areas. Be careful not to apply too much pressure or use abrasive materials that can damage the chisel.
Note: Always read and follow the manufacturer’s instructions when using a cleaning solution.
Step 3: Rinse and dry
After cleaning the chisel with a cleaning solution, rinse it thoroughly with clean water to remove any residue. Once rinsed, dry the chisel completely using a clean, dry cloth. Make sure there is no moisture left on the chisel to prevent rusting.
Step 4: Store properly
After cleaning and drying the chisel, it’s important to store it properly to prevent any further damage or contamination. Consider using a chisel case or a dedicated storage solution to protect the sharpness of the blade and keep it in optimal condition.
By following these steps, you can ensure that your router chisel is clean and ready for the sharpening process, which will help maintain its performance and extend its lifespan.


