


If you’re a DIY enthusiast or a professional carpenter, you know the importance of using the right tools for the job. One tool that can come in handy when working on woodworking projects is a mortise chisel drill bit. This specialized bit is designed to create clean and precise mortise holes, which are essential for joinery work.
Before you start using a mortise chisel drill bit, it’s important to understand its construction and how it works. Unlike regular drill bits, a mortise chisel drill bit has a square or rectangular shape with sharp edges on both sides. This design allows the bit to remove a specific amount of material from the wood, creating a mortise hole with straight sides and a flat bottom.
When using a mortise chisel drill bit, it’s essential to secure the workpiece firmly in place using clamps or a vice. This will prevent the wood from moving during the drilling process and ensure accurate results. Additionally, it’s important to mark the location of the mortise hole on the wood using a pencil or marking knife. This will serve as a guide and help you stay on track while drilling.
Once you have everything set up, you can start using the mortise chisel drill bit. It’s recommended to start at a slow speed and gradually increase it as you go. This will help you maintain control over the bit and prevent any mishaps. Remember to let the bit do the work and avoid applying excessive force, as this can lead to damage or breakage. Take your time and work slowly to achieve the desired results.
Using a mortise chisel drill bit can elevate your woodworking projects to the next level. With its ability to create precise and clean mortise holes, you’ll be able to achieve professional-looking joints and connections. Just remember to practice proper safety precautions and take your time to ensure accurate and satisfactory results.
What is a Mortise Chisel Drill Bit?
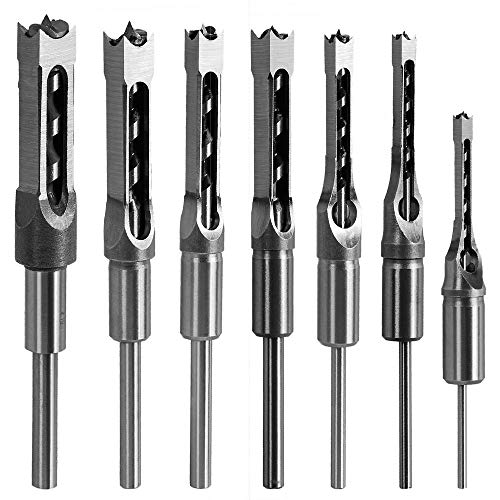
A mortise chisel drill bit is a specialized tool used in woodworking to create square or rectangular holes, known as mortises, in wood. It is a combination of a chisel and a drill bit, designed to remove material by both cutting and drilling.
The chisel part of the tool has a sharp cutting edge and a beveled side, allowing it to carve out the sides of the mortise. The drill bit portion has a pointed tip and spiral flutes, which remove wood chips from the hole as it is being drilled.
Mortise chisel drill bits are commonly used in joinery and furniture making, where precise and strong joints are required. They are often used in combination with a mortising machine, but can also be used with a power drill or a mallet and chisel.
When using a mortise chisel drill bit, it is important to securely clamp the workpiece and mark out the location and dimensions of the mortise. The bit should be aligned with the marks and the drill should be operated at a slow and steady pace to prevent overheating and ensure clean cuts.
- Choose a mortise chisel drill bit that is appropriate for the size and depth of the desired mortise.
- Securely clamp the workpiece in place.
- Mark out the location and dimensions of the mortise.
- Align the bit with the marks and start drilling at a slow and steady pace.
- Remove the bit regularly to clear wood chips and prevent overheating.
- Continue drilling until the desired depth is reached.
- Clear any remaining wood chips from the mortise.
By properly using a mortise chisel drill bit, woodworkers can create precise and strong mortises for a variety of woodworking projects.
Benefits of Using a Mortise Chisel Drill Bit
When it comes to woodworking, having the right tools can make all the difference in the quality and efficiency of your work. One such tool that can greatly benefit any woodworker is a mortise chisel drill bit.
Mortise chisel drill bits are specifically designed for creating clean and precise mortise holes in wood. These bits feature a chisel-like end that allows you to remove material as you drill, resulting in a clean and accurate hole.
Here are some benefits of using a mortise chisel drill bit:
1. Precise and Clean Holes:
One of the main benefits of using a mortise chisel drill bit is that it allows you to create precise and clean holes in wood. The chisel-like end of the bit ensures that the edges of the hole are sharp and clean, without any splintering or tearing of the wood fibers.
2. Efficient Material Removal:
With a mortise chisel drill bit, you can efficiently remove material as you drill. The chisel-like end helps to chip away the wood as you go, making the process faster and more efficient. This is especially important when creating mortise and tenon joints, as the fit needs to be precise for a strong and durable connection.
3. Versatility:
Mortise chisel drill bits are a versatile tool that can be used for a variety of woodworking projects. Whether you’re creating mortise and tenon joints, drilling hinge recesses, or making square holes, a mortise chisel drill bit can handle it all. Its versatility makes it a great addition to any woodworker’s toolbox.
In conclusion,
a mortise chisel drill bit is a valuable tool for any woodworker looking to create precise and clean holes in wood. Its benefits include the ability to create precise and clean holes, efficient material removal, and versatility in a variety of woodworking projects. Adding a mortise chisel drill bit to your toolbox can greatly enhance the quality and efficiency of your woodworking projects.
Choosing the Right Mortise Chisel Drill Bit
When it comes to using a mortise chisel drill bit, choosing the right one is crucial for the success of your woodworking project. There are several factors to consider when selecting a mortise chisel drill bit, including the size and shape of the bit, as well as the type of material you will be working with.
The first thing to consider is the size of the mortise chisel drill bit. The size you choose will depend on the width of the mortise you need to create. If you are working on a smaller project, a smaller bit with a width of around 1/4 inch may be sufficient. For larger projects, you may need a wider bit, such as 3/8 inch or 1/2 inch. It’s important to choose a bit that is the appropriate size for your project to ensure the mortise is the right width and depth.
Another important factor to consider is the shape of the mortise chisel drill bit. There are a few different shapes to choose from, including straight, spoon, and fishtail. The shape you choose will depend on the type of mortise you are creating. Straight bits are ideal for making straight, clean mortises, while spoon bits are great for making round-bottomed mortises. Fishtail bits are versatile and can be used to create both straight and round-bottomed mortises.
Finally, consider the type of material you will be working with. Some mortise chisel drill bits are specifically designed for use with certain types of wood or other materials. For example, some bits are designed for use with hardwoods, while others are better suited for softer woods. Choosing a bit that is appropriate for your material will help ensure clean and precise mortises.
In conclusion, choosing the right mortise chisel drill bit is essential for successful woodworking projects. Consider the size and shape of the bit, as well as the type of material you will be working with. By selecting the right bit, you can achieve clean and precise mortises that are essential for strong and durable joinery.
Tips for Selecting the Correct Size and Type
When it comes to using a mortise chisel drill bit, selecting the correct size and type is crucial for achieving clean and precise results. Here are some tips to help you choose the right one for your project:
1. Consider the Size of the Mortise
The first thing you need to consider is the size of the mortise you want to create. Mortise chisel drill bits come in various sizes, typically ranging from 1/4 inch to 1 inch or larger. Ensure that the size of the bit matches the dimensions of your mortise to ensure a proper fit.
2. Determine the Type of Wood
The type of wood you are working with also plays a role in selecting the correct mortise chisel drill bit. Softer woods, such as pine or cedar, require smaller bits to prevent excessive tear-out. Harder woods, like oak or mahogany, may require larger and more durable bits to handle the task.
Pro tip: If you frequently work with different types of wood, it may be a good idea to have a set of mortise chisel drill bits in various sizes and types to accommodate your needs.
3. Consider the Blade Configuration
There are different blade configurations available for mortise chisels, such as straight and spiral. Straight blades are suitable for basic mortises, while spiral blades are better for clearing out waste material efficiently. Consider the type of cut you want to achieve and choose a chisel with the appropriate blade configuration.
Pro tip: Pay attention to the shank diameter of the mortise chisel drill bit as well. Ensure that it fits securely in your drill and is compatible with the chuck size.
By following these tips and selecting the correct size and type of mortise chisel drill bit, you can ensure that your woodworking projects turn out seamless and professional-looking. Remember to always prioritize safety and use the right tools for the job at hand.
Preparing the Workpiece
Before you start using a mortise chisel drill bit, it is important to properly prepare your workpiece. This will ensure that you get clean and accurate results. Here are a few steps you can follow:
1. Mark the Mortise
First, mark the location of the mortise on your workpiece using a pencil or marking knife. Make sure the mark is clear and easy to see.
2. Secure the Workpiece
Next, secure the workpiece firmly in a vise or clamp. This will prevent it from moving while you are drilling the mortise.
Note: If you are working with a large or heavy workpiece, you may need to use additional support or a workbench with clamps to ensure stability.
3. Select the Right Size Chisel Bit
Choose a mortise chisel drill bit that matches the width of your mortise. This will ensure a snug fit and accurate drilling.
Tip: If you are unsure about the size, you can start with a slightly smaller bit and gradually widen the mortise as needed.
By following these preparation steps, you will be ready to start using your mortise chisel drill bit with confidence.
Marking and Securing the Wood
Before using a mortise chisel drill bit, it is important to properly mark and secure the wood you will be working on. This will ensure accurate and precise cuts while also ensuring your safety.
1. Marking
Start by marking the location of the mortise on the wood. Use a pencil or a marking knife to make a clear and visible line. This will serve as a guide for the chisel and help you to make accurate cuts. Take your time with this step to ensure the mortise is in the correct position.
2. Securing
Next, you’ll want to secure the wood in place. This can be done using clamps or a workbench vise. Make sure the wood is steady and won’t move while you’re working on it. This will prevent accidents and ensure that your cuts are clean and precise.
If you’re working with a larger piece of wood, it’s a good idea to support it with additional blocks or supports to prevent any deflection or movement during the drilling process. This will result in more accurate and cleaner mortises.
Remember to wear appropriate safety gear, such as goggles and gloves, when marking and securing the wood. This will protect you from any potential injury.
By properly marking and securing the wood, you’ll be able to work more effectively and achieve better results with your mortise chisel drill bit. Take the time to prepare the wood properly before starting your project, and you’ll be rewarded with precise and professional-looking mortises.
Using the Mortise Chisel Drill Bit
A mortise chisel drill bit is a versatile tool that can be used for various woodworking tasks. It is specifically designed to create mortises, which are rectangular holes that are used to join pieces of wood together. Here are some steps on how to effectively use a mortise chisel drill bit.
|
Step 1: First, secure the piece of wood that you want to create the mortise on. You can use clamps or a vise to firmly hold the wood in place. |
Step 2: Next, mark the dimensions of the mortise on the wood. Use a ruler or a marking gauge to ensure accurate measurements. |
|
Step 3: Once you have marked the dimensions, attach the mortise chisel drill bit to your drill. Make sure it is securely in place before proceeding. |
Step 4: Position the drill bit at one end of the marked area and start drilling. Apply a steady and consistent pressure as you drill into the wood. |
|
Step 5: Continue drilling until you reach the desired depth. Take your time and avoid rushing the process. |
Step 6: Once the mortise has been created, clean out any excess wood chips or debris from the hole. |
Remember to wear appropriate safety gear, such as goggles and gloves, when using a mortise chisel drill bit. This will help protect you from any potential accidents or injuries. Additionally, always follow the manufacturer’s instructions and guidelines for proper usage of the tool.
By following these steps, you can effectively use a mortise chisel drill bit to create accurate and clean mortises in your woodworking projects. Practice and patience are key to mastering this skill, so don’t be discouraged if it takes some time to get the hang of it!
Proper Technique and Safety Guidelines
Using a mortise chisel drill bit requires proper technique and adherence to safety guidelines to ensure a smooth and safe woodworking experience. Here are some important tips to keep in mind:
1. Secure Workpiece:
Before starting, make sure that the workpiece is securely clamped or held down to prevent any movement during the drilling process. This will help maintain accuracy and prevent accidents.
2. Wear Safety Gear:
Always wear appropriate safety gear, including safety goggles, ear protection, and a dust mask. This will protect your eyes, ears, and lungs from dust, wood particles, and flying debris.
3. Start Slowly:
Begin drilling at a slow speed to create a pilot hole. This will help guide the chisel bit and prevent it from wandering off course.
4. Gradually Increase Speed:
Once the pilot hole is established, gradually increase the speed of the drill to cut through the wood. Avoid applying excessive pressure, as it may cause the chisel bit to bind or break.
5. Use a Hammer and Chisel Combination:
For better control and precision, consider using a hammer and chisel in combination with the mortise chisel drill bit. Start by creating an outline of the mortise using the chisel and hammer, then use the drill bit to remove material within the outline.
6. Work in Small Sections:
It is recommended to work in small sections when drilling with a mortise chisel drill bit. This will prevent overheating of the bit and minimize the risk of wood splintering.
7. Clear Dust and Debris:
Regularly clear away debris and dust from the drilled hole to maintain visibility and prevent any potential clogs. Use a brush or compressed air to remove the material.
By following these proper techniques and safety guidelines, you can effectively and safely use a mortise chisel drill bit for your woodworking projects.


