

Using a hand held pipe cutter is a convenient and efficient way to cut pipes of various materials. Whether you’re a professional plumber or a DIY enthusiast, knowing how to properly use this tool is essential to ensure accurate and clean cuts.
Step 1: Measure and mark
Before using the pipe cutter, it’s important to measure the desired length of the pipe and mark it with a pencil or a marker. This will help you maintain accuracy and avoid mistakes during the cutting process.
Step 2: Secure the pipe
Clamp the pipe tightly into the pipe cutter. Make sure it is securely held in place to prevent slipping during cutting. The pipe cutter should have a V-shaped support that will help stabilize the pipe.
Step 3: Align the cutting wheel
Position the cutting wheel of the pipe cutter on the mark you made earlier. Make sure the cutting wheel is aligned perpendicular to the pipe. This will ensure a straight cut and prevent any uneven edges.
Step 4: Start cutting
Gently apply pressure on the handles of the pipe cutter to start the cutting process. Rotate the cutter around the pipe while applying consistent pressure. It’s important to maintain a steady and controlled pace to avoid damaging the pipe or the cutter.
Step 5: Finish the cut
Continue rotating the pipe cutter until the cutting wheel goes all the way through the pipe. Once the cut is complete, release the pressure on the handles and remove the pipe from the cutter. Use a file or sandpaper to smooth out any rough edges.
Using a hand held pipe cutter is an efficient way to cut pipes with precision and ease. By following these steps, you’ll be able to achieve accurate and clean cuts for your plumbing or DIY projects.
Basics of Using a Hand Held Pipe Cutter
A hand-held pipe cutter is a versatile tool that can be used to make clean, precise cuts in pipes of various materials. Whether you are a professional plumber or a DIY enthusiast, understanding the basics of using a hand-held pipe cutter is essential.
Choosing the Right Cutter
Before using a hand-held pipe cutter, it is important to choose the right tool for the job. There are different types of pipe cutters available, including ones specifically designed for PVC, copper, or steel pipes. The type of material you are working with will determine the type of cutter you should use.
Preparing the Pipe
Before making any cuts, it is important to properly prepare the pipe. This includes ensuring that the pipe is clean and free from any debris or rough edges. Use a pipe cleaner or sandpaper to smooth out any rough areas and remove any dirt or rust.
Measuring and Marking
Next, measure and mark the pipe at the desired location for the cut. Use a measuring tape or ruler to ensure an accurate measurement. Make sure to double-check your measurements before proceeding.
Using the Cutter
To use the hand-held pipe cutter, place the cutting wheel against the mark on the pipe. Keep a firm grip on the cutter and rotate it around the pipe, applying steady pressure. Gradually increase the pressure as the pipe cutter penetrates the material. Continue rotating the cutter until the pipe is cut all the way through.
Finishing Touches
After making the cut, use a deburring tool or a file to remove any burrs or sharp edges from the cut end of the pipe. This will ensure a clean, smooth finish and prevent any injury when connecting the pipes.
Remember to always wear appropriate safety gear when using a hand-held pipe cutter, including safety glasses and gloves. If you are unsure about how to use a hand-held pipe cutter or feel uncomfortable doing so, it is best to seek the assistance of a professional.
Understanding the Pipe Cutter
A pipe cutter is a handy tool used to cut pipes quickly and efficiently. It consists of a sharp cutting wheel attached to a handle. The cutting wheel, usually made of hardened steel, is used to score the pipe, allowing it to be easily snapped or cut.
There are different types of pipe cutters available, including hand-held pipe cutters and power pipe cutters. Hand-held pipe cutters are commonly used for smaller pipes and are operated manually by the user. Power pipe cutters, on the other hand, are typically used for larger pipes and are powered by electricity or compressed air.
When using a hand-held pipe cutter, it is important to ensure that the pipe is secured properly in place. This can be done by using a vise or clamp to hold the pipe steady. The cutting wheel should be aligned with the mark or measurement on the pipe, indicating where the cut needs to be made.
Once the pipe is properly secured, the cutting wheel is rotated around the pipe while applying firm pressure. This scoring action will create a groove in the pipe, making it easier to cut. It is important to maintain a steady and consistent pressure while rotating the cutting wheel to ensure a clean and even cut.
Once the groove is made, the pipe can be snapped or cut by applying additional pressure. For smaller pipes, a snapping action may be enough to separate the pipe. For larger pipes, a pipe cutter may be used to make a complete cut.
After the pipe is cut, it is important to deburr the edges to remove any sharp burrs or rough edges. This can be done using a deburring tool or a file. Deburring helps to ensure a clean and smooth finish and prevents any damage or injury that may be caused by sharp edges.
In conclusion, understanding how to properly use a hand-held pipe cutter is essential for anyone working with pipes. By following the correct techniques and taking appropriate safety precautions, pipes can be cut efficiently and accurately, saving time and effort.
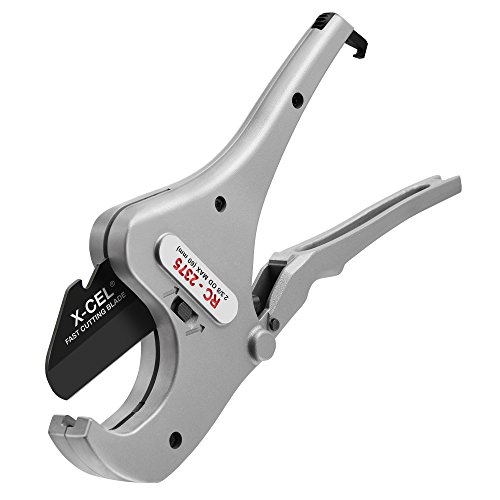
Selecting the Right Pipe Cutter
When it comes to effectively cutting pipes, choosing the right pipe cutter is crucial. There are various types of pipe cutters available on the market, each suitable for different pipe materials and sizes. Here are some factors to consider when selecting the right pipe cutter:
1. Type of Pipe
First and foremost, determine the type of pipe you will be working with. Whether it’s copper, plastic, steel, or another material, each pipe requires a specific type of cutter. Make sure the pipe cutter you choose is designed for the material you are working with.
2. Pipe Size
Pipe cutters come in different sizes to accommodate various pipe diameters. Before purchasing a pipe cutter, measure the diameter of the pipe you will be cutting. Ensure that the cutter you select is suitable for pipes of that diameter. Using a cutter that is too small or too large may result in inefficient or inaccurate cuts.
3. Cutting Mechanism
Consider the cutting mechanism of the pipe cutter. There are different types available, such as ratcheting cutters, rotary cutters, and scissor-style cutters. Each mechanism offers its own advantages and may be more suitable for specific pipe cutting applications. Evaluate your needs and choose a cutting mechanism that will make your work easier and more efficient.
Remember, selecting the right pipe cutter is essential for achieving clean, precise, and effortless cuts. Taking the time to evaluate the type of pipe, size, and cutting mechanism will ensure that you have the right tool for the job, resulting in successful pipe cutting projects.
Preparing for Pipe Cutting
Before you begin using a hand held pipe cutter, it is important to properly prepare for the task. Taking the time to gather the necessary tools and materials, as well as ensuring a safe work environment, will help ensure a successful and efficient pipe cutting process. Here are some important steps to follow:
Gather the Tools and Materials
Make sure you have all the necessary tools and materials before starting the pipe cutting process. This includes a hand held pipe cutter, safety gloves, safety glasses, a tape measure or ruler, and a marker to mark the cutting point on the pipe.
Ensure a Safe Work Environment
Creating a safe work environment is crucial to avoid accidents or injuries while using a hand held pipe cutter. Clear the area of any obstacles or debris that may interfere with the cutting process. Make sure to work in a well-ventilated area to prevent the inhalation of any fumes or dust that may be generated during the cutting process.
Caution: Always wear safety gloves and safety glasses to protect yourself from any potential hazards.
Additionally, it is important to inspect the pipe for any signs of damage or corrosion before cutting. If you notice any issues with the pipe, it may be necessary to repair or replace it before proceeding with the cutting process.
By properly preparing for pipe cutting, you can ensure a safe and efficient process that yields accurate results. Take the time to gather the necessary tools and materials, as well as create a safe work environment, before starting your pipe cutting project.
Marking the Pipe
Before you begin cutting the pipe, it is important to accurately mark the area where you want to make the cut. This will ensure that your cut is precise and that the pipe will fit properly in your project.
Here are the steps to follow when marking the pipe:
- Clean the pipe: Before marking the pipe, make sure to clean it thoroughly to remove any dirt or debris. This will help you make accurate markings.
- Measure the desired length: Use a tape measure or ruler to measure the length you want the pipe to be. Measure from one end of the pipe and mark the measurement with a pencil or marker.
- Double-check your measurements: Before making the final mark, double-check your measurements to ensure accuracy. It’s always better to be safe than sorry.
- Make the final mark: Once you are confident in your measurements, make the final mark on the pipe. Use a straight edge or level to ensure the mark is straight and even.
- Additional markings: Depending on your project, you may need to make additional markings on the pipe. For example, if you need to make multiple cuts, mark those areas accordingly.
By following these steps, you can ensure that you have properly marked the pipe before making any cuts. This will help you achieve precise and accurate results when using a hand-held pipe cutter.
Cutting the Pipe
Using a hand-held pipe cutter is a simple and effective way to cut pipes for any DIY plumbing project. Follow these steps to safely and accurately cut your pipes:
- Measure and mark: Start by measuring and marking the length you want to cut the pipe. Use a measuring tape and a pencil to make a straight and precise mark.
- Secure the pipe: Place the pipe firmly in the jaws of the pipe cutter. Make sure it is positioned straight and securely held.
- Adjust the cutter: Adjust the cutter wheel to the appropriate size by turning the adjustment knob or handle. The wheel should be in contact with the pipe but not too tight.
- Start cutting: Apply gentle pressure on the handles of the cutter to start the cutting process. Use a smooth and continuous motion to rotate the cutter around the pipe.
- Continue cutting: Keep rotating the cutter around the pipe, applying constant pressure, until you have made a full rotation or cut through the pipe. Take your time and let the cutter do the work.
- Inspect the cut: Once you have cut through the pipe, inspect the cut to ensure it is clean and even. Make any necessary adjustments or re-cuts if needed.
Remember to always wear safety goggles and gloves when using a pipe cutter to protect your eyes and hands from any debris or sharp edges. Be cautious and work slowly to avoid any accidents or injuries. With practice, you will become more comfortable and proficient at cutting pipes with a hand-held pipe cutter.
Finishing the Cut
Once you have made your initial cut using the hand held pipe cutter, it is important to properly finish the cut to ensure a clean and smooth edge. This step is crucial for a secure and leak-free connection when joining pipes.
Deburring the Cut Edge
After making the cut, you may notice some burrs or rough edges on the cut end of the pipe. These burrs can interfere with the proper fitting of pipes and may even cause leaks. To remove these burrs, you will need to deburr the cut edge.
To deburr the cut edge, gently use a deburring tool or a file to shave off the rough edges. Start at the outer edge and work your way towards the inner part of the cut. Be careful not to apply too much pressure, as this can damage the pipe. The goal is to create a smooth and even surface.
Once you have finished deburring the cut edge, use your fingers to feel the edge and ensure that it is smooth. Run your fingers along the edge to check for any remaining burrs, and if necessary, repeat the deburring process until the edge feels completely smooth.
Cleaning the Cut Pipe
Before connecting the cut pipe to another pipe or fitting, it is essential to clean the cut end thoroughly. This will remove any debris or dirt that may interfere with the proper fitting of the pipes.
Use a clean cloth or rag to wipe off the cut end of the pipe, removing any dust, dirt, or metal shavings. You can also use a pipe cleaning brush to scrub the inside of the cut end, ensuring that it is clean and free from any obstructions.
It is important to note that different types of pipes may require specific cleaning procedures or solvents. Be sure to consult the manufacturer’s instructions or guidelines for the appropriate cleaning method for your specific type of pipe.
By properly finishing the cut, you will ensure a secure and leak-free connection when joining pipes. Taking the time to deburr the cut edge and clean the cut pipe will help maintain the integrity of the joint and prolong the lifespan of your plumbing system.