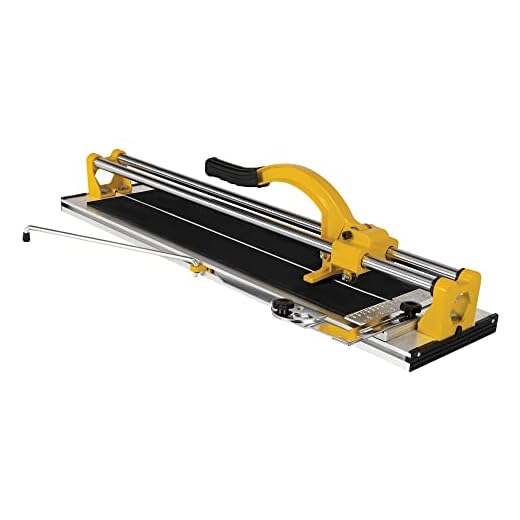
If you’re planning to tile your bathroom or kitchen, a Qep Hand Tile Cutter is an essential tool to have in your arsenal. Whether you’re a professional tiler or a DIY enthusiast, this versatile tool will make your tile cutting job much easier and more precise. Don’t be intimidated by the task at hand, with this step-by-step guide, you’ll be able to cut tiles like a pro in no time!
The first step in using a Qep Hand Tile Cutter is to measure the size of the tile you want to cut. Use a tape measure and a pencil to mark the desired length and width on the tile’s surface. Make sure your measurements are accurate, as this will determine the final result.
Once you have your measurements, place the tile on the cutter’s base, making sure it is lined up with the cutting guide. Secure the tile in place using the cutter’s adjustable lever or clamps, if available. This will prevent the tile from moving while you’re cutting.
Next, using both hands, hold the cutter’s handle firmly and apply steady pressure as you push the cutting wheel across the tile’s surface, following the marked line. It’s important to maintain a steady pace and pressure to ensure a clean and even cut. If necessary, make multiple passes until the tile is completely cut.
Finally, once the tile is cut, remove it from the cutter and check the quality of the cut. If any rough edges or uneven surfaces are present, use a tile file or sandpaper to smooth them out. This will ensure a seamless installation and professional-looking finish.
Using a Qep Hand Tile Cutter may sound intimidating at first, but with the right technique and practice, you’ll become a tile-cutting expert in no time. Remember to always wear protective gloves and eyewear when using any cutting tool, and follow the manufacturer’s instructions for your specific cutter model. So, what are you waiting for? Start tiling and transform your space with confidence!
QEP Hand Tile Cutter: A Step-by-Step Guide to Use It
Are you looking for an easy and precise way to cut tiles for your project? The QEP Hand Tile Cutter is a handy tool that can make tile cutting a breeze. Whether you are a professional tiler or a DIY enthusiast, this guide will walk you through the steps of using the QEP Hand Tile Cutter effectively.
Step 1: Measure and Mark
Start by measuring the tile you need to cut and mark the cutting line using a pencil. Make sure to take accurate measurements to avoid any unnecessary mistakes. Use a straight edge or a ruler to ensure a straight cutting line.
Step 2: Adjust the Cutter
Align the marked cutting line with the blade of the QEP Hand Tile Cutter. Then, adjust the cutting wheel to the desired cutting depth. This depth depends on the thickness of the tile you are cutting. Make sure to tighten the cutting wheel to secure it in place.
Step 3: Score the Tile
Hold the tile firmly with both hands and position it against the cutting wheel. Apply gentle pressure to the tile and move the QEP Hand Tile Cutter along the cutting line. The cutting wheel will score the surface of the tile. Repeat this process a few times for deeper scores.
Step 4: Snap the Tile
Once you have scored the tile, place it on a level surface with the scored line facing upwards. Hold the tile on both sides of the cut line and apply even pressure to break the tile along the scored line. Use slow and steady pressure to prevent any uneven breaks.
Note: For thicker tiles, you may need to use tile nippers or pliers to break off any remaining pieces along the scored line.
Step 5: Smooth the Edges
After breaking the tile, you may notice rough or jagged edges. You can use a rubbing stone or sandpaper to smooth out the edges and ensure a clean finish. Be careful when handling the tile as the edges may still be sharp after smoothing.

Remember: Always wear appropriate safety gear, such as gloves and goggles, when using the QEP Hand Tile Cutter to protect yourself from any potential injuries.
With the QEP Hand Tile Cutter and this step-by-step guide, you can easily and accurately cut tiles for your next tiling project. By following these simple steps, you’ll be able to achieve precise cuts and create professional-looking results.
Preparation and Setup
Using a QEP hand tile cutter requires proper preparation and setup to ensure accurate and efficient cutting. Before getting started, gather all the necessary tools and materials. This includes the QEP hand tile cutter, the appropriate tile to be cut, safety goggles, and work gloves.
1. Safety First
Prior to starting any project, it is important to prioritize safety. Put on your safety goggles to protect your eyes from tile shards or dust. Additionally, wear work gloves to safeguard your hands from potential injuries.
2. Setting Up the Cutter
Find a flat and sturdy surface to work on, such as a workbench or table. Place the QEP hand tile cutter on this surface, ensuring it is stable and level. Make sure the blade is sharp and securely attached to the cutter.
Refer to the user manual provided by the manufacturer for specific instructions on setting up your particular QEP hand tile cutter model.
3. Measuring and Marking the Tile
Take the tile that needs to be cut and use a tape measure to determine the desired dimensions. Use a pencil or marker to make accurate marks on the surface of the tile where it needs to be cut. Be precise in your measuring and marking to ensure a clean and accurate cut.
4. Setting the Cutting Guide
The QEP hand tile cutter comes with a cutting guide that helps to make straight cuts. Align the guide with the marked line on the tile, ensuring it is secure and straight. This will serve as a reference point for your cutting.
Some QEP hand tile cutters may have adjustable cutting guides, so consult the user manual for instructions on setting up the cutting guide specific to your model.
5. Cutting the Tile
Once the setup is complete, it is time to start cutting. Hold the tile firmly against the cutting guide, making sure it is securely positioned. Push down on the handle of the QEP hand tile cutter with steady pressure to score the tile along the marked line.
Once scored, use the handle to apply more pressure to snap the tile along the marked line. Be careful during this step to avoid any accidents and ensure a clean break.
6. Finishing Touches
Inspect the cut edge of the tile to ensure it is smooth and free from any rough edges. If necessary, use a tile file or sandpaper to smooth out any imperfections.
Repeat the above steps for any additional cuts needed for your project.
Now that you have completed the preparation and setup, you are ready to use your QEP hand tile cutter confidently and effectively.
Cutting Tiles with QEP Hand Tile Cutter
The QEP Hand Tile Cutter is a versatile tool that allows you to easily and accurately cut tiles for your various home improvement projects. Whether you are installing a new backsplash in your kitchen or tiling a bathroom floor, this tool will help you achieve professional-looking results.
1. Prepare the Tile
Before you begin cutting the tile, it’s important to properly prepare it. Measure the tile and mark the cutting line using a pencil or marker. Make sure to use a straight edge to ensure a clean and straight cut. You can also use a tile scribe or a tile scriber and cutter to score the cutting line.
2. Position the Tile
Once the tile is marked and ready to be cut, securely position it on the QEP Hand Tile Cutter. Make sure it aligns with the cutting wheel. The cutting wheel should be on the side of the tile that you want to keep, so double-check the alignment before proceeding.
3. Score the Tile
Apply firm and consistent pressure while running the cutting wheel along the marked cutting line. Make sure to do this in one smooth motion for the best results. The cutting wheel should score the tile without applying too much pressure, so be careful not to press too hard.
4. Break the Tile
Once the tile is scored, carefully position it on the QEP Hand Tile Cutter’s breaking mechanism. Apply pressure to the handle to gently break the tile along the scored line. The breaking mechanism will prevent the tile from shattering or breaking unevenly, ensuring a clean break.
5. Smooth the Edges
After breaking the tile, you may notice rough or uneven edges. To smooth them out, use a tile file or sandpaper to sand down any rough areas. This will give your cut tile a neater, more professional finish.
Remember to always wear safety goggles and gloves when using the QEP Hand Tile Cutter to protect yourself from any potential accidents. With practice and the right technique, you’ll soon become proficient at cutting tiles and achieving the desired results for your home improvement projects.
Finishing and Cleaning Up
After cutting your tiles with the Qep Hand Tile Cutter, it’s important to take the time to finish and clean up the edges for a professional-looking result. Here are some steps to follow:
1. Smoothing the Edges:
Using a tile file or sandpaper, gently smooth the edges of the cut tiles to remove any rough or sharp edges. Be careful not to apply too much pressure, as this can cause the tile to crack.
2. Removing any Burrs:
Check for any burrs or raised edges along the cut line. These can be removed using a file or sandpaper. Smooth out any rough areas until the tile feels smooth to the touch.
3. Cleaning the Tiles:
Use a damp cloth or sponge to wipe away any dust or debris from the tiles. This will ensure a clean surface for grouting and installation.
4. Inspecting the Tiles:
Before installing the tiles, inspect them for any chips or cracks that may have occurred during cutting. If any tiles are damaged, replace them with new ones to maintain a seamless finish.
5. Organizing the Tiles:
As you finish cutting and cleaning each tile, stack them in an organized manner to prevent any damage. Use tile spacers to keep the tiles evenly spaced and aligned.
 |
Pro Tip: Always wear protective gloves and goggles when working with tile cutters to prevent injuries from flying tile shards. |
Following these steps will ensure that your tile cutting project with the Qep Hand Tile Cutter is completed with professional-looking results. Remember to work slowly and carefully to achieve the best outcome.