Setting up a dynamometer for quads can be a complex process, but with the right equipment and knowledge, it can be done efficiently. A dynamometer, also known as a dyno, is a device used to measure the power output of an engine. In the case of quad bikes, a dynamometer can be used to measure the power output of the quad’s engine and assess its performance.
To set up a dynamometer for quads, you will need a few key components. Firstly, you will need the dynamometer itself, which consists of a load unit and a measuring unit. The load unit applies a controlled resistance to the quad’s engine, while the measuring unit calculates and displays the power output. Additionally, you will need a computer with the necessary software to control and monitor the dynamometer.
Once you have the necessary equipment, you can begin the setup process. Start by connecting the load unit to the quad’s engine. This is typically done by attaching a hub to the quad’s rear axle or by connecting the load unit directly to the quad’s drivetrain. Make sure the connections are secure and the load unit is properly aligned with the quad’s engine.
Next, connect the measuring unit to the load unit and the computer. Ensure that all the cables are properly connected and that the measuring unit is securely attached to the load unit. Once everything is connected, you can calibrate the dynamometer by entering the necessary settings into the software on your computer. This may involve inputting the quad’s weight, tire characteristics, and other variables that can affect the accuracy of the power measurement.
After calibration, you can start the quad’s engine and begin the dyno test. The load unit will apply resistance to the engine, and the measuring unit will calculate and display the power output. Monitor the dyno test closely, making note of any unusual readings or issues that may arise. Once the test is complete, you can analyze the data and make any necessary adjustments to optimize the quad’s performance.
Overview of Dynamometer Quads
A dynamometer quad is a piece of equipment used to measure and analyze the performance of quadcopters and other unmanned aerial vehicles (UAVs). It is an essential tool for researchers, engineers, and hobbyists who want to fine-tune and optimize the flight characteristics of their quadcopters.
The dynamometer quad consists of a motor dynamometer, a load dynamometer, and various sensors. The motor dynamometer measures the power output and efficiency of the quadcopter’s motors, while the load dynamometer simulates the forces the quadcopter experiences during flight. The sensors collect data on various parameters such as thrust, torque, RPM, voltage, current, and temperature.
Benefits of Using a Dynamometer Quad
Using a dynamometer quad offers several benefits:
- Performance Analysis: With a dynamometer quad, you can accurately measure and analyze the performance of your quadcopter, including its thrust-to-weight ratio, power consumption, and overall efficiency.
- Tuning and Optimization: By collecting data on different flight parameters, you can fine-tune and optimize your quadcopter’s flight characteristics, such as stability, maneuverability, and endurance.
- Research and Development: For researchers and engineers, a dynamometer quad provides a valuable tool for studying and developing new propulsion systems, motor designs, and control algorithms.
- Safety Testing: A dynamometer quad can be used to perform safety tests, such as overload and endurance tests, to assess the quadcopter’s ability to withstand extreme conditions and stress.
Setting Up a Dynamometer Quad
Setting up a dynamometer quad involves the following steps:
- Selection of Dynamometer: Choose a suitable motor dynamometer and load dynamometer based on the specifications and requirements of your quadcopter.
- Installation: Install the dynamometers on a rigid frame or test stand, ensuring that they are securely fastened and aligned with the quadcopter’s motors.
- Calibration: Calibrate the dynamometers and sensors to ensure accurate and reliable measurements. This typically involves zeroing and scaling the sensors and verifying their outputs against known standards.
- Data Collection: Connect the dynamometers and sensors to a data acquisition system or computer, which will collect and record the measurements during the testing process.
- Testing and Analysis: Conduct various test flights to collect data on different flight parameters. Analyze the data to understand the quadcopter’s performance and make any necessary adjustments or optimizations.
By setting up and using a dynamometer quad, you can gain valuable insights into the performance and behavior of your quadcopter, leading to improved flight characteristics and overall performance.
Step 1: Understanding Dynamometers
A dynamometer is a device that is used to measure and analyze the power and torque outputs of an engine or a motor. It is commonly used in automotive, aerospace, and industrial applications to evaluate the performance and efficiency of various mechanical systems.
What is a Dynamometer?
A dynamometer, also known as a dyno, is essentially a machine that is designed to simulate the workload on an engine or motor. It applies a controlled resistance to the engine or motor and measures the output parameters such as torque, power, speed, and fuel consumption. This helps in determining the performance characteristics and efficiency of the engine or motor under different operating conditions.
Types of Dynamometers
There are several types of dynamometers available, each designed for specific applications and power outputs. Some common types include:
- Engine Dynamometers: These dynamometers are used to measure the power and torque output of internal combustion engines.
- Chassis Dynamometers: These dynamometers are designed to test the performance of whole vehicles, including cars, motorcycles, and trucks.
- Eddy Current Dynamometers: These dynamometers use electromagnetic induction to generate resistance and measure the power and torque outputs.
- Hydraulic Dynamometers: These dynamometers use hydraulic fluid to generate resistance and measure the power and torque outputs.
- Electric Dynamometers: These dynamometers use electrical resistance to generate the workload and measure the power and torque outputs.
Understanding the different types of dynamometers will help you choose the most suitable one for your specific testing needs. It is important to consider factors such as power capacity, accuracy, and compatibility with your engine or motor.
Step 2: Selecting a Suitable Dynamometer for Quads
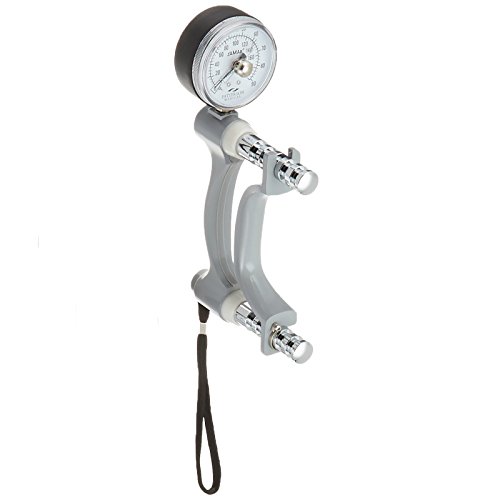
When setting up a dynamometer for quads, it is important to select a suitable dynamometer that can accurately measure the power output and torque of the quad muscles. Here are some factors to consider when selecting a dynamometer:
- Type of Dynamometer: There are different types of dynamometers available, such as isokinetic, isometric, and isotonic. Each type has its own advantages and disadvantages, so it is important to choose one that best suits your specific needs.
- Measurement Range: Consider the measurement range of the dynamometer. Make sure it is able to accommodate the power output and torque levels of the quad muscles during different types of exercises or movements.
- Accuracy: Look for a dynamometer that provides accurate and reliable measurements. Check for calibration and certification to ensure its accuracy.
- Software Compatibility: If you plan to analyze and record the data collected by the dynamometer, check if it is compatible with the software or analysis tools you intend to use. This will make it easier to track progress and make adjustments to your training program.
- User-friendly Interface: The dynamometer should have an easy-to-use interface that allows you to quickly and efficiently set up and perform tests. Look for features such as programmable protocols and customizable settings.
- Cost: Consider your budget when selecting a dynamometer. Keep in mind that higher-end models may offer more advanced features and better accuracy, but they may also come at a higher price.
By considering these factors and thoroughly researching different options, you can select a suitable dynamometer that meets your needs and allows you to accurately measure the performance of your quad muscles.
Step 3: Installation and Setup of Dynamometer Quads
Once you have purchased a dynamometer for your quads, it’s time to install and set it up properly. Follow these steps to ensure a successful installation:
1. Choose a Suitable Location
Select a location for your dynamometer that provides enough space for the quads to be securely mounted and operated. Make sure the floor is level and stable to prevent any accidents or damage. Additionally, ensure that the area has proper ventilation to prevent overheating during use.
2. Secure the Dynamometer
Use appropriate mounting hardware to securely attach the dynamometer to the floor or a sturdy workbench. This will prevent any movement or vibrations during testing, ensuring accurate results. Follow the manufacturer’s instructions for proper installation and tightening torque.
3. Connect Power and Data Cables
Connect the power cable of the dynamometer to a suitable power source, following safety guidelines and local regulations. Make sure to use the correct voltage and amperage to avoid any damage to the dynamometer. Additionally, connect the data cable to the appropriate interface on the dynamometer and the computer or data acquisition system.
4. Set Parameters and Calibration
Before using the dynamometer, it’s important to set the parameters and calibrate it according to your specific requirements. This may involve adjusting settings such as load capacity, speed range, and sensitivity. Refer to the user manual provided by the manufacturer for detailed instructions on parameter setup and calibration.
5. Test and Verify
Once the dynamometer is properly installed and calibrated, perform a test run to ensure everything is working correctly. Test the quads at various speeds and loads to verify the accuracy and reliability of the dynamometer readings. If any issues arise, refer to the troubleshooting section of the user manual or seek assistance from the manufacturer.
Following these steps will help you correctly install and set up your dynamometer quads, allowing you to accurately measure and monitor their performance.
Step 4: Calibration and Testing of Dynamometer Quads
Calibration and testing are crucial steps in setting up a dynamometer for quadriceps muscle testing. Follow the steps below to ensure accurate and reliable results.
1. Start by connecting the dynamometer to the appropriate power source and turning it on. Allow the device to warm up for at least 15 minutes before starting the calibration process.
2. Set the dynamometer to the desired testing mode, such as isometric or isotonic, depending on the specific requirements of your study or assessment. Refer to the manufacturer’s instructions for guidance on the correct settings.
3. Attach the dynamometer to the subject’s leg following the manufacturer’s recommendations. Ensure that the attachment is secure and properly aligned with the quadriceps muscle group.
4. With the dynamometer in place, perform a zero calibration to eliminate any measurement errors caused by gravitational forces or external factors. Follow the manufacturer’s instructions to perform this calibration accurately.
5. Once the zero calibration is complete, proceed to the actual calibration process. Apply known forces or weights to the dynamometer and record the corresponding measurements. Compare these measurements to the expected values to ensure the accuracy of the dynamometer readings.
| Force Applied (lb) | Measured Value (lb) | Error (%) |
|---|---|---|
| 10 | 9.8 | 1.0 |
| 20 | 19.7 | 1.5 |
| 30 | 30.2 | 0.6 |
6. If the measurements deviate significantly from the expected values, repeat the calibration process until satisfactory results are obtained. This may involve adjusting the dynamometer settings or repositioning the attachment on the subject’s leg.
7. After calibration, it is important to perform preliminary tests on healthy individuals to establish a reference range of values for quadriceps muscle strength. This will aid in comparing the results of future tests to determine any abnormalities or improvements in muscle function.
8. Finally, document the calibration process and any adjustments made. This information is vital for maintaining the integrity and reliability of the dynamometer over time.
By following these calibration and testing procedures, you can ensure accurate and consistent results when using a dynamometer to assess quadriceps muscle strength.
Step 5: Troubleshooting and Maintenance of Dynamometer Quads
Proper troubleshooting and maintenance are essential to ensure the reliable performance and longevity of your dynamometer quads. Regular maintenance checks and timely problem-solving can help prevent costly repairs and minimize downtime. Here are some tips for troubleshooting and maintaining your dynamometer quads:
1. Regular Inspection:
Perform routine inspections to check for any signs of wear or damage. Look for loose bolts, frayed cables, or any other issues that may affect the operation of the dynamometer quads. Address any problems promptly to prevent further damage.
2. Lubrication:
Proper lubrication is crucial to ensure smooth operation and extend the lifespan of the dynamometer quads. Follow the manufacturer’s guidelines for lubrication intervals and use the recommended lubricants. Apply lubrication to moving parts such as pulleys, bearings, and cables.
3. Calibration:
Regular calibration is necessary to maintain the accuracy of the dynamometer quads. Follow the manufacturer’s guidelines for calibration intervals and procedures. Calibration ensures that the readings provided by the dynamometer quads are precise and reliable.
4. Cleaning:
Keep your dynamometer quads clean from dirt, debris, and other contaminants. Regularly clean all surfaces, including the cables, pulleys, and sensors. Use a mild detergent and a soft cloth to remove any built-up grime. Avoid using harsh chemicals that may damage the equipment.
5. Troubleshooting:
If you encounter any issues with your dynamometer quads, refer to the manufacturer’s troubleshooting guide. The guide should provide you with step-by-step instructions to diagnose and resolve common problems. Follow the recommended troubleshooting procedures carefully.
6. Professional Assistance:
If you are unable to resolve the issue on your own or if there are complex problems, seek professional assistance. Contact the manufacturer or a qualified technician who has experience with dynamometer quads. They can provide the necessary expertise to diagnose and repair any issues.
By following these steps and maintaining your dynamometer quads properly, you can ensure their optimal performance and extend their lifespan. Regular maintenance and timely troubleshooting will help you address any problems quickly and prevent major breakdowns.
Step 6: Advanced Features and Upgrades for Dynamometer Quads
Once you have set up your dynamometer quads and are familiar with their basic operation, there are several advanced features and upgrades that you can consider implementing to enhance their performance and functionality. These features and upgrades can provide you with more precise data and make your testing process more efficient.
Here are some advanced features and upgrades you can explore:
|
1. Load Control |
Consider adding load control capabilities to your dynamometer quads. This feature allows you to maintain a constant load on the quads during testing, providing a more realistic simulation of real-world conditions. |
|
2. Data Acquisition Systems |
Upgrade your data acquisition system to a more advanced one. A high-quality data acquisition system can provide you with more accurate and detailed data, allowing you to make more informed decisions based on the test results. |
|
3. Control Software |
Consider upgrading the control software of your dynamometer quads. Advanced control software can offer additional features, such as customizable test profiles, real-time data visualization, and remote control capabilities. |
|
4. Sensor Upgrades |
Upgrade the sensors used in your dynamometer quads. More advanced sensors can provide better accuracy and faster response times, allowing you to capture more precise data during testing. |
|
5. Calibration Procedures |
Develop and implement calibration procedures for your dynamometer quads. Regular calibration ensures that your quads are providing accurate and reliable data, reducing the chances of measurement errors. |
By implementing these advanced features and upgrades, you can take your dynamometer quads to the next level and improve the overall testing experience. Remember to carefully research and evaluate each option before making any changes to ensure compatibility and optimal performance.