


Squaring is an essential part of many construction and home improvement projects. Whether you’re building a deck, installing tile, or framing walls, achieving perfect right angles is crucial for ensuring that your project is structurally sound and visually appealing. One powerful tool that can help you achieve accurate squareness is a laser level.
A laser level is a versatile tool that emits a laser beam to create a level or plumb reference line. It is commonly used by professionals and DIY enthusiasts alike for various applications, including leveling and aligning objects, measuring distances, and, of course, squaring.
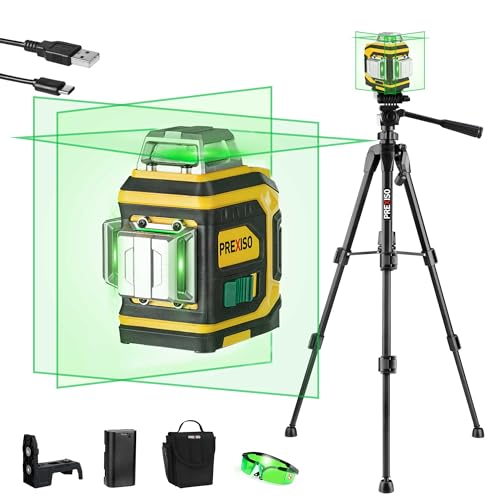
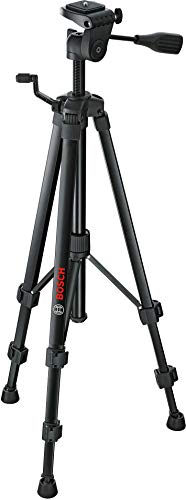
When it comes to squaring with a laser level, there are a few steps you can follow to ensure accurate results. First, position your laser level on a sturdy tripod or mount it securely to a wall, depending on your project’s needs. Make sure the laser is level and stable. Next, turn on the laser and adjust the beam’s height and rotation speed as necessary.
Once the laser level is set up correctly, you can begin squaring your project. Start by aligning the laser beam along one side of the area you want to square. For example, if you’re framing a wall, position the laser beam along one edge of the wall. Then, use a measuring tape to mark a point along the opposite edge of the area, at a distance equal to the desired square length. Move the laser level along the first edge while keeping the beam aligned with the marked point.

Repeat the process on the adjacent side, making sure the laser beam aligns with the marked point. If the laser beam deviates from the mark, adjust the position of the wall until the beam aligns accurately. Once the laser beam aligns with the marked point on both sides, you have achieved a square angle.
Squaring with a laser level can save you time and effort compared to traditional methods. It provides a visual reference that allows for quick adjustments and ensures precise squareness. Whether you’re a professional contractor or a DIY enthusiast, incorporating a laser level into your projects can significantly improve the accuracy and quality of your work.
What is a Laser Level?
A laser level is a handheld or mounted device that emits a laser beam to provide a reference line or plane for measuring or aligning objects. It is commonly used in construction, surveying, and other industries to ensure accuracy and precision in various tasks.
The laser level emits a straight and highly visible beam of light that can be projected horizontally, vertically, or both. This beam serves as a guide for aligning objects, such as walls, floors, shelves, and electrical installations, ensuring that they are perfectly level or plumb.
Laser levels are equipped with leveling mechanisms that allow them to be adjusted and set at the desired angle or position. Some laser levels also have the ability to project multiple beams, creating a grid or crosshair pattern to aid in more complex alignment tasks.
One of the key advantages of using a laser level is its accuracy and ease of use. The laser beam provides a clear visual reference that eliminates the need for traditional spirit levels or plumb bobs, which can be time-consuming and less accurate. Laser levels also allow for faster and more efficient work, as they can cover larger distances and provide precise measurements.
| Advantages of Laser Levels: |
| 1. Accurate and precise measurements |
| 2. Time-saving and efficient |
| 3. Versatile and can be used for various applications |
| 4. Easy to use and adjust |
| 5. Provides a visual reference for alignment |
Overall, laser levels are valuable tools that help ensure accurate and professional results in a wide range of projects. Whether you are hanging pictures, installing shelves, or constructing a building, a laser level can greatly simplify and improve the accuracy of your work.
Why Use a Laser Level to Square?
When it comes to squaring, using a laser level can provide several advantages over manual methods. A laser level is a precision instrument that emits a laser beam to create a straight and level reference line. This reference line can be used to determine if a surface or object is perfectly square.
Here are some reasons why using a laser level to square is beneficial:
| Accuracy: | A laser level provides a highly accurate reference line, ensuring precise measurements when squaring. This eliminates human error and ensures that your squares are perfectly aligned. |
| Efficiency: | Using a laser level to square saves time and effort compared to traditional methods. The laser beam helps you quickly identify any deviations from a square shape, allowing for prompt adjustments. |
| Versatility: | Laser levels can be used in various applications, including construction, woodworking, and layout tasks. They can be easily adjusted and positioned to create horizontal, vertical, or diagonal reference lines for different squaring needs. |
| Visibility: | The laser beam emitted by a laser level is highly visible, even in bright or outdoor settings. This makes it easier to see and align the reference line accurately, ensuring precise squaring in different lighting conditions. |
| Consistency: | Using a laser level ensures consistent squaring throughout a project. Once the initial reference line is established, it can be used as a guide for multiple squares, ensuring uniformity and accuracy across different surfaces or objects. |
In summary, using a laser level to square offers unparalleled accuracy, efficiency, versatility, visibility, and consistency. It is a valuable tool for achieving precise and professional-looking square shapes in various applications. Invest in a high-quality laser level and experience the benefits it brings to your squaring tasks.
Step 1: Setting Up the Laser Level
Before you begin squaring with a laser level, you need to properly set up the laser level equipment. Follow these steps to ensure accurate measurements:
- Choose a stable and level surface to place the laser level. It’s important to have a solid foundation to prevent any movement or wobbling during the measurement process.
- Position the laser level at the desired starting point of the square. This could be a corner or any other landmark that you want to align your measurements with.
- Adjust the height of the laser level so that it is at the appropriate level for your measurements. You may need to use a tripod or other stabilizing device to achieve the desired height.
- Make sure the laser level is turned on and properly calibrated. Refer to the manufacturer’s instructions for specific calibration procedures.
- Check the accuracy of the laser level by measuring a known distance. Use a measuring tape or ruler to verify that the laser’s projection matches the expected measurement.
- If necessary, fine-tune the laser level’s position and height to achieve the desired alignment and accuracy.
- Once you are satisfied with the setup, you can proceed to the next steps of squaring with the laser level.
By correctly setting up the laser level, you can ensure accurate and reliable measurements throughout the squaring process.
Calibrating the Laser Level
Before using a laser level for squaring, it is important to ensure that the device is properly calibrated. Calibration ensures that the laser beam is accurately aligned and provides accurate measurements. Here are the steps to calibrate your laser level:
Step 1: Check the Batteries
Make sure the battery level is sufficient for operation. Low batteries can affect the accuracy of the laser level.
Step 2: Set up the Laser Level
Place the laser level on a stable surface or mount it securely on a tripod. Ensure that the device is level using a bubble level or built-in leveling mechanism.
Step 3: Activate the Laser Level
Turn on the laser level and allow it to self-level. This may involve an automatic leveling process or manual adjustment if necessary.
Step 4: Align the Laser Beam
Using the adjustable knobs or buttons, align the laser beam with a known reference point. This can be a wall or a mark on the floor.
Step 5: Check for Accuracy
Use a measuring tape or ruler to measure the distance between multiple points along the laser beam. The measurements should be consistent and match the expected distances.
By following these calibration steps, you can ensure that your laser level is accurately squared and provides reliable measurements for your projects.
Securing the Laser Level in Position
When using a laser level to square an area, it is crucial to secure the device in a stable position. This will ensure accurate measurements and reliable results. Here are some steps to follow when securing a laser level in position:
1. Choose a sturdy surface: Place the laser level on a stable and level surface such as a tripod, table, or floor. Make sure the surface is free from any vibrations or movements that could affect the accuracy of the laser beam.
2. Adjust the height: Set the height of the laser level according to the desired measurement level. Use the adjustable legs or column of the tripod to achieve the desired height. Ensure that the laser level is positioned at a comfortable working height for easy visibility.
3. Lock the position: Most laser levels come with a locking mechanism to secure the position. Once the laser level is set at the desired height and position, use the locking mechanism to prevent any accidental movement or adjustment. This will help maintain the accuracy of the laser beam throughout the squarement process.
4. Check for stability: After locking the laser level in position, give it a slight shake or tap to ensure it is securely fixed. If there is any wobbling or instability, readjust the position and locking mechanism until the laser level is firmly secured.
5. Test the laser beam: Before proceeding with the squarement process, double-check the laser beam to ensure it is level and aligned correctly. Rotate the laser level and observe if the beam stays consistent and aligned with the desired measurement lines or markers.
By following these steps for securing the laser level in position, you can ensure accurate measurements and effectively square an area using a laser level.
Step 2: Finding a Reference Point
Once you have your laser level set up on a stable surface and turned on, the next step is to find a reference point.
This reference point will serve as the starting point for squaring your measurements. It should be a fixed object or surface that you can easily measure from.
Identifying the Reference Point
Look around the room and identify a suitable reference point. It could be a wall corner, a door frame, or any other stable and easily identifiable feature.
Make sure that the reference point is in close proximity to the area you will be working on. This will ensure that your measurements are accurate and consistent.
Marking the Reference Point
Once you have identified the reference point, use a pencil or a marker to mark it. This will make it easier for you to measure from it later on.
Make the mark visible and clear so that you can easily refer back to it as you square with the laser level.
Pro tip: If you are working on a larger room or space, consider marking multiple reference points around the area. This will help you ensure that your measurements are accurate from different angles.
Remember: The reference point is crucial for squaring with a laser level. Take the time to find and mark it accurately before moving on to the next step.
Using an Existing Wall or Corner
To square with a laser level using an existing wall or corner, follow these steps:
- Set up the laser level: Place the laser level on a stable surface, such as a tripod or a flat table.
- Aim the laser: Rotate the laser level until the laser beam aligns with the existing wall or corner.
- Mark the laser line: Use a pencil or a marker to mark the laser line on the wall or floor.
- Measure the distance: Use a tape measure or a ruler to measure the distance from the laser line to the opposite corner or wall.
- Adjust as needed: If the measured distance is not the same as the laser line, adjust the position of the laser level until the desired squareness is achieved.
- Verify with additional measurements: Check the squareness by measuring the distance from the laser line to other corners or walls to ensure consistent squareness throughout the space.
By using an existing wall or corner as a reference point, you can quickly and accurately square a room or space using a laser level.

Creating a Temporary Reference Point
To ensure accuracy when squaring with a laser level, it is important to create a temporary reference point. This reference point will serve as a fixed point to align the laser level and ensure that the measurements are correct.
To create a temporary reference point, follow these steps:
Step 1: Choose a visible spot
Select a visible spot on the wall or floor where you want to establish the reference point. This spot should be easily recognizable and accessible. It is recommended to choose a point that is close to the area you will be working on.
Step 2: Mark the spot
Once you have chosen the spot, use a pencil or a removable marker to mark it. Make sure the mark is clear and visible.
Note: If you are working on a wall, make sure the mark is at eye level or slightly above to ensure easy visibility.
Step 3: Align the laser level
Place the laser level on a stable surface and turn it on. Position the laser so that the beam intersects with the temporary reference point. Adjust the level and height of the laser until the beam is aligned with the mark. This will help establish a straight and level reference line.
Tip: It may be helpful to use a leveling bubble or an additional level to ensure the laser level is perfectly aligned.
By creating a temporary reference point and aligning the laser level to it, you can ensure accuracy and precision when squaring. This will help you achieve straight and level lines, making your projects look professional and well-executed.