Whether you are a professional contractor or a DIY enthusiast, having the right tools is essential for any project. One tool that can greatly simplify your work is a cross level laser. This versatile device allows you to easily and accurately determine angles and alignment, making it perfect for tasks such as installing cabinets, laying tile, or hanging pictures.
Using a cross level laser may seem intimidating at first, but with a little practice, you’ll be able to achieve professional results with ease. The first step is to set up the laser on a stable surface or mount it on a tripod. Make sure the laser is level by adjusting the bubble vials or using the built-in leveling mechanism.
Once the laser is level, you can start measuring angles. Simply position the laser at the desired height and rotate it until the laser line aligns with the reference point or surface. Use a measuring tape or ruler to determine the angle, or use the digital display if your cross level laser has one. If you need to adjust the angle, simply rotate the laser until it aligns with the new position.
Using a cross level laser also allows you to easily transfer angles and measurements to other surfaces. Simply position the laser at the desired angle, then use a pencil or marker to mark the corresponding points on the surface. This ensures accurate alignment and eliminates the guesswork involved in manual measurements.
With its versatility and ease of use, a cross level laser is a must-have tool for any DIYer or professional contractor. It not only saves you time and effort, but also ensures precise and accurate measurements, resulting in professional-looking results every time.
What is a Cross Level Laser?
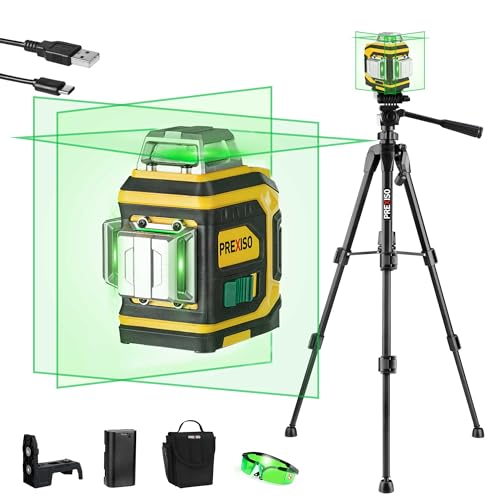
A cross level laser is a precision tool used in construction and other industries to accurately measure and set angles. It is designed to project a laser beam in the shape of a cross, which can be used to align objects or make exact measurements.
The cross level laser consists of a laser emitter and a leveling mechanism. The laser emitter produces a highly visible laser beam, while the leveling mechanism ensures that the laser beam is perfectly horizontal or vertical, depending on the desired application.
One of the main advantages of using a cross level laser is its ability to project a laser beam at any angle. This makes it ideal for situations where objects need to be aligned or set to a specific angle, such as installing cabinets or laying out a tiled floor.
The laser beam projected by a cross level laser is bright and easy to see, even in brightly lit environments or in outdoor settings. This makes it highly visible and allows for precise alignment and measurement.
Using a cross level laser is relatively simple. The laser level is typically mounted on a tripod or a stand, and the laser beam is projected onto the surface or object that needs to be aligned. The user can then adjust the position of the object until it lines up perfectly with the laser beam.
In addition to its use in construction, cross level lasers are also used in surveying, landscaping, and other applications where precise measurements and alignments are required. They are a valuable tool for professionals and DIYers alike, providing accuracy and efficiency in a wide range of projects.
| Benefits of using a cross level laser: |
|---|
| – Accurate and precise measurements |
| – Easy to use and adjust |
| – Highly visible laser beam |
| – Can be used at any angle |
| – Saves time and effort |
Benefits of Using a Cross Level Laser
Using a cross level laser can bring numerous benefits to both professionals and DIY enthusiasts. Here are some of the advantages of using a cross level laser for any angle:
Precision Measurement
A cross level laser enables highly accurate measurements, ensuring precise alignment and leveling. With its laser beams intersecting at a perfect 90-degree angle, it allows for quick and precise measurements for projects such as installing tiles, building shelves, or hanging pictures.
Time and Cost Efficiency
By using a cross level laser, you can save time and reduce the risk of errors. The laser beams provide a visual guide, eliminating the need for manual calculations or trial and error methods. This leads to faster completion of projects and reduces material wastage, ultimately saving time and money.
Increased Versatility
One of the main advantages of a cross level laser is its versatility. It can be used for a wide range of applications, including framing, carpentry, plumbing, electrical work, and more. Whether you are a professional contractor or a DIY enthusiast, a cross level laser can prove to be an essential tool in your arsenal.
Ease of Use
A cross level laser is designed to be user-friendly, even for beginners. The simple operation and intuitive controls make it easy to use and manipulate. The laser beams are highly visible, even in various lighting conditions, making it convenient to work in different environments.
Improved Safety
Using a cross level laser promotes safety by minimizing the risk of accidents. With precise measurements and alignments, there is less chance of structural instability or incorrect installations that could lead to accidents or damage.
In conclusion, a cross level laser is a valuable tool that offers precision, efficiency, versatility, ease of use, and improved safety. Whether you are a professional or a DIY enthusiast, incorporating a cross level laser into your projects can significantly enhance your results.
Using a Cross Level Laser
A cross level laser is a versatile tool that can be used for a wide range of applications. Whether you are a professional tradesperson or a DIY enthusiast, a cross level laser can help you achieve accurate and precise measurements.
When using a cross level laser, it is important to first set it up correctly. Place the laser on a stable surface or mount it on a tripod to ensure that it does not move during use. Make sure the laser is level by adjusting the leveling screws or using the built-in leveling mechanism. Once the laser is level, it is ready to be used.
To use the cross level laser, simply turn it on and project the laser beam onto the surface you want to measure. The laser beam will create a horizontal line and a vertical line, forming a cross shape. You can then use the laser beam as a reference point to measure distances or align objects.
One of the key advantages of using a cross level laser is that it allows you to measure angles accurately. Whether you need to find a 90-degree angle or a specific angle for a miter joint, a cross level laser can help you achieve precise results. Simply rotate the laser beam until it aligns with the angle you want to measure, and then use a protractor or other measuring tool to determine the angle.
Additional Tips for Using a Cross Level Laser
Here are some additional tips to help you make the most of your cross level laser:
- Always wear protective goggles when using a cross level laser to protect your eyes from the laser beam.
- Consider using a laser enhancement target or receiver if you are working in bright or outdoor environments where the laser beam may be difficult to see.
- Before using the cross level laser, ensure that the battery is fully charged or replace it with a fresh one to avoid interruptions during use.
- Take care to avoid aiming the laser beam at reflective surfaces, as it may cause unwanted reflections and inaccuracies in measurements.
By following these tips and using the cross level laser correctly, you can make your measurements more accurate and your projects more efficient. Take the time to familiarize yourself with the features and functions of your cross level laser, and you will be able to tackle any project with confidence.
Step 1: Set Up the Laser
1. Choose a stable surface: Find a flat and sturdy surface to set up the cross level laser. This can be a table, countertop, or any other surface that provides stability during operation.
2. Position the laser: Place the cross level laser at the desired location on the surface. Ensure that it is aligned correctly and facing in the direction you want to measure or project the cross lines.
3. Adjust the height: Use the adjustable legs or base of the laser to set the desired height. This will depend on the specific requirements of your project or task. Make sure the laser is securely positioned at the desired height.
4. Check the leveling: Turn on the laser and check if it is level. Most cross level lasers have a built-in leveling feature that indicates if the laser is perfectly horizontal or vertical. Use the leveling indicators to make any necessary adjustments.
5. Secure the laser: Once the laser is level and positioned correctly, secure it in place using the provided mounting accessories or clamps. This will ensure that the laser remains stable during operation, even if there is movement or vibrations in the surrounding area.
6. Calibration: Before using the laser to measure or project angles, it is important to calibrate it according to the manufacturer’s instructions. Follow the calibration steps provided in the user manual to ensure accurate and reliable results.
By following these steps, you will be able to set up the cross level laser for any angle measurement or projection task effectively and accurately.
Step 2: Adjust the Angle
Once you have set up your cross level laser, the next step is to adjust the angle. This is important to ensure accurate measurements and precise alignment.
Here’s how you can do it:
1. Secure the Cross Level Laser
Make sure the cross level laser is firmly secured on a stable surface or mounted on a tripod. This will help prevent any movement or shaking that could affect the accuracy of the measurements.
2. Turn on the Laser
Press the power button or switch to turn on the laser. The laser beam will start emitting a bright red light.
3. Rotate the Laser
Rotate the laser module or the tripod head to adjust the angle of the laser beam. You can use the markings or degree indicators on the laser module or tripod head to guide you in adjusting the laser to the desired angle.
Note: Some cross level lasers come with a digital level or inclinometer that displays the angle. You can use this feature to set the laser angle more accurately.
4. Check the Alignment
Once you have adjusted the angle, check the alignment of the laser beam. It should be aligned with the desired reference point or line. You can use a visual target or a laser receiver to verify the alignment.
5. Fine-tune the Angle
If the laser beam is not aligned as desired, make small adjustments to the angle until you achieve the desired alignment. Repeat the process of checking the alignment and making adjustments until you are satisfied with the results.
Remember: Take your time when adjusting the angle to ensure accuracy. It is better to be precise than to rush and end up with incorrect measurements.
Step 3: Use the Laser for Precision Measurements
Now that you have set up your cross level laser, you can use it to make precise measurements for any angle. Follow these steps to ensure accurate results:
- Position the laser at the desired starting point.
- Turn on the laser and adjust the height and rotation to align the laser beam with the target point.
- Securely fix the laser in place to avoid any movement.
- Use a measuring tape or ruler to mark the distance between the laser and the target point.
- Repeat the process for the desired end point and mark the distance.
- Subtract the starting point distance from the end point distance to obtain the precise measurement for the desired angle.
Remember to take precautions while using the laser to ensure accurate measurements. Avoid any obstructions or interference with the laser beam and always double-check your measurements for accuracy. With practice, you will become skilled in using the cross level laser for any angle you need.