Using a laser level for concrete projects can greatly improve the accuracy and efficiency of your work. Whether you need to lay down a concrete foundation, create a level surface for flooring, or construct a retaining wall, a laser level can provide precise measurements and ensure that your concrete is level and evenly distributed.
One of the main advantages of using a laser level for concrete is that it eliminates the need for traditional leveling methods such as manual leveling tools and string lines. With a laser level, you can easily mark the desired level on the walls or stakes, set up the laser level, and instantly see if the concrete needs to be adjusted. This saves a significant amount of time and effort, especially for large concrete projects.
Before using a laser level for concrete, it is important to ensure that the laser level is properly calibrated and set up. This involves checking the battery life, adjusting the leveling feet or tripod to ensure stability, and confirming that the laser beam is visible and centered. Once the laser level is set up correctly, you can begin using it to measure and mark the desired level on the concrete surface.
To use a laser level for concrete, start by placing the laser level on a stable surface or tripod. Make sure it is positioned at the correct height and angle according to your project requirements. Next, turn on the laser level and adjust the beam until it aligns with your desired level. You can use a bubble vial or electronic leveling feature to help you achieve the correct alignment. Once the laser level is aligned, mark the laser line on the walls or stakes surrounding the concrete area.
When pouring the concrete, use the marked laser line as a guideline to ensure that the concrete is level and evenly distributed. Make any necessary adjustments to the concrete surface as needed, using a screed or trowel. Continuously check the laser line as you work to ensure that the concrete is staying level and on track. Once the concrete is poured and leveled, remove any excess material and let it cure according to the manufacturer’s instructions.
In conclusion, using a laser level for concrete projects can greatly improve the accuracy and efficiency of your work. By providing precise measurements and leveling guidance, a laser level can help you achieve a level and evenly distributed concrete surface. Remember to properly calibrate and set up the laser level before using it, and continuously check the laser line as you work to ensure that the concrete is level and on track. With the help of a laser level, you can achieve high-quality concrete results with minimal effort.
Understanding Laser Levels
A laser level is a valuable tool that is commonly used in construction and home improvement projects. It works by projecting a straight, level line onto a surface, making it easier to ensure accuracy and precision. Laser levels are particularly useful when working with concrete, as they can help with tasks such as leveling and aligning forms, checking for slope and grade, and ensuring that surfaces are level and plumb.
There are different types of laser levels available, each with its own features and functions. Here are some key terms and concepts to understand when using a laser level:
- Self-leveling: Many laser levels are equipped with a self-leveling feature, which automatically adjusts the level of the laser line if the device is not perfectly level. This ensures that the projected line is always accurate and straight, even if the tool is not placed on a level surface.
- Manual leveling: Some laser levels require manual leveling, meaning that the user needs to adjust the position of the device until the bubble vials indicate that it is level. This type of laser level may be more affordable but requires more effort to achieve accurate results.
- Visible laser: Laser levels can project either a visible or an invisible laser line. Visible laser levels are easier to use as the projected line is visible to the naked eye, making it easier to align and adjust. Invisible laser levels, on the other hand, require the use of a receiver to detect the laser line.
- Receiver: A laser level receiver is a device that is used to detect the laser line emitted by an invisible laser level. It is helpful when working outdoors or in bright environments where the visibility of the laser line may be affected.
- Range: Laser levels have a specified range within which they can project a level line. The range is typically measured in feet or meters and indicates the maximum distance at which the laser line can be seen or detected.
When using a laser level for concrete projects, it is important to follow the manufacturer’s instructions and take safety precautions. Always ensure that the laser level is securely positioned and protected from moisture and other potential hazards. Additionally, wear appropriate safety equipment, such as safety glasses, when working with a laser level.
By understanding the different types and features of laser levels, you can choose the right tool for your concrete project and use it effectively to achieve precise and accurate results.
Get a Clear Understanding of Laser Levels
Using a laser level for concrete projects can greatly enhance accuracy and efficiency. Laser levels are versatile tools that utilize a laser beam to create a straight and level reference line or plane. They are commonly used in construction, carpentry, and other industries where precision is essential.
Types of Laser Levels:
1. Point Lasers: These laser levels emit a single dot and are commonly used for simple alignment tasks. They are easy to use and generally affordable, making them suitable for small-scale concrete projects.
2. Line Lasers: Line laser levels project a straight line or multiple lines onto surfaces. They are ideal for tasks that require accurate leveling or alignment over longer distances.
Benefits of Using a Laser Level for Concrete:
1. Improved Accuracy: Laser levels provide precise measurements and alignments, ensuring that concrete structures are perfectly level and plumb. This minimizes the risk of errors and reduces the need for costly adjustments or rework.
2. Time and Cost Savings: By eliminating the need for manual measurements and string lines, laser levels help save time and improve productivity. They also minimize material waste by ensuring accurate placements, ultimately reducing costs.
3. Enhanced Safety: Using laser levels reduces the chances of human error that can lead to accidents or injuries. With clear reference lines, workers can easily follow the correct layout, minimizing potential hazards.
4. Versatility: Laser levels are not only useful for concrete projects. They can be utilized for various tasks, such as installing ceiling fixtures, aligning tiles, or hanging shelves. This versatility makes them a valuable tool for any DIY enthusiast or professional.
By understanding the different types of laser levels and their benefits, you can choose the most suitable one for your concrete project. Laser levels offer unparalleled accuracy, time savings, increased safety, and versatility. They are essential tools for any construction or DIY project where precision is paramount.
Preparing the Concrete Surface
Before using a laser level for concrete, it is crucial to ensure that the concrete surface is properly prepared. This will help to ensure accurate and reliable results.
Clean the Surface
The first step in preparing the concrete surface is to clean it thoroughly. Remove any debris, dust, or loose particles that may be present. This can be done by using a broom or a brush to sweep away any loose materials. If necessary, use a power washer to remove stubborn dirt or stains.
It is essential to have a clean surface, as any dirt or debris can interfere with the laser level’s accuracy. A dirty surface may cause the laser beam to bounce off particles, resulting in incorrect readings.
Level the Surface
Next, it is important to ensure that the concrete surface is level. Use a level tool to check for any uneven areas or slopes. If there are any high or low spots, they need to be addressed and corrected.
If the surface is uneven, it can affect the accuracy of the laser level. Leveling the surface will help to ensure that the laser beam reflects accurately and provides reliable measurements.
Depending on the extent of the unevenness, various methods can be employed to level the surface. This can include using self-leveling compounds, grinding down high spots, or adding additional concrete to low areas.
| Step | Action |
|---|---|
| 1 | Clean the surface |
| 2 | Level the surface |
| 3 | Address any uneven areas |
Properly Prepare the Concrete Surface for Leveling
Before using a laser level to achieve a level surface on your concrete, it is crucial to properly prepare the concrete surface. Follow these steps to ensure a successful leveling process:
1. Clear the Area
Before you begin, remove any debris, dirt, or obstructions from the area where you will be working. This will provide a clean and even surface for the leveling process.
2. Clean the Concrete
Thoroughly clean the concrete surface to remove any dirt, dust, or stains. Use a broom or a pressure washer to achieve a clean surface. Cleaning the concrete will help the leveling material adhere properly.
3. Repair any Cracks
If there are any cracks or damaged areas on the concrete surface, it is essential to repair them before leveling. Use a concrete patching compound or epoxy to fill in the cracks and ensure a smooth and level surface.
4. Moisturize the Concrete
Prior to applying the leveling material, wet the concrete surface with water. This will prevent the concrete from absorbing moisture from the leveling material too quickly, which can cause cracking or uneven drying.
5. Prime the Surface
Applying a concrete primer is optional but recommended. A primer can improve the bond between the leveling material and the concrete, ensuring a strong and durable surface. Follow the manufacturer’s instructions for proper application.
6. Mix and Apply the Leveling Material
Prepare the leveling material according to the manufacturer’s instructions. Mix it thoroughly to achieve a smooth consistency. Use a trowel or a screed to spread the leveling material evenly over the concrete surface. Make sure to follow the manufacturer’s recommended thickness for the leveling material.
By properly preparing the concrete surface, you will ensure a solid foundation for leveling with a laser level. Taking the time to complete these steps will result in a level and professional finish for your concrete project.
Setting Up the Laser Level
Before you begin, make sure to read the instructions provided with your laser level. Setting up the laser level correctly is important for accurate results. Here’s how to do it:
- Find a stable surface: Place the laser level on a stable surface such as a tripod or a flat table. Ensure that the surface is level and secure the laser level in place.
- Power on the laser: Turn on the laser level using the power button or switch. Wait for the laser to stabilize and become level. This usually takes a few seconds.
- Adjust the height: If your laser level has an adjustable height feature, set it to the desired height depending on your requirements. Some laser levels come with extendable legs for easy height adjustment.
- Aim the laser: While keeping the laser level stable, align the laser beam with your reference point. You can use the built-in spirit levels or bubble vials to ensure that the laser is level in both the vertical and horizontal directions.
- Lock the laser: Once the laser is aligned and level, lock it in place using the locking mechanism provided. This will prevent any accidental movement of the laser during use.
- Check the laser level: To verify that the laser level is set up correctly, use a measuring tape or ruler to measure the distance between the laser level and the reference point. The measurement should match the required distance.
Once the laser level is set up properly, you are ready to use it for your concrete project. Remember to always follow the safety guidelines and take necessary precautions while working with a laser level.
Step-by-Step Guide to Setting Up a Laser Level
Step 1: Choose an appropriate location to set up your laser level. Make sure the surface is stable and level.
Step 2: Remove any obstacles or debris from the area where you plan to set up the laser level.
Step 3: Turn on the laser level and adjust the height or angle as needed. Refer to the manufacturer’s instructions for specific details on how to adjust your laser level.
Step 4: Position the laser level in the desired location, ensuring that it is stable and secure. Some laser levels come with built-in mounting brackets for easier setup.
Step 5: Adjust the laser level until it emits a steady beam. Use the bubble vials or digital displays on the laser level to ensure it is perfectly level.
Step 6: Once the laser level is set up and level, mark the reference point or line where you want to work with a pencil or tape.
Step 7: Begin your concrete work, using the laser level beam as a guide. Make sure to follow the line or reference point marked in the previous step.
Step 8: Continue checking the laser level periodically during the concrete work to ensure that you are maintaining the correct level.
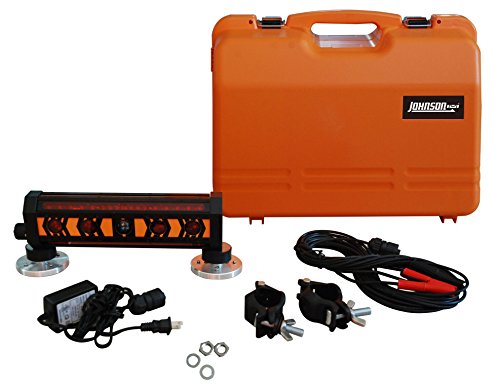
Step 9: Once you have finished using the laser level, turn it off and carefully pack it away in its storage case to protect it from damage.
Note: Different laser levels may have variations in the setup process. Always consult the manufacturer’s instructions for your specific laser level.